Advertisement
Advertisement
Table of Contents

Related Manuals for BullFrog M Series


Summary of Contents for BullFrog M Series
- Page 1 BULLFROG SPAS OWNERS MANUAL...
- Page 2 QUICK REFERENCE To assist you with the installation and maintenance Electrician service of your new spa, please fill out the following 1. Name: information and keep it on hand for future reference. Telephone: 2. Name: Telephone: Spa Information Concrete, Decking, and Masonry Model: 1.
-
Page 3: Table Of Contents
Safety Instructions & Warnings: Getting to Know Your Spa: Equipment Compartment: Filling Your Spa: M Series, A Series & STIL Controls & Operation: R Series Spas (R600) Controls & Operation: X Series Spas Controls & Operation: JetPaks and Jets: Water Care and Chemistry:... -
Page 4: Important Overview
IMPORTANT OVERVIEW Congratulations on your purchase of a Bullfrog Spas M Series, A Series, R Series, STIL, or X Series hot tub†. NOTE: In this document, the terms “Spa” and “Hot Tub” are used interchangeably. Take a moment to read this manual carefully. -
Page 5: Safety Instructions & Warnings
IMPORTANT SAFETY INSTRUCTIONS Save these instructions WARNING: To Reduce the Risk of Injury: Water temperature in a spa should never exceed 104˚F Safety Instructions (40 ˚ C). Water temperatures between 100˚ F (38˚C) and 104˚F (40˚C) are considered safe for a healthy adult. Water temperature in excess of 104˚... - Page 6 No. storms, tornadoes, etc.). 6 AWG. CAUTION: Non-Approved Accessories. Using accessories not approved by Bullfrog International, LC could void your warranty or cause other problems. Please consult your authorized Bullfrog Spa dealer. CAUTION: Spa Location. Locate your spa on a...
- Page 7 For free additional 2. DO NOT STAY IN SPA FOR LONGER THAN 10 MINUTES. copies, contact your authorized Bullfrog Spa Dealer. THIS MARKING IS TO BE REMOVED ONLY BY THE OWNER AFTER SAFETY SIGN IS INSTALLED 69.1-S...
-
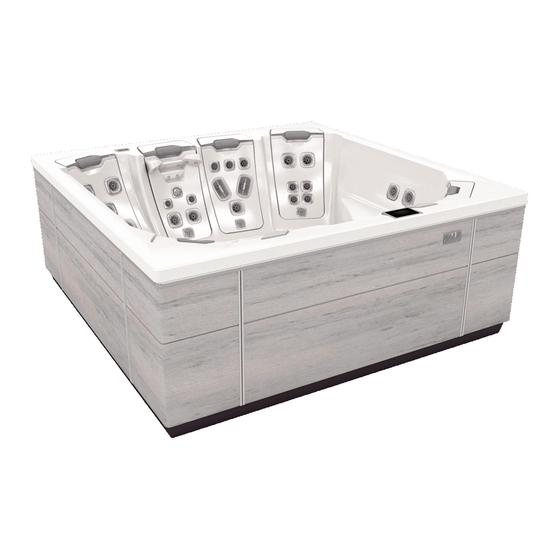
Page 8: Getting To Know Your Spa
GETTING TO KNOW YOUR SPA Spa Overview M Series [M9 Pictured] 1. Main touch-screen control 2. Filter access located behind 1st JetPak to the right of main control 3. Multi-function auxiliary control 4. Adjustable headrest 5. Water feature 6. High-flow foot therapy jet 7. - Page 9 Spa Overview STIL [STIL7 Pictured] 1. Main touch-screen control 2. JetPaks 3. Filter access 4. Removable headrests and JetPak access 5. Water feature 6. Leg therapy jets 7. Interior LED light 8. Floor drain 9. Suction fitting 10. Ozone jet 11.
- Page 10 Spa Overview A & R Series [A7 Pictured] 1. Main control 2. Auxilliary control 3. JetPaks 4. Filter access 5. Removable headrests and JetPak access 6. Water feature 7. Foot and leg therapy jets 8. Interior LED light 9. Floor drain 10.
- Page 11 Spa Overview X Series [X7 Pictured] 1. Main control 2. Filter access 3. Headrest 4. Speaker 5. Water feature 6. Foot and leg therapy jets 7. Cup holder 8. In-wall therapy jets (lighting optional) 9. Floor drain 10. Suction fitting 11.
-
Page 12: Equipment Compartment
EQUIPMENT COMPARTMENT Spa Equipment Compartment M Series [M8 Pictured, shown with corner panels removed] Front Compartment 1. Jet pump 1 2. Jet pump 2 3. Jet pump 3 4. Control center box 5. EOS ozone generator box 6. EOS mixing module 7. - Page 13 Spa Equipment Compartment A Series, R Series, X Series, STIL [A7 Pictured] 1. Main control 2. Jet pump 1 3. Jet pump 2 4. Control center box 5. Ozone generator box 6. Water heater 7. Safety certificate and serial number 8.
-
Page 14: Filling Your Spa
Never fill the spa with soft water unless an appropriate mineral supplement is immediately added (see your authorized Bullfrog Spas Dealer). If your water is extremely hard, it is preferable to either dilute the water’s hardness by blending the water with water from a water softener, using a mineral filter, or by the addition of a special water softening chemical (see your authorized Bullfrog Spas Dealer). - Page 15 Installation Instructions included with the cover. appropriate mineral supplement is immediately added (see your authorized Bullfrog Spas Dealer). If your water is extremely hard, Cover locks are an essential component for compliance with the it is preferable to either dilute the water’s hardness by blending ASTM F1346-91 safety standard for spa covers.
- Page 16 IMPORTANT: Your Bullfrog Spa is equipped with one of 3 types of main control systems that correspond to the spa series. Locate the control system on your spa by matching it with the photo provided under each control panel section and follow the specific instructions in that section for operation of your spa.
- Page 17 When an accessory has more than two states, press the button once, and then again, until it reaches the desired state. The settings on the M Series, A Series or STIL (A1000) control pad are navigated by the use of the (Settings) button.
- Page 18 Change the language setting by touching the “Language” title and Series only) then selecting the desired language. M Series spas feature a cover with sensor technology as standard Standby/Lock equipment. This technology provides several automated/smart Standby mode allows you to service your spa. Pumps can be functions for additional convenience and safety.
- Page 19 Disconnect Bluetooth: If a device with Bluetooth technology is connected to the M Series, A Series or STIL Audio, you can Cloud Control 2 App Notifications: If your spa is connected disconnect it by pressing the Disconnect button at the bottom to the Bullfrog Spas CloudControl 2 smartphone application of the screen.
- Page 20 R SERIES (R800) CONTROL Priming the Pumps Pumps must be primed directly after filling to ensure correct operation of your spa. After initial start up, verify that the home status screen appears on the panel. To prime the pumps press “Jets 1”...
- Page 21 Jet / Key 1 Up Button Press for jets Used to move through LOW/HIGH/OFF menu selections Key 4 Settings Jet / Key 2 Key 5 Press for jets LOW/HIGH/OFF (spas with 2 pumps) Mode/Invert Lights Toggle Down Button Key 6 Press for lights Used to move through ON/OFF...
- Page 22 your selected mode. be reduced by 20°F (7°C) (see description of “Economy mode” above) during peak daytime hours. Spa will heat to normal set In the descriptions of each mode below “Economy mode” means point during evening hours, every day of the week. that the set point will be reduced by 20°F*, which means that the Suggested use: Use to save maximum energy and heat only heating system will not be engaged unless the temperature falls to...
- Page 23 From the Settings page you can access the Maintenance When you change the display orientation, the contextual options menu, which gives you access to the following options: and arrow keys adjust to the chosen orientation. The Mode and Menu keys remain unchanged, as well as the accessory keys in the •...
- Page 24 automatically. Default settings should be confirmed by the Play/Pause audio: Press the Play/Pause button to start or pause installer to match the actual phase and amperage at the spa’s the audio. installation location. In rare occassions it may be necessary to adjust the Phase and Amperage setting to match the actual Adjusting the volume: Press the Volume Up or the Volume service available at the installation location using the instructions...
- Page 25 X SERIES SPA CONTROL PANELS Priming the Pumps Pumps must be primed directly after filling to ensure correct operation of your spa. After initial start up, verify that the home status screen appears on the panel. To prime the pumps press “Jets 1”...
- Page 26 Jet / Key 1 Press to toggle jets LOW/HIGH/OFF Up Button Settings Used to move through menu selections Down Button Mode/Invert Used to move through menu selections Jet / Key 2 Press to toggle jets Lights Toggle LOW/HIGH/OFF (for Press to toggle lights spas equipped with ON/OFF dual pumps)
- Page 27 Home, Standard - Beginner, Energy saving, Super energy saving, Economy time: Monday - Friday, 6:00 AM - 6:00 PM. and Weekender, depending on your needs and preferences. Filter cycle start time: 7:00 PM, duration 3 hours. Use the (Light) button to select your setting. A check mark Super Energy Savings (factory default setting) will appear within the selected icon to confirm your selected In Super Energy Savings mode the spa temperature set point will...
- Page 28 Menu keys remain unchanged, as well as the accessory keys From the Settings page you can access the Maintenance menu, in the main spa menu. which gives you access to the following options: You can lock the keypad by selecting one of 3 security levels: •...
- Page 29 done at installation or when replacing a part. About This screen displays technical information about the control system (X500) software on your X Series spa and applicable revisions of the different components of your system. Audio System Controls (Optional) Press the (Mode) button to access “in.stream 2”...
-
Page 30: Jetpaks And Jets
Step 6: Replace the Snap-Cap and head rest over the JetPak and press down firmly to snap into place. For M Series snap caps press down on the front part of the Snap-Cap to place and then press firmly on the rear portion of the Snap-Cap to reengage the snap feature and secure in place. - Page 31 Additional Jets To adjust the water flow to adjustable jets in the shell of M Series, A Series, R Series & STIL spas turn the inner jet face. In addition to the jetting options offered as part of the JetPak •...
-
Page 32: Water Care And Chemistry
@ease ® ® (USA Only) Beginning in 2019 all 2-filter Bullfrog Spas come equipped with an @ease-ready holder system installed in the filtration compartment. This holder accepts FROG @ease system cartridges (mineral & SmartChlor® chlorine) designed specifically for Bullfrog Spas. The holder is backward compatible for all 2013-later, 2-filter Bullfrog Spas. - Page 33 600 gallons. Use with the FROG @ease SmartChlor Cartridge in the FROG Step 3: Put The System To Work @ease Sanitizing System for Bullfrog Spas. Ensure all hot tub equipment is working properly. Operate the pump and filter as recommended by your hot tub manufac- turer.
- Page 34 The FROG @ease System has two replaceable cartridges. Blue = FROG @ease Mineral Cartridge Silver = FROG @ease SmartChlor Cartridge The combination provides the Fresh Mineral Water benefits of cleaner, Bullfrog Spa Models Setting # clearer and softer water that’s easier to take care of.
- Page 35 life of the cartridge varies depending on r’s hot tub size and number of users. FROG Then push the top Holder @ease SmartChlor Cartridge will last about part of the cartridge 3-4 weeks for an average 400 gallon hot tub. in until it snaps into Drain water from cartridge to ensure it is place...
- Page 36 For each additional use, test the water one additional time. • Use an accurate test kit to perform all chemical tests. Test kits and supplies are available from your authorized Bullfrog • Add chemicals directly to the spa, evenly spreading the dealer.
-
Page 37: Spa Maintenance
Granular bromine 4 teaspoons (20ml) of per 200 gallons (909.2l) of water • Your Bullfrog Spas spa may be equipped with the EOS enhanced Non-chlorine Shock 5 teaspoons (25ml) of per 200 gallons ozone purification system. Long term maintenance of this (909.2l) of water... - Page 38 See Spa Filling instructions Page 10. Filter Maintenance (M Series) It is recommended that pleated flat filter used in M Series spas be replaced every 4 weeks or as needed.. Step 3: Pull the drain out with a slight clockwise turn. Use...
- Page 39 Replace the filter cartridge(s) After multiple cleanings, worn filter cartridges will need to be replaced. To maintain warranty protection, use only genuine Bullfrog Spas filter cartridge replacements. To clean or replace your filter cartridge(s), complete the following: CAUTION: Never operate spa with the filter(s) removed.
- Page 40 Step 4: Bullfrog Spas Dealer. For stubborn stains, use a mild acrylic Let cover air dry. cleaner or a mild detergent. To apply these cleaners, use a soft, Step 5: Make sure the cover clips are secured.
- Page 41 Once the water is completely out of the spa then close each and is not covered by the Bullfrog Spas Warranty. valve before proceeding to step 3. Vacuum the Spa...
- Page 42 STIL Door Removal STIL spas are designed so that there are no visible fasteners from M Series Door Removal the exterior. Snap features in the corners and the cabinet panels allow for simple equipment area access, however, it is important...
- Page 43 Step 3: groove of the extrusion. Lower the door while gently pushing Electrical Disconnect – be sure to disconnect any on it until you feel the snaps line up with the snap features in lighting or any other electrical wiring that is mounted onto the the ribs.
- Page 44 Refer to the troubleshooting and error codes section of the TechBook for your spa pack system� DISPLAY MESSAGES & ERROR MESSAGES Please note that if you are in a swim spa configuration, the message may be followed by "Master" or "Slave" to designate from which pack the error is coming�...
-
Page 45: Troubleshooting Guide
Solution: Turn on or reset the GFCI circuit breaker. If this does not solve the problem, have a qualified Electrician check the electrical service. Cause #2: The 20 or 30A fuse, depending on the system, has blown. Solution: Contact your authorized Bullfrog Spas Dealer. GFCI breaker trips repeatedly: Cause #1: Improper wiring to spa or GFCI breaker is defective. - Page 46 Bullfrog International, LC 668 W. 14600 S. Bluffdale, UT 84065 T: 801.565.8111 F: 801.565.8333 E: info@bullfrogspas.com v 6.1.1 Register your spa online by visiting: bullfrogspas.com/warranty-registration North America 2020 Bullfrog International LC...
Need help?
Do you have a question about the M Series and is the answer not in the manual?
Questions and answers