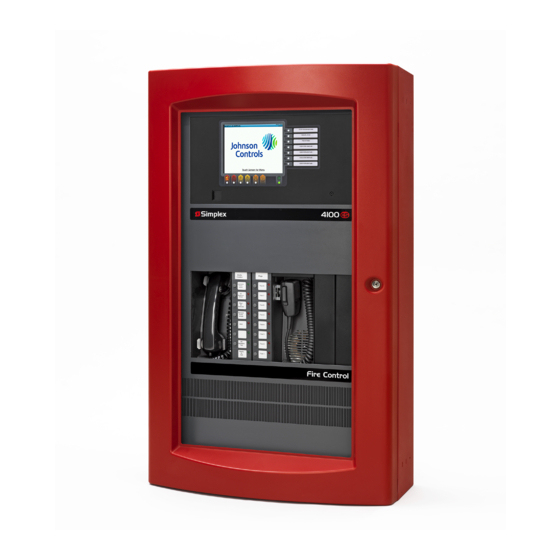
Simplex 4100 Installation Manual
Emergency warning and intercommunication system (ewis)
Hide thumbs
Also See for 4100:
- Operator's manual (100 pages) ,
- Service instructions manual (98 pages) ,
- Operating instructions manual (97 pages)

Subscribe to Our Youtube Channel
Related Manuals for Simplex 4100


Summary of Contents for Simplex 4100
- Page 1 SIMPLEX 4100 EWIS INSTALLATION MANUAL EMERGENCY WARNING and INTERCOMMUNICATION SYSTEM (EWIS) Type 4100 INSTALLATION MANUAL VOLUME 2 of 3 Document No.: 4100-M011 March 1998 Issue 1.0...
- Page 2 Read Only Memory MANUFACTURERS DETAILS APPROVALS: AUSTRALIAN STANDARD AS2220.1 (1989) SSL CERTIFICATE OF COMPLIANCE NUMBER xxx The 4100 Evacuation Panel is manufactured by: Simplex International Time Equipment Pty Ltd 140 Old Pittwater Road Brookvale N.S.W 2100 Australia ACN: 008 435 443...
- Page 3 March 1998 Original - File: ewisins RELATED DOCUMENTATION This manual is part of a three volume set relating to the 4100 EWIS Option. The following lists the documentation relating to the 4100 EWIS Option. Volume 1 4100 EWIS - Operator Manual.
-
Page 4: Table Of Contents
2.5 BAY DOOR OPTION....................... 14 2.6 CHECK AND TERMINATE ALL ZONES ................16 2.7 COMPLETE INSTALLATION PROCEDURE................18 2.8 INSTALLATION CHECKLIST FOR SIMPLEX TECHNICAL REPRESENTATIVE....19 2.8.1 Visual Inspection......................20 2.8.2 Install Printed Circuit Boards ..................20 3. FIELD TERMINATIONS ....................27 3.1 SPEAKER LINE TERMINATIONS .................. - Page 5 8. APPENDIX A – TROUBLE SHOOTING PROCEDURE...........75 8.1 GENERAL TROUBLESHOOTING INFORMATION ............... 75 8.2 TROUBLESHOOTING CHART....................75 8.3 GENERAL SYSTEM FAULTS ....................78 9. APPENDIX B - EWIS 4100 FAULT MESSAGES..............81 9.1 CARD TROUBLES........................81 9.2 BATTERY TROUBLES ......................82 9.3 EARTH GROUNDS......................... 82 9.4 ANNUNCIATOR TROUBLES ....................
- Page 6 Figure 3 Installing the System Cards................6 Figure 4 Card Address Label and Address Switch ............. 6 Figure 5 Location of Address Switch SW1 on a Typical 4100 Daughter Card.... 7 Figure 6 Installing the Retainer Panel ................ 9 Figure 7 Mounting the door on the Back Box ............13 Figure 8 Location of DIP Switches on Typical Device ..........
- Page 7 SIMPLEX 4100 EWIS Page vii INSTALLATION MANUAL PANEL DETAILS panel sticker 4100 Panel supplied by Installation location Contract/Job Number As installed EWIS System drawing number Panel Installation date Panel Commissioned date Maintenance Company Telephone Service Contact Document No.: 4100-M011 March 1998...
- Page 8 Page viii SIMPLEX 4100 EWIS INSTALLATION MANUAL This page intentionally left blank Document No.: 4100-M011 March 1998 Issue 1.0...
-
Page 9: Introduction
Trained to install and service microprocessor based EWIS and fire alarm equipment. NOTES: A. Indexes for the 4100 Field Wiring Diagram are found on the first page of the document. B. All wiring must be in accordance with local codes. -
Page 10: Anti Static Precautions
Page 2 SIMPLEX 4100 EWIS INSTALLATION MANUAL • In addition to the envelope that contained this publication and the material listed in the Packaging Information section of the Factory Documentation, supplied material includes an envelope labelled System Hardware, as shown in Figure 1. -
Page 11: Installation Procedure
10mm all round clearance. 2.2 CARD INSTALLATION The following instructions provide a systematic method for installing system printed circuit boards (or cards) in a 4100 EWIS system if these are not already installed. STEP # ACTION Open each system card box and remove the system cards from the container. -
Page 12: Figure 2 System Card Box Label
3. Carefully install the Master Controller Card in the left hand slot on the Master Motherboard, located in the CPU bay (See Figure 3.) 4. 4100 Panels: Carefully install the RS-232/2120 Communication Card (if Supplied) in the right hand slot on the Master Motherboard (See Figure 3). - Page 13 SIMPLEX 4100 EWIS Page 5 INSTALLATION MANUAL Document No.: 4100-M011 March 1998 Issue 1.0...
-
Page 14: Figure 3 Installing The System Cards
Page 6 SIMPLEX 4100 EWIS INSTALLATION MANUAL Figure 3 Installing the System Cards 6. Carefully install each daughter Card into its proper slot on its motherboard (See Figure 3.), making certain that the preset configuration of the daughter card address switch, SW1, matches the daughter card address label (located next to the daughter card’s motherboard). -
Page 15: Figure 5 Location Of Address Switch Sw1 On A Typical 4100 Daughter Card
SIMPLEX 4100 EWIS Page 7 INSTALLATION MANUAL Figure 5 Location of Address Switch SW1 on a Typical 4100 Daughter Card 7. Make certain that all cables and wiring harness are connected in original locations as shipped from the factory. • Refer to Simplex Field Wiring Diagram (Part No. 841-731). - Page 16 INSTALLATION MANUAL 8. Make certain that all system wiring is terminated at specified terminal locations as specified in the Simplex Field Wiring Diagram (Part No. 841-731). 9. Perform a complete system test of all installed devices. 10. Install the retainer panel on the back box with the retainer clips at the top of the back box (See Figure 6).
-
Page 17: Figure 6 Installing The Retainer Panel
SIMPLEX 4100 EWIS Page 9 INSTALLATION MANUAL Figure 6 Installing the Retainer Panel Document No.: 4100-M011 March 1998 Issue 1.0... - Page 18 Page 10 SIMPLEX 4100 EWIS INSTALLATION MANUAL 11. Secure the retainer panel using the retainer panel holding screws provided. 12. Remove the panel door from the door box. Document No.: 4100-M011 March 1998 Issue 1.0...
- Page 19 SIMPLEX 4100 EWIS Page 11 INSTALLATION MANUAL 13. Mount the door on the back box using the following procedure (See Figure 7). a) Lift and place the front door assembly bottom pin into back box hinge hole. b) Lift and slide top bolt pin up and across to lower bolt pin.
- Page 20 Page 12 SIMPLEX 4100 EWIS INSTALLATION MANUAL Document No.: 4100-M011 March 1998 Issue 1.0...
-
Page 21: Install And Tag All System Wiring
• Resistors other than those described above will be used by the Simplex Technical Representative (T.R.) during installation checkout. B. Wire peripherals in accordance with the appropriate 4100 Field Wiring Diagram (841-731). C. Use a small screwdriver or ball point pen to set device address switches. -
Page 22: Bay Door Option
(item 7). Then push the clevis pins inward and remove the door. e. Store the door and its hardware in a safe, clean and dry place until all wires are terminated in the 4100 panel. Document No.: 4100-M011 March 1998... -
Page 23: Figure 10 Removing The Option Bay Door
SIMPLEX 4100 EWIS Page 15 INSTALLATION MANUAL Figure 10 Removing the Option Bay Door Document No.: 4100-M011 March 1998 Issue 1.0... -
Page 24: Check And Terminate All Zones
Page 16 SIMPLEX 4100 EWIS INSTALLATION MANUAL 2.6 CHECK AND TERMINATE ALL ZONES NOTES: Use the CARD SUMMARY BY LOCATION Report (Table 6) to determine the location of the motherboard on which each specific circuit terminates. • A stick-on “ADDRESS” label on each motherboard identifies that board’s number. -
Page 25: Table 1 Acceptable Zone And Signal Circuit Meter Readings
SIMPLEX 4100 EWIS Page 17 INSTALLATION MANUAL Circuit Type Meter Reading Style B (formerly Class B) Initiating Device (Zone) Circuit From zone + to zone – (each zone) 3.3K ohms From zone + to ground Infinity From zone – to ground... -
Page 26: Complete Installation Procedure
• Use the tie wraps in the system hardware envelope to neatly dress the panel wiring. Install the option bay door. Call your local Simplex Branch Office (listed in the Yellow Pages) to install the printed circuit boards and test the system. ONLY SIMPLEX REPRESENTATIVES ARE AUTHORISED TO APPLY AC OR BATTERY POWER TO THE 4100 EWIS SYSTEM. -
Page 27: Installation Checklist For Simplex Technical Representative
Lift the retainer from the back box. Visually inspect the 4100 system. Verify that all wiring is connected to the panel, to include the unified ground. -
Page 28: Visual Inspection
Each printed circuit board must be plugged into its proper motherboard for power and communications with the CPU. Each 4100 printed circuit board has an 8 bit DIP switch (SW1) which is used to set its address and communication baud rate. Verify each address and baud rate prior to installation of each board. - Page 29 SIMPLEX 4100 EWIS Page 21 INSTALLATION MANUAL Dip switch positions 2 through 8 are used for addressing, while dip switch position 1 is used for baud rates selection. Check switch settings, jumpers and resistors on each printed circuit board prior to installation.
-
Page 30: Figure 11 Custom Terminal Wiring Identifiers
Page 22 SIMPLEX 4100 EWIS INSTALLATION MANUAL Figure 11 Custom Terminal Wiring Identifiers Document No.: 4100-M011 March 1998 Issue 1.0... -
Page 31: Table 2 Printed Circuit Board Addresses
SIMPLEX 4100 EWIS Page 23 INSTALLATION MANUAL Side View of Dip Switch SW-1 SW1-2 SW1-3 SW1-4 SW1-5 SW1-6 SW1-7 SW1-8 CPU MODULE IS ALWAYS ADDRESS 0 = ADDRESS 0 = ADDRESS 1 = ADDRESS 2 = ADDRESS 3 = ADDRESS 4... -
Page 32: Table 3 All Expansion Cards
Page 24 SIMPLEX 4100 EWIS INSTALLATION MANUAL DIP SWITCH SW1 ADDRESS AND BAUD RATE SELECT SWITCH POSITION BRS = BAUD RATE SELECT 0-9600 baud (INTERNAL/REMOTE) ON = 0 OFF = 1 Table 3 All Expansion Cards Document No.: 4100-M011 March 1998... -
Page 33: Table 4 24 Point Graphic I/O Card Pluggable Resistors
SIMPLEX 4100 EWIS Page 25 INSTALLATION MANUAL PLUGGABLE RESISTOR SETTINGS DRIVE # RESISTOR # INPUT OUTPUT 2K .5W 20 OHM 1W 2K .5W 20 OHM 1W 2K .5W 20 OHM 1W 2K .5W 20 OHM 1W 2K .5W 20 OHM 1W 2K .5W... - Page 34 Page 26 SIMPLEX 4100 EWIS INSTALLATION MANUAL This page intentionally left blank Document No.: 4100-M011 March 1998 Issue 1.0...
-
Page 35: Field Terminations
SIMPLEX 4100 EWIS Page 27 INSTALLATION MANUAL 3. FIELD TERMINATIONS This section describes procedures to successfully install and terminate all field equipment that is to be terminated to the 4100 EWIS System. 3.1 SPEAKER LINE TERMINATIONS 8225 8250 Amplifier Card... - Page 36 Page 28 SIMPLEX 4100 EWIS INSTALLATION MANUAL Speaker lines are terminated in the 8225 or 8250 Amplifier card. Only one Zone can be terminated on each Amplifier card, speakers can be wired in parallel, and terminated with a 10k End of Line Resistor.
- Page 37 SIMPLEX 4100 EWIS Page 29 INSTALLATION MANUAL Figure 12. Wiring to the speaker lines is supervised via a 10k end of line resistor placed across the last speaker in each zone. The capacitor fly lead is connected to the transformer primary winding. Select either 0.5 W, 1 W, 2 W, or 5 W terminal for the required power output for the speaker.
- Page 38 Page 30 SIMPLEX 4100 EWIS INSTALLATION MANUAL Document No.: 4100-M011 March 1998 Issue 1.0...
-
Page 39: Emergency Alarm Initiating Devices Terminations
SIMPLEX 4100 EWIS Page 31 INSTALLATION MANUAL 3.2 EMERGENCY ALARM INITIATING DEVICES TERMINATIONS Other Manual EOLR Call Point Zones ZN1 ZN2 5002 Monitor Card ZN5 ZN6 Other Manual Call Point Zones Figure 13 Monitor Card Terminations for Manual Call Points Document No.: 4100-M011... - Page 40 Page 32 SIMPLEX 4100 EWIS INSTALLATION MANUAL Manual Call Points are terminated in the 4100-5002 monitor card. There are 8 zones per card and are labelled ZN1 to ZN8 (See Figure 13). Document No.: 4100-M011 March 1998 Issue 1.0...
- Page 41 SIMPLEX 4100 EWIS Page 33 INSTALLATION MANUAL One Zone can terminate many Manual Call Points, but they must be wired in parallel, and terminated with a 3k3 End of Line Resistor across the last manual call point. The terminating connections are located at the Top and Bottom of the motherboard.
-
Page 42: Fire Indicator Panel Ewis Trip Terminations
Page 34 SIMPLEX 4100 EWIS INSTALLATION MANUAL 3.3 FIRE INDICATOR PANEL EWIS TRIP TERMINATIONS Other FIP TRIPs EOLR Fire Indicator Panel Trip ZN1 ZN2 5002 Monitor Card ZN5 ZN6 Other FIP TRIPs Figure 14 Monitor Card Terminations for FIP trips Document No.: 4100-M011... - Page 43 SIMPLEX 4100 EWIS Page 35 INSTALLATION MANUAL The Fire Indicator Panel Trip can be terminated in the 4100-5002-monitor card. There are 8 Input zones per card and are labelled ZN1 to ZN8 (See Figure 14). Each input zone monitors a set of Normally Open Contacts located in the Fire Indicator Panel and is terminated with a 3K3 End Of Line Resistor.
- Page 44 Page 36 SIMPLEX 4100 EWIS INSTALLATION MANUAL One of the monitor card terminations can be used. The terminating connections are located at the Top and Bottom of the motherboard. Document No.: 4100-M011 March 1998 Issue 1.0...
-
Page 45: Visual Alarm Device Line Terminations
SIMPLEX 4100 EWIS Page 37 INSTALLATION MANUAL 3.4 VISUAL ALARM DEVICE LINE TERMINATIONS Additional EOLR Visual EVAC Alarm Evacuation Visual Alarm Device Zone Devices EOLR ALERT Visual Alarm Device NOTE: Only one SIG3 SIG4 SIG5 connection per port SHLD 4322... - Page 46 Page 38 SIMPLEX 4100 EWIS INSTALLATION MANUAL Visual Alarm Devices are terminated in the 4100-4322-signal card. There are 6 signal ports per card and are labelled SIGx to SIGx. Where x corresponds to a signal port number. Visual Alarm Devices are terminated on each port of the signal card.
-
Page 47: Wip Line Terminations
SIMPLEX 4100 EWIS Page 39 INSTALLATION MANUAL 3.5 WIP LINE TERMINATIONS Additional WIPs EOLR Note: Only One WIP Phone off each port SIG3 SIG4 SIG5 SHLD 4322 Signal Card SHLD SIG6 SIG7 SIG8 Additional WIPs Figure 16 Signal Card Terminations for WIPs Document No.: 4100-M011... - Page 48 SHLD (See Figure 16). Only One WIP phone can be terminated on each port of the signal card. These phones must be Simplex WIP phones Part Number: - 2084-9106. Document No.: 4100-M011 March 1998 Issue 1.0...
- Page 49 SIMPLEX 4100 EWIS Page 41 INSTALLATION MANUAL The last Each WIP phone in each zone must terminated with a 10k End of Line Resistor. The terminating connections are located at the Top and Bottom of the motherboard. Document No.: 4100-M011 March 1998 Issue 1.0...
-
Page 50: Microphone Terminations
Page 42 SIMPLEX 4100 EWIS INSTALLATION MANUAL 3.6 P.A. MICROPHONE TERMINATIONS Note S = Cable Shield MECP SECP REM MIC Terminations Terminations Terminations Figure 17 Pre Amplifier Board Terminations for PA Document No.: 4100-M011 March 1998 Issue 1.0... - Page 51 SIMPLEX 4100 EWIS Page 43 INSTALLATION MANUAL The P.A Microphone is terminated on the pre amplifier card. The pre amplifier card is used to terminate the Master Emergency Control Point Microphone, the Secondary Emergency Control Point Microphone, and remote microphone.
- Page 52 Page 44 SIMPLEX 4100 EWIS INSTALLATION MANUAL Figure 17) Document No.: 4100-M011 March 1998 Issue 1.0...
-
Page 53: Background Music Terminations
SIMPLEX 4100 EWIS Page 45 INSTALLATION MANUAL BACKGROUND MUSIC TERMINATIONS Note S = Cable Shield Terminations Figure 18 Pre Amplifier Board Terminations for BGM The Background Music input is terminated on the pre amplifier card. Document No.: 4100-M011 March 1998... -
Page 54: Network Wip Phone Termination
Page 46 SIMPLEX 4100 EWIS INSTALLATION MANUAL The terminating connections are located at the bottom of the pre amplifier board (See Figure 18) 3.8 NETWORK WIP PHONE TERMINATION The Network Master WIP phone is terminated on the Master Phone Assembly 4100-0205. -
Page 55: Figure 19 Master Wip Phone Network
SIMPLEX 4100 EWIS Page 47 INSTALLATION MANUAL The Network Master WIP Phone is the start and finish of the WIP Phone Network. The WIP Phone Network leaves the master Node from port P3 and is looped through each slave node and returns to the master node on port P4. (See... -
Page 56: Network Wip Phone Termination - Master Node
Page 48 SIMPLEX 4100 EWIS INSTALLATION MANUAL 3.8.1 Network WIP Phone Termination – Master Node The WIP Master Phone is terminated on connector P6. Only use approved master phone part number 2084-9106. The next node in the network is terminated on connector P4. -
Page 57: Network Wip Phone Termination - Slave Node
SIMPLEX 4100 EWIS Page 49 INSTALLATION MANUAL 3.8.2 Network WIP Phone Termination – Slave Node The WIP Master Phone is terminated on connector P6. Only use approved master phone part number 2084-9106. The network connections for slave node WIP Phones in the WIP Phone network are terminated on terminal block TB1 termination 7,8. -
Page 58: Secp Termination
Page 50 SIMPLEX 4100 EWIS INSTALLATION MANUAL Figure 21 WIP Network Slave Node Phone Terminations The Master Phone Handset terminations are on terminals labelled 1 & 2. The positive line on terminal 1 and the negative line on terminal 2. -
Page 59: Programmers Report
The software revision must match the system CFIG chip label for proper operation of the LCD display. -------------------------------------------------------------------------------- XYZ BUILDING GENERAL INFORMATION Page 2796 node:1 rev:6 14:41:55, WED, 25-MAR-98 -------------------------------------------------------------------------------- 4100 Fire Alarm System GENERAL Simplex Time Recorder Co. INFO Node Number: 1 System Type: 4100+ Job Filename : 2796 Job Title :... -
Page 60: Card Summary By Location
DAUGHTER CARDS: Card Card Type Zone Range ----- ---------------------------------------- ----------------- (7003) 4100+ Master Controller (3003) 8 Pt, 3 Amp Relay w/ Feedback AUX3-10 (0304) Remote Unit Interface (RUI) RUI 1 (5002) 8 Zn Class B Monitor (IDC) w/Sup ZN1-8 (5002) 8 Zn Class B Monitor (IDC) w/Sup... -
Page 61: System Point Summary
AHUM (Air Handling Unit Monitor) PRI (Primary Elevator Capture)___ The installer should use the System Point Summary when marking wires to the 4100 panel. These markings should include zones (ZNx+, ZNx--), signals (SIGx), etc., for each circuit within the system. -
Page 62: Table 7 System Point Summary Report
Page 54 SIMPLEX 4100 EWIS INSTALLATION MANUAL NOTE: The SYSTEM POINT SUMMARY Report is found within the computer printout portion of the Factory Documentation. --------------------------------------------------------------------------------XYZ BUILDING SYSTEM POINT SUMMARY Page 62796 node:1 rev:6 14:41:55, WED, 25-MAR-98 -------------------------------------------------------------------------------- POINT SUMMARY System Point Summary (ascending by zone name):... -
Page 63: System Option Summary
SIMPLEX 4100 EWIS Page 55 INSTALLATION MANUAL 4.4 SYSTEM OPTION SUMMARY The System Options Summary lists all standard system operations. Enabled operations are shown with the word “YES”. -------------------------------------------------------------------------------- XYZ BUILDING SYSTEM OPERATION Page 2796 node:1 rev:6 14:41:55, WED, 25-MAR-98... -
Page 64: Unit Detail Report
Page 56 SIMPLEX 4100 EWIS INSTALLATION MANUAL 4.5 UNIT DETAIL REPORT The Unit Detail Report shows detailed information regarding each printed circuit board as well as software cards (pseudos) in the system. Custom information is shown for each type of card, such as card number, card address (binary), circuits on the card, circuit types, custom labels, and coding information, if applicable. -
Page 65: Annunciator Report
SIMPLEX 4100 EWIS Page 57 INSTALLATION MANUAL 4.6 ANNUNCIATOR REPORT The Local Annunciator Report is shown first (if applicable), followed by the Remote Annunciator Report (if applicable). The first page of these reports shows the controller/card number, position, and the type of display cards selected. The next pages will show the point, switch mode, reference address, reference custom label, and the reference type. -
Page 66: Digital Pseudo Point Summary
Page 58 SIMPLEX 4100 EWIS INSTALLATION MANUAL 4.7 DIGITAL PSEUDO POINT SUMMARY The Digital Pseudo Point Summary shows all digital pseudo points within the system. It also identifies the custom labels, and pseudo type for each digital pseudo point within the system. -
Page 67: Table 12 Analog Pseudo Point Summary
SIMPLEX 4100 EWIS Page 59 INSTALLATION MANUAL The Analog Pseudo Point Summary shows all analog pseudo points within the system. It also identifies the custom labels and pseudo type for each analog pseudo point within the system. -------------------------------------------------------------------------------- XYZ BIULDING... -
Page 68: Table 13 Point List Summary
EMPTY SATELLITE PHONES - SCC 4100 ON/OFF EMPTY SATELLITE PHONES - SCC 4100 NORMAL/SHORT EMPTY SATELLITE PHONES - SCC 4100 ON/OFF RMPH EMPTY SWITCH POWER SUPPLY AMPS TO BATTERY SWITCH POWER SUPPLY AMPS TO BKGRND MUSIC L100 POINTS TO EXCLUDE FROM AUTOMAP... -
Page 69: Point List Detail
SIMPLEX 4100 EWIS Page 61 INSTALLATION MANUAL 4.10 POINT LIST DETAIL The Point List Detail identifies each list (with points identified) within the Point List Summary. It shows the list number, points within the list, custom point labels, and type of device connected to the circuit. -
Page 70: Options Detail Report
Page 62 SIMPLEX 4100 EWIS INSTALLATION MANUAL 4.11 OPTIONS DETAIL REPORT The Options Detail Report specifies the options selected for the system. Also included in this report is a list of the passcode assignment levels for the various system functions. -
Page 71: Network Interface Report
SIMPLEX 4100 EWIS Page 63 INSTALLATION MANUAL 4.12 NETWORK INTERFACE REPORT The Network Interface Report specifies the network points associated with the node and identifies them as either Public Points or External Points (points referenced from other nodes). -------------------------------------------------------------------------------------- XYZ BUILDING 1... -
Page 72: Custom Control Equation Listing
Page 64 SIMPLEX 4100 EWIS INSTALLATION MANUAL 4.13 CUSTOM CONTROL EQUATION LISTING The Custom Control Equation Listing displays the line by line Custom Control equations for the system. -------------------------------------------------------------------------------- XYZ BUILDING CUSTOM CONTROL EQUATION LISTING Page 156 2796 node:1 rev:6... -
Page 73: Placing System Into Operation
SIMPLEX 4100 EWIS Page 65 INSTALLATION MANUAL 5. PLACING SYSTEM INTO OPERATION Before undertaking any activities inspect the interior visually and check that all panel equipment is securely mounted, and that all cables are connected at the appropriate points. 5.1 POWER UP PROCEDURES When power is first applied to the panel, or when the processor has been reset, the system will self-test the integrity of its memory and verify proper card installation. - Page 74 SIMPLEX 4100 EWIS INSTALLATION MANUAL To power up the 4100 system, perform the following steps: Ensure that the mains isolate switch is OFF and batteries are disconnected. Ensure that 240V AC supply is connected to the panel from the mains distribution board.
-
Page 75: Output Level Adjustments
SIMPLEX 4100 EWIS Page 67 INSTALLATION MANUAL 6. OUTPUT LEVEL ADJUSTMENTS 6.1 SPEAKER VOLUME ADJUSTMENT Speaker volume can be adjusted, using the variable resistors located on the Amplifier card. To adjust the Speaker volume:- Locate Master Volume variable resister on the Amplifier board 8225 or 8250. -
Page 76: Pa Volume Adjustment
Page 68 SIMPLEX 4100 EWIS INSTALLATION MANUAL 6.2 PA VOLUME ADJUSTMENT PA volume can be adjusted, using the variable resistor located on the Amplifier card. To adjust the Speaker volume:- Locate TR2 PA Volume variable resister on the Amplifier board 8225 or 8250. -
Page 77: Speech Microphone Level Adjustment
SIMPLEX 4100 EWIS Page 69 INSTALLATION MANUAL 6.3 SPEECH MICROPHONE LEVEL ADJUSTMENT Note: There is no adjustment for the MECP microphone or the SECP microphone levels. There adjustment facility available for a remote microphone if fitted. To adjust the remote microphone:- Locate R1 variable resister on the pre-amplifier board 002 –... -
Page 78: Background Music Adjustment
Page 70 SIMPLEX 4100 EWIS INSTALLATION MANUAL 6.4 BACKGROUND MUSIC ADJUSTMENT adjust background Music (BGM) output levels:- Locate R2 variable resister on the pre-amplifier board 002 – 064. (See Figure 25) Use a screwdriver to adjust variable resistor to required output level. -
Page 79: Commissioning The System
SIMPLEX 4100 EWIS Page 71 INSTALLATION MANUAL 7 COMMISSIONING THE SYSTEM 7.1 COMMISSIONING CHECK LIST JOB NAME: JOB NUMBER: ....................PANEL SERIAL NUMBER: ................... Please place a tick in the space provided if check is correct. If not please give details. - Page 80 Page 72 SIMPLEX 4100 EWIS INSTALLATION MANUAL Manual Mode Test – Each Zone Alert Tone OK ..................Evac Tone OK..................PA Speech OK ..................Visual Output OK ..................Fault Modes Operating Correctly ............- WIP Lines - O/C & S/C ..............
-
Page 81: Battery/Battery Charger Details
SIMPLEX 4100 EWIS Page 73 INSTALLATION MANUAL 7.2 BATTERY/BATTERY CHARGER DETAILS Battery type and capacity ________________________ Float charge voltage ________________________ Terminal volts ________________________ Discharge rate ________________________ Date battery installed ________________________ Replacement date ________________________ Maximum discharge current @ 1.5 hour rate... -
Page 82: System Test Procedures
The lamp test pushbutton on the control panel is used to determine local lamp failures within the system. Only lamps on the 4100 control panel will illuminate along with the five function and acknowledge LEDs. All segments on the LCD will also change. -
Page 83: Appendix A - Trouble Shooting Procedure
Do not take voltage readings on the system printed circuit board IC’s. When troubleshooting the 4100 system, check the obvious things first. These are the LEDs, toggle switches, dip switch settings, power, clipped jumpers, resistors, city jumpers and wiring to include contractor installed field wiring, all of which are located in the fire alarm panel. - Page 84 Page 76 SIMPLEX 4100 EWIS INSTALLATION MANUAL circuit board to ensure proper voltage and signals are present. If these signals and voltages are incorrect, the printed circuit board is probably defective. If the visual inspection of the panel was normal, and the voltages are correct, the next step in sectionalisation is to test the return field wires from the peripheral devices.
-
Page 85: Figure 26 Voltage Chart
SIMPLEX 4100 EWIS Page 77 INSTALLATION MANUAL MONITOR 28 VDC 6-18 VDC Current Limited Alarm CIRCUIT 28 VDC 28 VDC Short Circuit Alarm 28 VDC 0 VDC Open Circuit 7 VDC 28 VDC Normal Circuit 28 VDC 0 VDC Alarm Condition... -
Page 86: General System Faults
Page 78 SIMPLEX 4100 EWIS INSTALLATION MANUAL 8.3 GENERAL SYSTEM FAULTS FAULT / STATUS POSSIBLE CAUSE SOLUTION Mains ON indicator is OFF • Mains at Distribution • Turn Power ON. board is OFF. • Mains Switch is OFF. • Turn Mains Switch ON. - Page 87 SIMPLEX 4100 EWIS Page 79 INSTALLATION MANUAL FAULT / STATUS POSSIBLE CAUSE SOLUTION Communication Fault • Section of the RS 485 • Check section loop faulty or termination, field disconnected from wiring. module. • Check internal comms connections. • Ensure all modules are plugged in.
- Page 88 Page 80 SIMPLEX 4100 EWIS INSTALLATION MANUAL FAULT / STATUS POSSIBLE CAUSE SOLUTION EWIS Zone fault Visual • Visual cable fault. • Check cabling and connections. • Fuse blown on signal • Replace fuse. card. 2 amp 3AG. EWIS Zone fault Alarm •...
-
Page 89: Appendix B - Ewis 4100 Fault Messages
SIMPLEX 4100 EWIS Page 81 INSTALLATION MANUAL 9. APPENDIX B - EWIS 4100 FAULT MESSAGES 9.1 CARD TROUBLES If the LCD displays ... Wrong Card Abnormal 1st Line Shows Card Expected at this Address. Reprogram System or Insert Proper Daughter Card. -
Page 90: Battery Troubles
Page 82 SIMPLEX 4100 EWIS INSTALLATION MANUAL 9.2 BATTERY TROUBLES If the LCD displays ... Master Battery Backup Status is Trouble Check connector P9 on Master Power Supply. Check that Batteries Terminals are Connected. Check Fuse(s) in the Battery Harness. -
Page 91: Annunciator Troubles
SIMPLEX 4100 EWIS Page 83 INSTALLATION MANUAL 9.4 ANNUNCIATOR TROUBLES If the LCD displays ... Card X, Led (Switch) Display Slot X Card Defined But Not Inserted Annunciator Display Card Programmed in Software but not connected via the Ribbon Cable. -
Page 92: 4100 Lcd Display Fault Messages Table
Page 84 SIMPLEX 4100 EWIS INSTALLATION MANUAL 9.5 4100 LCD DISPLAY FAULT MESSAGES TABLE IF THE LCD DISPLAYS POSSIBLE CAUSE SOLUTION • Speaker cabling fault. • Check as instructed in OPEN CIRCUIT FAULT SPEAKER LINE • Open circuit cable. installation manual. - Page 93 SIMPLEX 4100 EWIS Page 85 INSTALLATION MANUAL IF THE LCD DISPLAYS POSSIBLE CAUSE SOLUTION • Mains at Distribution • Turn Power ON. CARD XX POWER SUPPLY / CHARGER board is OFF. • Mains Switch is OFF. • Turn Mains Switch ON.
- Page 94 Page 86 SIMPLEX 4100 EWIS INSTALLATION MANUAL IF THE LCD DISPLAYS POSSIBLE CAUSE SOLUTION • Section of the RS 485 • Check NETWORK HAS FAILED section loop faulty or termination, field disconnected from wiring. NETWORK GROUND module. FAILED • Check internal comms NETWORK IS connections.
- Page 95 SIMPLEX 4100 EWIS Page 87 INSTALLATION MANUAL This page intentionally left blank Document No.: 4100-M011 March 1998 Issue 1.0...
-
Page 96: Appendix C List Of Installed Equipment
Page 88 SIMPLEX 4100 EWIS INSTALLATION MANUAL 10. APPENDIX C LIST OF INSTALLED EQUIPMENT Loud Speaker Amplifier Visible Signals WIPs Evacuation Fire Power Total Total Zone Zone Load Rating Document No.: 4100-M011 March 1998 Issue 1.0... - Page 97 SIMPLEX 4100 EWIS Page 89 INSTALLATION MANUAL Loud Speaker Amplifier Visible Signals WIPs Evacuation Fire Power Total Total Zone Zone Load Rating Document No.: 4100-M011 March 1998 Issue 1.0...
Need help?
Do you have a question about the 4100 and is the answer not in the manual?
Questions and answers