Table of Contents
Advertisement
Advertisement
Table of Contents

Summary of Contents for Mevo START
- Page 1 MEVO START USER MANUAL Model# A30103A ...
-
Page 2: Table Of Contents
What is Mevo Start? How Does Mevo Start Communicate With My Mobile Device? What is the Difference Between "Mevo Hotspot" and Connecting to a Wi-Fi Network? Can I Switch Between Multiple Mevo Start Cameras? How Long Does the Battery Last? - Page 3 Using an External Audio Source With Mevo Best Practices For Great Audio Echo Suppression Navigating the Mevo App Which Mobile Devices are Compatible with Mevo Start? Can I Use the App While on a Call? Find & Navigate Settings Adjusting the Camera's Image Enable Livestream Studio Remote Camera Mode I Don't Like My Settings;...
- Page 4 About Mevo Start Mevo Start User Manual Page 4...
-
Page 5: About Mevo Start
What is Mevo Start? Mevo Start is the pocket-sized live event camera that lets you edit your video while your event unfolds. This camera helps busy consumers, organizations, and event producers seamlessly share the engaging stories of their live events. ... -
Page 6: What Is Mevo Start
In order for the Mevo App to detect a nearby Mevo Camera, you must have Bluetooth & Wifi enabled on your mobile device. If you launch the Mevo app but do not have Bluetooth enabled, the app will prompt you to turn it on. Tap S ettings . ... -
Page 7: What Is The Difference Between "Mevo Hotspot" And Connecting To A Wi-Fi Network
Connecting to a Wi-Fi Network? Mevo Start supports a variety of ways of connecting to the internet so that you can go live from your event. We understand that some of the terms and methods may be confusing, so we break it down for ... -
Page 8: Can I Switch Between Multiple Mevo Start Cameras
The Mevo app currently supports controlling only one Mevo camera at a time. If you would like the ability to switch between multiple Mevo cameras, you can integrate Mevo Start as a r emote camera source in the Livestream Studio production switcher... -
Page 9: How Long Does The Battery Last
How Long Does the Battery Last? Our team has done extensive testing of Mevo Start's battery life, which varies slightly depending on how you use your Mevo Start. Broadly speaking, the Mevo Start by itself can stream or record for more than 4 hours. ... - Page 10 Mevo Start Operating Temperature Mevo Start cameras can operate in a temperature range of 32F-95F (0-35C). You may experience poor performance outside of this range. Mevo Start User Manual Page 10...
-
Page 11: Mevo Start Operating Temperature
What Is the Warranty for Mevo Start? Mevo Start has a one-year warranty starting on the purchase date. More can be found here: h ttps://mevo.com/warranty Mevo Start User Manual Page 11... -
Page 12: What Is The Warranty For Mevo Start
What Is the Return Policy for Mevo Start? If you purchased your Mevo Start directly from m evo.com , you have thirty (30) days to return your camera. Please review our full return policy here for more details: ... -
Page 13: Federal Communication Commission Interference Statement
FCC Radiation Exposure Statement: This equipment complies with FCC radiation exposure limits set forth for an uncontrolled environment. This equipment should be installed and operated with minimum distance 20cm between the radiator & your body. Mevo Start User Manual Page 13... - Page 14 Mevo Start User Manual Page 14...
-
Page 15: Ic Rss-Gen (Canada)
For product available in the USA/Canada market, only channel 1~11 can be operated. Selection of other channels is not possible. Pour les produits disponibles aux États-Unis / Canada du marché, seul le canal 1 à 11 peuvent être exploités. Sélection d'autres canaux n'est pas possible. Mevo Start User Manual Page 15... -
Page 16: Out Of The Box
Out of the Box Mevo Start User Manual Page 16... -
Page 17: What's Included With Mevo Start
When you open the Mevo box, the first thing you will see is the Mevo Start camera. Remove Mevo Start from the camera tray.. You will see an envelope with a pull tab. Remove the envelope. Inside will be the Quick Start Guide and a Microfiber cleaning cloth.. ... -
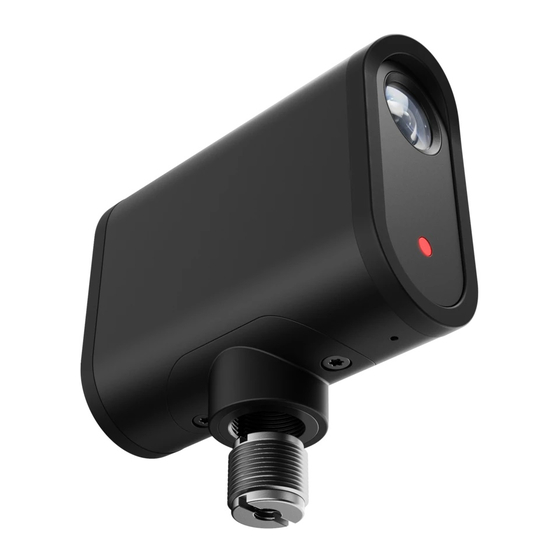
Page 18: Mevo Start Camera Diagram
Mevo Start Camera Diagram Below is a diagram detailing the features on the physical Mevo camera. Learn more about the d ifferences b etween each camera. Mevo Start User Manual Page 18... -
Page 19: What Kind Of Stand Can Mevo Start Mount On
You can find the Mevo stand available for individual purchase i n the Mevo store . You may also find similar ones through multiple retailers. If it matches the above specs, it will work with the Mevo Start. ... -
Page 20: Mounting Mevo Start To A Stand Or Tripod
Determine which thread fits your stand or tripod. If you need to use one of the threads on the adapter, ensure that the needed thread is on the bottom and screw it into the bottom of Start until it is secure. ... - Page 21 Mevo shop fits the built-in 5/8"-27 microphone stand thread on its own. If you're using the swivel mount included with the stand, attach it using the appropriate end. Place Mevo Start on top of your stand or tripod and turn it clockwise until it is secured. ...
-
Page 22: What Distance Should Mevo Start Be From My Event
Mevo Start has been designed to be close to the subject or event taking place, rather than in the back of a room like a traditional camera. For example, if your event takes place in an auditorium, Mevo Start ... -
Page 23: How Do I Charge The Mevo Start's Battery
To do so, you will need a USB-A wall charger (not included) and the included USB-A to USB-C cable.. Plug the USB-A end (i.e. the larger plug) into the AC adapter. Plug the USB-C end of the USB cable into the back of Mevo Start. Mevo Start User Manual Page 23... - Page 24 Plug the AC adapter into any standard wall outlet. It will begin charging automatically. The LED indicators on the rear of the camera (above the power button) will blink white to indicate that it is charging. Mevo Start User Manual Page 24...
-
Page 25: How Do I Update The Camera's Firmware
If a firmware update becomes available, the Mevo app will indicate so when you first configure your mobile device's connection to your Mevo Start. Instead of seeing the option to C onnect , the button will instead say U pdate Firmware . ... - Page 26 The LED on the camera will begin blinking and the app will indicate the updates progress: downloading the firmware to the device, uploading the firmware from the device to the camera, and then the camera running the update. After the update is complete, the camera will restart. Mevo Start User Manual Page 26...
- Page 27 You may see an alert indicating that your device disconnected from the Mevo hotspot, if in hotspot mode. Selecting O K w ill redirect you to your device's Wi-Fi settings menu, where you can select Mevo Start’s hotspot again and connect to the camera. ...
- Page 28 If your Mevo firmware update fails, here are some suggestions for troubleshooting: • Keep both devices close to each other and make sure you are in h otspot mode a nd not using Wi- Fi. ...
-
Page 29: Getting Started
Getting Started Mevo Start User Manual Page 29... -
Page 30: Download And Install The Mevo App
The first result should be M evo - The Live Event Camera . Start the download from the App Store or Google Play. When the download finishes, the Mevo app will be available on your device and is ready to use. ... -
Page 31: Turn The Mevo Start Camera On And Off
When the LED lights are stable, the camera is ready to be used. When you are finished using your Mevo Start, simply press and hold the power button until all the LEDs are lit up and you hear a couple beeps. The camera will turn off.. ... - Page 32 The LED ring will blink white before slowly fading off. This indicates that your camera is now off. You can also remotely turn off your Mevo camera by navigating to Settings, scrolling down to the bottom, and tapping T urn Off Mevo .
-
Page 33: Launching The Mevo App
After the app downloads and installs, tap the icon on your device's home screen to launch the app. You will first see this screen indicating that Mevo has joined Vimeo. Tap N ext t o continue. ... - Page 34 If you do not have a Vimeo plan, you can still use your Mevo Start with its included features. Tap S kip i n the bottom right corner to continue. ...
- Page 35 Mevo Start User Manual Page 35...
-
Page 36: Connect To Mevo Start In Hotspot / 4G-Lte Mode
Connect To Mevo Start in Hotspot / 4G-LTE Mode If you do not have a local Wi-Fi network, you can connect your Mevo camera to the Mevo app through the camera's Hotspot mode, then stream over your mobile device's 4G-LTE connection. ... - Page 37 Once you are connected to the Mevo Start's Wi-Fi hotspot, navigate back to the Mevo app. You will then see the card update with a blue C onnect b utton. Tap this to connect the app to your camera. ...
- Page 38 The LED ring will spin in blue around the top of the camera, then turn solid blue at the front. The connection card will spin away and reveal your Mevo camera's live production screen. Android Device Launch the Mevo app and tap the blue C onnect b utton.
- Page 39 Change Wi-Fi On Phone. The option to Change Wi-Fi On Mevo Start will allow you to connect your Mevo Start to the same W i-Fi network t o which your mobile device is connected. ...
- Page 40 The app will refresh for a moment to change your Android device's Wi-Fi connection to the camera’s hotspot. When it finishes, the camera's LED ring will spin blue and the live production screen will open automatically on your mobile device. Mevo Start User Manual Page 40...
-
Page 41: Connect To Mevo Start With A Local Wi-Fi Network
Connect to Mevo Start With a Local Wi-Fi Network When you first power on your Mevo Start and open the Mevo app, by default the unit will prompt you to connect to Mevo Start Hotspot mode. If you prefer to connect Mevo Start to your local Wi-Fi network, ... - Page 42 doing so, Mevo will connect to your Wi-Fi network and the camera's live edit view will open on your ...
- Page 43 On the bottom right of the card, tap the C onfigure Mevo b utton. Tap S how WiFi Networks . The app will take a moment to load, and then your available networks will populate in a list. ...
- Page 44 Refresh Network List a t the bottom of the menu to refresh the list. Tap the network you want to connect to. 5GHz networks are more reliable for connecting and streaming and are recommended in favor of 2.4GHz networks. Mevo Start User Manual Page 44...
- Page 45 After a moment, your Mevo Start will be connected to your network. This will also be indicated by the LED ring showing a solid green light above the bars icon on the back of the camera. Tap D one , and the Mevo Start card will update its status again for a moment. ...
- Page 46 It soon will then give you the option to connect to your Mevo Start. Tap C onnect . You are now communicating with your Mevo Start via your Wi-Fi network. In addition, any streams ...
-
Page 47: Using The Built-In Microphone
The built-in microphones have configurable modes for enhanced performance depending on your environment. Navigate to the A udio & Video m enu. Mevo Start User Manual Page 47... - Page 48 v ia your mobile device or by connecting it into the back of the Mevo Start camera via the 3.5mm microphone or line in.. Suggest to add something about the line-in here. Not sure if it’s ready in app ...
-
Page 49: What Microsd Cards Are Compatible With Mevo Start
Mevo Start is compatible with m icroSD c ards (SD, SDHC, SDXC formats). Our team has tested a variety of microSD cards with Mevo Start and recommend the following models (along with their manufacturer ID numbers), in order of storage size. ... - Page 50 • SanDisk Ultra UHS-1 U1 (SDSDQUAN-200G-A4A) • Lexar High Performance 633x UHS-1 (LSDMI200BBNL633R) The cards listed below have been tested and determined n ot compatible w ith Mevo Start: 128GB • Silicon Power Elite (SP128GBSTXBU1V20SP) ...
-
Page 51: Record To A Microsd Card
When your Mevo Start i s on a nd connected to the Mevo app, you can start recording. As a best practice, you may want to f ormat your SD card f irst. - Page 52 Tap the red R ecord b utton to start recording. When you recording begins, you will see a timer and a space indicator in the bottom left corner. To finish recording, tap the red circle icon in the bottom left corner of the Mevo app. Then drag the circle to ...
- Page 53 The Mevo's front LED will stop showing red indicating that your recording has been stopped. The Mevo app will display a pop-up message in the upper-left corner saying that your recording is in the library; tap the message to open the library. ...
-
Page 54: How Do I Find, Save, And Share My Recordings
How Do I Find, Save, and Share my Recordings? Recorded content from Mevo Start can be uploaded to any video hosting provider, including Livestream, YouTube, Vimeo, Facebook, Twitter and more. First open the M ore Options m enu to find your recordings in your library. ... - Page 55 After that, open the menu again and select S hare t o it to your destination of choice. Mevo Start User Manual Page 55...
- Page 56 V ideos and Photos. M ake sure that U pload HD i s toggled on. T ip for Uploading a Recording to Facebook Mevo Start User Manual Page 56...
-
Page 57: I'm New To Streaming. What Best Practices Do You Recommend
• Record a backup. T he professionals do it, and we recommend everyone does. Make sure you keep a microSD card inside your Mevo Start so that a backup recording saves while you are streaming. If you lose connection, the recording will save on the SD card that you can share later. ... -
Page 58: Streaming To Your Website Using Vimeo And Mevo Start
Connect to Mevo Start and tap the red button in the bottom left corner. Towards the right side, you will ... - Page 59 3. If you are creating a new event, you can give it a title at the top left side of the screen. 4. Choose your streaming quality in the upper right corner (up to 1080p). 5. When your settings are configured, tap G o Live i n the upper right corner to start your stream. ...
- Page 60 VOD to your account, you may toggle this switch off. If you have a microSD card inside your camera, "Save to Mevo SD card" will be toggled on by default indicating that a recording will save to your card; this is strongly recommended. If you do not wish to ...
-
Page 61: Stream To Livestream With Mevo Start
Stream to Livestream with Mevo Start Once your Mevo Start is connected to the Mevo app, you should notice a red button in the bottom left corner of the picture. Tap it to see more options. To stream to Livestream, tap the Livestream logo in the menu that appears. - Page 62 6. Tap G o Live i n the upper right corner to start your stream. Tap small red dot on the bottom left corner to see more information about your stream, including viewer count, battery percentage, bitrate, and a timer.
- Page 63 Choose whether or not to post the video on demand on your event page, save to your microSD card, and upload to Vimeo. Then tap D one . Mevo Start User Manual Page 63...
-
Page 64: Stream To Facebook Live With Mevo Start
Stream to Facebook Live with Mevo Start Once your Mevo Start is connected to the Mevo app, you should notice a red button in the bottom left corner of the picture. To log in and stream to Facebook Live, tap this red button, then tap the Facebook Live icon. ... - Page 65 4. Give your stream a title. 5. You can also toggle chat on and off here. 6. Choose you streaming quality up to 720p. 7. Tap G o Live i n the upper right corner to start streaming. ...
- Page 66 You can choose to keep your stream in your Facebook feed or not, save on your microSD card (highly recommended), and upload the recording to Vimeo. After making your selection, tap D one . Mevo Start User Manual Page 66...
- Page 67 Mevo Start User Manual Page 67...
-
Page 68: Stream To Twitter And Periscope With Mevo Start
A browser will open prompting you to log in to your Periscope account. Once you are logged in, it will prompt you to authorize Mevo to access your Periscope account. Scroll down and tap A uthorize . After authorizing Mevo, you will see a pop-up alert informing you that Periscope's streaming quality ... - Page 69 3. Give your stream a title. 4. When you are ready to start streaming, tap G o Live . The gearwheel icon open another screen that gives you the option to log out of your account ...
- Page 70 When you are ready to end your stream, tap the small red dot in the bottom left corner, and then slide it to the right. The stream will end immediately and give you the option of saving your video in your feed and your microSD card. Mevo Start User Manual Page 70...
-
Page 71: Stream To Youtube Live With Mevo Start
All of your streaming and recording options will populate. Tap the Y ouTube i con. You will be prompted to log in via Google. Continue to log in to your account and authorize Mevo. ... - Page 72 The screen shown below will open. On the bottom, you can either create a new event on your YouTube channel directly from the Mevo app, select S tream Now t o stream directly to your channel page rather ...
- Page 73 o n your YouTube account. Mevo Start will start sending the stream to YouTube. If you selected S tream Now , your channel is currently live. If you selected an event, you will instead see a countdown to the start time you previously configured. ...
- Page 74 A card will appear indicating your stream has ended. If you streamed to a scheduled event and no longer intend to stream to this event, toggle on C omplete Live Event on Youtube ; do not select this if Mevo Start User Manual Page 74...
- Page 75 You can also choose whether or not to save a recording of your stream to your microSD card and upload the recording to Vimeo. See Y ouTube's documentation r egarding saving archives of your streams on YouTube. Mevo Start User Manual Page 75...
-
Page 76: Stream To A Custom Destination Via Rtmp
Stream to a Custom Destination via RTMP In Mevo version 1.9, you can stream to any streaming destination that accepts RTMP protocol, such as Twitch, UStream, Brightcove, and other providers. Tap the red button in the bottom left corner of the live edit view. ... - Page 77 If your provider has a mobile app or mobile-friendly website from which you can find the URL and stream key, you can save some time by copying and pasting them into their respective fields in the Mevo app. ...
- Page 78 When you are ready to start streaming, tap G o Live . When the stream starts you will see the timer in the bottom left corner, which you can tap to expand and see additional data such as outgoing bitrate. ...
- Page 79 When your event is over, tap the red dot, then drag it to the right as prompted to end the stream. The stream will end and you will have the option to save the recording to your microSD card Mevo Start User Manual Page 79...
-
Page 80: Stream To Multiple Providers Simultaneously
Stream to Multiple Providers Simultaneously You may stream to multiple destinations simultaneously via Mevo without the need to increase your local bandwidth. You can choose multiple of Mevo's streaming destinations within a few guidelines. To access this feature, you must have a Vimeo Producer or Vimeo Premium plan; learn how to subscribe ... - Page 81 720p. When you're ready to start streaming, tap G o Live. A fter a moment the stream will start and your event will appear in the native players for each chosen destination. Mevo will indicate that it is simulcasting ...
-
Page 82: Upload Recordings To Vimeo
Upload Recordings to Vimeo Mevo has an integration with Vimeo that allows you to upload recordings from your microSD card to your Vimeo account directly from the Mevo app. You m ust h ave an external internet connection (Local Wi-Fi, Ethernet, or 4G USB modem) in order to use ... - Page 83 It will queue up in Vimeo and you can see its progress in the Mevo app. When it has finished, you can ...
- Page 84 r equire you to save the recording to your phone first. Mevo Start User Manual Page 84...
-
Page 85: Audio Setup
Audio Setup Mevo Start User Manual Page 85... -
Page 86: Methods Of Using Audio With Mevo Start
Methods of Using Audio with Mevo Start Mevo Start has a built-in microphone array for audio recording, and allows external audio inputs via the 3.5mm jack at the rear of the camera or charging port on your mobile device. ... -
Page 87: How Do I Control Audio
By default, M evo i s selected. This means that your audio source is the microphone array built into the camera. Learn more a bout using the built-in microphone and its enhancement options. Mevo Start User Manual Page 87... - Page 88 mixer interface. To the far right of the interface is the levels monitor. This indicates how loud or soft your audio is. Mevo Start User Manual Page 88...
- Page 89 Audio that is over modulating is generally indicated by the top notches flashing red. This means you should lower your audio levels by dragging the audio slider to the left. Not sure what is the best audio workflow for your production? See our suggestions h ere Mevo Start User Manual Page 89...
-
Page 90: Supported External Audio Sources & Adapters
Our team has tested a variety of adapters, extenders, and mixers to use as audio sources with Mevo Start. These adapters can be either via the lightning port or the headphone jack on the phone or tablet or via USB on the Mevo Boost. ... - Page 91 A note about the Belkin Lightning Splitter: This lightning splitter h as been tested with the Mevo app and we have found that it works only with certain workflows. It d oes work w ith the TRRS-to-lightning adapter that is included with iPhone 7. It also works with a ...
- Page 92 Mobile devices cannot input audio with plugs that only have 2 or 3 chrome rings, such as those pictured below: A TS (tip-sleeve) and TRS (tip-ring-sleeve) plug. These are not supported as audio inputs. Mevo Start User Manual Page 92...
-
Page 93: Using An External Audio Source With Mevo
Using an External Audio Source With Mevo You may use an external audio source with your Mevo Start, via your Start’s 3.5m Input, USB-C port, mobile device's 3.5mm port, lightning port, or using the Mevo Mic app. ... - Page 94 Plug your external audio input into your mobile device. Once you have connected your Mevo to your app, open the main menu by tapping the M ore Options i con (•••) in the bottom right corner of the live ...
- Page 95 When inputting a stereo signal into the iPhone through the Lightning port or into a Mevo Boost via USB, the output will remain in stereo. When using an external audio source, you should mute your audio output on the app by tapping the ...
-
Page 96: Best Practices For Great Audio
Mixers have an output, from which you can run a stereo cable into your iPhone so that your Mevo gets this clear, mixed audio feed. ... - Page 97 described above should provide clear audio and a simple workflow for your event. Mevo Start User Manual Page 97...
-
Page 98: Echo Suppression
Echo Suppression is a handy feature for customers using the headphone jack or the built-in mobile device microphone to bring in audio. In addition, customers monitoring their audio via the Mevo app should also turn on this feature to prevent audio feedback from playing back in their stream and/or recording. ... - Page 99 Mevo Start User Manual Page 99...
-
Page 100: Navigating The Mevo App
Navigating the Mevo App Mevo Start User Manual Page 100... -
Page 101: Which Mobile Devices Are Compatible With Mevo Start
Which Mobile Devices are Compatible with Mevo Start? Before d ownloading the Mevo app , you should check to make sure that your mobile device is on this list and is running the minimum required OS software version. ... - Page 102 • Google Pixel 4 XL • • HTC 10 • LG G5 • LG G6 • LG G7 ThinQ • Motorola Z • Motorola Moto X Pure Edition • Nexus 9 • Nexus 5x Mevo Start User Manual Page 102...
- Page 103 • Samsung Galaxy S9 • Samsung Galaxy S9+ • Samsung Galaxy S10 • Samsung Galaxy S10+ • Samsung Galaxy Note 5 • Samsung Note 8 • Samsung Note 9 • Samsung Note 10 Mevo Start User Manual Page 103...
-
Page 104: Can I Use The App While On A Call
Android devices are able to continue using Mevo Start if a call comes in, provided you do not hit the B ack button on your phone. Mevo will continue to stream if you navigate away by tapping the H ome b utton. ... -
Page 105: Find & Navigate Settings
Find & Navigate Settings There are various ways to configure and customize your Mevo. To find your settings, tap the M ore Options i con in the bottom right corner. The gearwheel icon will open a settings menu. - Page 106 Network : C hange y our network connection setup (e.g. switch from Mevo Hotspot mode to a Wi-Fi network). Live Streaming Destinations : Account settings and stream configurations for L ivestream, F acebook L ive, ...
- Page 107 • Copyright information • Send Information to Mevo: This helps our developers improve the application but allowing Livestream to share crash data and see how the app is being used. Support : Provides a link to m evo.com/support ...
-
Page 108: Adjusting The Camera's Image
Adjusting the Camera's Image You can adjust everything about the image Mevo Start produces via a quick-access menu that allows you to see the changes you are making in real-time. Access the Image Settings Menu In the live edit view, tap the Options icon (•••) in the lower right corner. Then tap the image ... - Page 109 ISO for optimal appearance for outdoors, which will keep your indoor environment looking darker. Image Adjustment Settings Exposure Mevo Start User Manual Page 109...
- Page 110 ISO measures the image sensor's sensitivity to light. Higher ISO settings are ideal for darker settings, although will produce grainier shots than lower ISO settings. ISO can only be manually adjusted when the Camera Mode is set to M anual ; it will automatically adjust in other modes. Mevo Start User Manual Page 110...
- Page 111 Brightness, contrast, and saturation are adjustments best made to your shot after you've established your Shutter speed and ISO settings. Tap the desired setting and scroll up or down to choose an option; Mevo will adjust the image based on your selection. ...
- Page 112 When you choose a setting, you will see a notification in the upper left corner indicating that your video is in the process of inverting or reverting to normal. Mevo Start User Manual Page 112...
- Page 113 Electronic Image Stabilization (EIS) helps retain the video quality while the camera is in motion. Customers looking to use the Mevo while moving rather than in a stationary location may be want to consider turning EIS on, although doing so w ill disable Mevo's live-editing features (zoom, pan, cut, ...
- Page 114 Adjustments menu (swipe the row left to see all the filters). Options include • Normal • Custom • Stage • Back Lit • Outdoors • High Contrast • Flat • Black White • Vivid • Sepia Mevo Start User Manual Page 114...
- Page 115 If you switch to a different preset, Mevo will remember the last configuration you had under C ustom ; if you select C ustom a gain, the image will revert back to the adjustments you made previously. ...
-
Page 116: Enable Livestream Studio Remote Camera Mode
Studio machine . If it is not connected to the same network (i.e. to the same access point), Studio cannot recognize Mevo. Launch the Mevo app and navigate to the main Settings menu. Scroll down to find the S tudio Mode o ption. ... - Page 117 The below message may prompt you to change some settings in Studio to improve the experience with Mevo remote camera. Clicking A pply Recommendations w ill set all direct inputs to be delayed by one second, syncing them with Mevo and any other remote camera sources. ...
- Page 118 Use your finger to slide the gray button to either PRV or PGM to put your Mevo into either Preview or Program, respectively Once Mevo is in Preview or Program, tap the button again and slide it to switch. ...
- Page 119 . • - If you've checked all the above steps a nd y ou are connecting over Ethernet, there could be a r are IP configuration issue. • Mevo Start User Manual Page 119...
-
Page 120: I Don't Like My Settings; Can I Reset To Default Settings
R eset . Select R eset Settings to Default . Mevo Start will disconnect from the app. When you reconnect, all settings will be reconfigured to their default state. Mevo Start User Manual Page 120... - Page 121 Mevo Start User Manual Page 121...
-
Page 122: Graphics Overlays
Graphics Overlays Mevo Start User Manual Page 122... -
Page 123: Types Of Graphics Overlays With Mevo Start
Types of Graphics Overlays with Mevo Start Mevo Start has the ability to add basic graphics overlays such as lower thirds, over-the-shoulder graphics, and corner bugs. To access this feature, you must have a Vimeo Producer or Vimeo Premium plan; learn how to ... -
Page 124: Recommended Specifications For Images In Graphics Overlays
Once you design your image, you will need to add it to your mobile device's camera roll in order to add it to your overlay. Please note that if you wish for your image to be transparent, you must design it as such before you upload it to Mevo; you cannot edit an image's opaqueness within the Mevo app. ... -
Page 125: Supported Alphabets And Character Sets In Graphics
If you are using graphic overlays, you may not be able to use every keyboard or alphabet you have installed on your mobile device. Mevo supports standard ISO Latin 1, Latin CE, Greek, and Cyrillic character sets. Other alphabets such as Chinese, Korean, and Japanese are not supported at this time. ... -
Page 126: Creating A Lower Third Overlay
Creating a Lower Third Overlay You can create simple lower third graphics overlays in the Mevo app to display information such as speakers' names, locations, or tips. To access this feature, you must have a Vimeo Producer or Vimeo Premium plan; learn how to subscribe ... - Page 127 By default, you will see a single-line white lower third. To use an image in the lower third, tap the image icon above the overlay. Allow Mevo to access your ...
- Page 128 At the bottom of the screen, you can choose between various colors for your background, and choose either black or white text for each background. Tap the dot of the color scheme you want to use (the default setting has black text on a white background selected). Mevo Start User Manual Page 128...
- Page 129 You cannot change your overlay once you tap the checkmark. Be sure you are satisfied with your overlay before saving it. This will upload the overlay to your microSD card for storage. Once it's uploaded, it will be available in the list page; tap the overlay to proceed. Mevo Start User Manual Page 129...
- Page 130 You will notice the lower third does not appear in the live edit view, but you can see it if you check the output display. This confirms that your viewers will see it. Mevo Start User Manual Page 130...
- Page 131 When the lower third is removed, tap the checkmark in the lower right to confirm removing it from the output and close the overlays screen. You will no longer see the lower third in your output. Mevo Start User Manual Page 131...
-
Page 132: Creating A Corner Bug Overlay
here . You will also need a s upported microSD card i nserted into your Mevo camera. In the live edit view, tap the canvas icon in the bottom right corner. The overlays screen will open. There are two options for adding a bug in either corner. Select which ... - Page 133 Allow Mevo to access your mobile device's camera and photos. The screen shown below will appear. You can choose an image from your photo library or take a photo with your camera. When you select an image, you can adjust how it's cropped, zoomed, and rotated. The rotate icon on the ...
- Page 134 The bug will appear in the overlays screen. You can move it to the opposite corner by tapping the image icon on the other side (1). Otherwise, tap the checkmark in the bottom right corner to confirm overlaying it into your output (2). Mevo Start User Manual Page 134...
- Page 135 You will not see the bug overlay in the live edit view, but you can see in your output monitor, confirming that it will appear in your broadcast. Mevo Start User Manual Page 135...
- Page 136 The bug will still be saved in the Mevo app on your microSD card, but will no longer appear in your stream. M aking these changes while broadcasting live will n ot interrupt your stream. ...
- Page 137 Mevo Start User Manual Page 137...
-
Page 138: Create An Over-The-Shoulder Overlay
Create an Over-the-Shoulder Overlay You can create an over-the-shoulder (OTS) graphics overlay with Mevo, allowing you to display text or images as part of a report or presentation. To access this feature, you must have a Vimeo Producer or Vimeo Premium plan; learn how to subscribe ... - Page 139 You can adjust the opacity of the background color using the slider on the bottom left side. Tap inside the box to start typing. The text editor will automatically move text to the next line as necessary. ...
- Page 140 You can add text to your image by tapping A dd your text . You can change the text color to black or white by navigating back to the color palette and selecting black or white on the far right side. The below example has aligned the text center-bottom and changed it to black. Mevo Start User Manual Page 140...
- Page 141 You cannot edit overlays; be sure you are satisfied with your OTS graphics appearance before tapping the checkmark. Your OTS graphics will be saved to your microSD card and appear in the following list screen. Tap the OTS to proceed with using it. Mevo Start User Manual Page 141...
- Page 142 To remove the OTS overlay, tap the canvas icon again. Tap the red delete icon on the OTS overlay, then tap the checkmark to confirm removing it from your output. Mevo Start User Manual Page 142...
- Page 143 The graphic will still be saved in the Mevo app via your microSD card. M aking these changes while broadcasting live will n ot interrupt your stream. Mevo Start User Manual Page 143...
-
Page 144: Create A Full Screen Graphics Overlay
Create a Full Screen Graphics Overlay You can create a full-screen graphics overlay with the Mevo. These graphics take over the entire screen and are ideal for pre- and post-event slates or slides during a presentation. To access this feature, you must have a Vimeo Producer or Vimeo Premium plan; learn how to subscribe ... - Page 145 card. Mevo Start User Manual Page 145...
- Page 146 Once your full screen has finished uploading, tap it to select it To push it out to your program output, tap the check mark in the lower right corner. Mevo Start User Manual Page 146...
- Page 147 Tap the red - i con in the middle of the screen. Then tap the check mark that appears in the lower right corner to remove the full screen from your program output. Mevo Start User Manual Page 147...
-
Page 148: Presenting A Slideshow With Mevo
Acrobat, or other file storing apps (provided those apps are also installed). Mevo can support a maximum of 5 0 slides per PDF . You cannot edit the document once it is uploaded to Mevo, so be sure your presentation is complete prior to your event. ... - Page 149 Tap the P resentation i con. Countdown puts a clock inside an overlay; l ear n more Tap Import PDF Slideshow. Mevo Start User Manual Page 149...
- Page 150 Mevo will open the Files explorer. Find your slideshow PDF and tap it to select it. A preview will load in the following screen. If you've selected the correct slideshow, tap the checkmark on the right side to upload it to your ...
- Page 151 You will see a preview of what it will look like to your viewers. By default it will start on the first slide, but you can adjust which slide to start on by tapping the arrows in the bottom left corner. ...
- Page 152 You can also tap the slides icon to pop open the slideshow at the bottom of the screen and custom choose which slide to display. Mevo Start User Manual Page 152...
- Page 153 OTS placeholders to move the slideshow, then tap the checkmark that appears in the lower right corner to proceed. Once the slideshow preview is gone, tap the checkmark on the bottom right corner to proceed with removing the overlay from your live production. Mevo Start User Manual Page 153...
- Page 154 Mevo Start User Manual Page 154...
-
Page 155: Add A Countdown Graphic
i nserted into your Mevo camera. From the live production screen in the Mevo app, tap the canvas icon to open the graphics overlay editor. Countdowns can be added to either full screen graphics or over-the-shoulder graphics. Choose ... - Page 156 (e.g. 10 minutes). Start Time allows you to set the countdown to run until a certain time (e.g. 12:30pm). When you've determined your countdown time, tap the checkmark on the right side of the screen to move to ...
- Page 157 Like other graphics overlays on Mevo, you can adjust the background color, select black or white font color, and text alignment. You can also choose to use an image instead of a background color. Tapping the timer icon will allow you to edit your countdown.
- Page 158 If you need to change the countdown time, tap the timer icon in the bottom right corner before applying the overlay to the output. This will allow you to edit the time and will create a duplicate of the first timer overlay you created. Mevo Start User Manual Page 158...
- Page 159 You can also switch overlay types here. For example, to switch from a fullscreen to an OTS slideshow, tap one of the OTS placeholders to move the countdown. Mevo Start User Manual Page 159...
-
Page 160: Editing A Graphics Overlay
When you create a graphics overlay in the Mevo app, it saves to your microSD card. Because of this, there is no direct way to edit a pre-existing graphic; instead, you can duplicate it and work off of the ... - Page 161 The graphics list screen will open. Under the overlay you wish to change, tap the the More Options (•••) icon to expand the menu, then tap the copy icon on the left to create a duplicate overlay. Mevo Start User Manual Page 161...
- Page 162 Edit the overlay as needed. When you are done, tap the checkmark on the right side. Mevo Start User Manual Page 162...
- Page 163 You will now have both overlays available in your list view. If you wish to discard the original version, tap the More Options (•••) icon that corresponds to it, then tap the the trash can icon. This will permanently delete the overlay from your microSD card. Mevo Start User Manual Page 163...
- Page 164 Mevo Start User Manual Page 164...
-
Page 165: Switching Between Multiple Graphics Overlays
here . You will also need a s upported microSD card i nserted into your Mevo Start camera. First, build a few graphics overlays; this example will use l ower thirds , but all overlay options can be ... - Page 166 To bring in your graphic during your event, tap the canvas icon and select your graphic type (in this case, lower third). Mevo Start User Manual Page 166...
- Page 167 Your graphics list will appear. Select the first overlay you wish to show by tapping it. Mevo Start User Manual Page 167...
- Page 168 When you are ready to move on to your next overlay, tap the canvas icon in the live edit view, then tap on the red delete icon with your current graphic. Mevo Start User Manual Page 168...
- Page 169 (1) before navigating back to this screen. Otherwise, to switch to your next overlay, tap the lower third placeholder to navigate to your graphics list (2). Mevo Start User Manual Page 169...
- Page 170 Tap another graphic from the list screen. Then confirm you want to push it to the output by tapping the checkmark. Keep in mind your graphics overlays will not appear in the live edit view, but you can see them in your output preview monitor. Mevo Start User Manual Page 170...
- Page 171 - Nothing will change in your output until you tap the checkmark on the overlay preview screen. - Mevo Start User Manual Page 171...
-
Page 172: How To Delete Graphic Overlays
How to Delete Graphic Overlays When you build graphic overlays for Mevo, they are stored on your microSD card. When you are done using them, you can delete them permanently via the Mevo app. From the live edit view, tap the canvas icon. ... - Page 173 The list screen for that graphic type will open. Tap the more options (•••) icon with the graphic you wish to remove. Tap the trash can icon. This will delete the graphic. Mevo Start User Manual Page 173...
- Page 174 Currently the only way to delete your overlays in bulk is to f ormat your microSD card ; keep in mind that doing so will delete all the content, such as recordings, saved on the card. Mevo Start User Manual Page 174...
Need help?
Do you have a question about the START and is the answer not in the manual?
Questions and answers
How do I change the battery?
The Mevo Start User Manual does not provide information on changing the battery.
This answer is automatically generated