Table of Contents
Advertisement
Quick Links
Advertisement
Table of Contents

Related Manuals for Fona XPan DG Plus


Summary of Contents for Fona XPan DG Plus
- Page 1 Technical Manuals FONA XPan DG Plus_ English...
- Page 2 Technical Manuals ITALIANO...
-
Page 3: Table Of Contents
FONA XPan DG Plus Table of contents INSTALLATION INSTRUCTIONS ........................6 1.1. DELIVERY CHECK LIST ........................... 7 1.1.1. Necessary Tools ..........................10 1.2. GENERAL..............................10 1.2.1. System Components ......................... 11 1.2.2. Control panel (touchscreen) ......................12 1.3. ROOM PREPARATION ........................... 13 1.4. - Page 4 Technical Manuals 2.1.6. Power supply unit ..........................58 2.1.7. Power switching unit JED 28 ......................60 2.1.8. Control unit ............................61 2.1.9. Multiplexer Board ..........................63 2.1.10. Ceph Interconnection Board ......................65 2.1.11. Network scheme ..........................66 2.1.12. Modbus ..............................67 2.1.13. Ethernet switch ..........................67 2.1.14. Detachable sensor ..........................68 2.1.15.
- Page 5 FONA XPan DG Plus 2.3.4. Filament calibration and Feedback signal calibration ............... 99 2.3.5. X-Ray Beam Alignment ........................100 2.3.5.1. X-Ray Beam alignment – 2D Exams ....................100 2.3.5.2. X-Ray Beam alignment – CEPH Exams ..................102 2.3.5.3. Collimator alignment ........................107 2.3.6.
-
Page 6: Installation Instructions
Avoid unnecessary exposure of the eyes and pay attention that the beams are not intercepted by any optical device. NEW SINCE 09.2018 MANUFACTURED BY FONA S.r.l. Via Galilei 11 - 20090 Assago (MI), Italy DISTRIBUTED BY FONA Dental s.r.o. Stefanikova 7 SK-811 06 Bratislava, Slovakia www.fonadental.com... -
Page 7: Delivery Check List
FONA XPan DG Plus 1.1. DELIVERY CHECK LIST Check list of system body box (120x80x86cm - 105kg) 1. System body 2. Cephalometric arm and assembly 3. Set of top covers 4. Mirror cover 5. Imaging Sensor 6. Handrest 7. Accessory box 8. - Page 8 Technical Manuals Check list of optional box temporal resting bar (optional) 1. Gear box with temporal bars 2. Mounting bolt (set of 2) 3. Resting bar tips (set of 4) Check list of motorized column box (229x31x33cm - 42kg) 1. Motorized column 2.
- Page 9 FONA XPan DG Plus Pictorial view of items in accessory box 1 Chin rest and bite block 2 Assembly limit switches for column 3 Bite block 3 Bite block for TMJ and sinus exams 4 Nasal support 4 Nasal support for TMJ...
-
Page 10: Necessary Tools
Technical Manuals 1.1.1. Necessary Tools In order to perform FONA XPan DG Plus system assembly and installation the following tools are required. Flat head screwdriver, medium size and small size Phillips screwdriver, medium size and small size A pair of scissors... -
Page 11: System Components
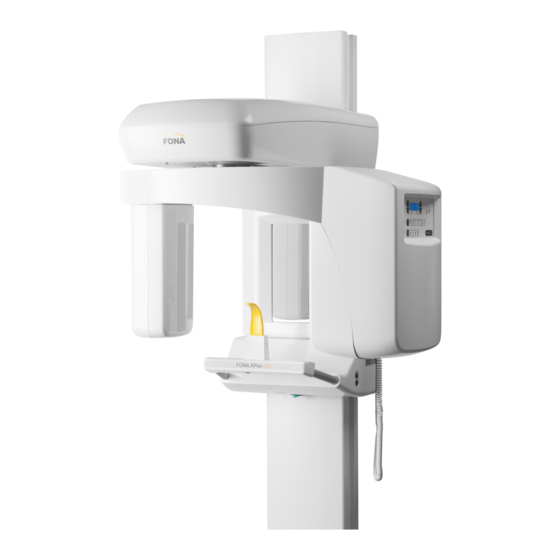
FONA XPan DG Plus 1.2.1. System Components 1 Column 7 Self-supporting base 2 Vertical Carriage 8 Up/down keys 3 CEPH Arm 9 X-Ray generator 4 Detachable Sensor 10 Control Panel (see next page) 5 Cephalostat 11 Rotating Arm 6 Bite support... -
Page 12: Control Panel (Touchscreen)
Technical Manuals 1.2.2. Control panel (touchscreen) System ON and ready PROGRAM Selection PATIENT build: small, X-ray emission medium, large, extra large FORWARD Shift ALARM or ERROR: (referred to patient) see Warning or Error messages in the Service BACKWARD Shift Chapter (referred to patient) INCREASE: kV(left), BACK to patient entrance... -
Page 13: Room Preparation
FONA XPan DG Plus 1.3. ROOM PREPARATION Room layout Room Survey A visit to the installation site is recommended prior Radiation Protection • to proceed to the installation to prepare the room. The system is equipped with lead barriers residual radiation. - Page 14 Technical Manuals Overview of electrical connections in the room...
-
Page 15: Host Computer Requirements
FONA XPan DG Plus 1.4. HOST COMPUTER REQUIREMENTS The FONA XPan DG Plus system for panoramic radiology is connected to the PC workstation with a CAT-5e cable connected to the PC via the USB-Ethernet Adapter provided. The PC workstation has to be devoted to radiographic imaging at top priority. -
Page 16: Possibilities Of Installation
Technical Manuals 1.5. POSSIBILITIES OF INSTALLATION The unit can be installed in three ways according to the wall condition and material: unit installed with wall bracket only, with self standing base only, in case the wall it is not suitable for fixation or wall bracket and self standing base together, which is providing the maximum stability to the device. -
Page 17: Hand-Switch Connection
FONA XPan DG Plus 1.6. HAND-SWITCH CONNECTION The hand-switch can be installed in three different ways by following the local regulation of your County and the will of the end-user. A. Hand-switch on the unit in the treatment room The unit is provided with hand-switch with coiled cable on the right side for use up to 3 m distance. -
Page 18: Facilities And Optional
Technical Manuals 1.7. FACILITIES AND OPTIONAL Door contact and external lights Safety connections are available in the mains connection module, behind the mirror cover (right side of the unit), for the connection of the door contact and of the external warning lights (please refer to the paragraph Connecting the external lights and door contact). -
Page 19: Assembling The System
FONA XPan DG Plus 1.8. ASSEMBLING THE SYSTEM WARNING. Do not change the installation sequence. Follow the sequence as described. 1.8.1. Unpacking The system comes in two boxes: System body box and column box. Opening the system box • Cut the adhesive tape sealing the carton box and open the flaps. - Page 20 Technical Manuals Open the column box • Carton box: remove top cover using a screwdriver to open • Keep top cover close to the box with foam blocks upward • Retrieve the packing list and check that listed items are present. •...
- Page 21 FONA XPan DG Plus Taking out the column Foot Carriage Holding Plate Motor Cables Wall Support • Extract the column from the box, the protective bag and the plastic bag, lay it down back side up on the foam blocks.
-
Page 22: Preparing The Column For Wall Mounting
Technical Manuals 1.8.2. Preparing the column for wall mounting case wall mounted configuration the column with wall support brought close to the wall in the mounting position mark holes for the anchors. The wall holder has to be mounted at about 210 cm (82” 11/16) from floor. -
Page 23: Preparing The Column For Floor Mounting (Optional)
FONA XPan DG Plus 1.8.3. Preparing the column for floor mounting (Optional) • Remove the foot to mount the self standing base. Then rotate the column to the front side. • Fix the base to the column with 6 bolts M 10x25. -
Page 24: Mounting System Body To The Column
Technical Manuals 1.8.4. Mounting system body to the column • Bring the column close to the mounting place. • Take three foam blocks out of the column packaging and use them to sustain the column on the lower part. • Lay down the column front part up, sustaining it on the wall support (2) on one side and on two foam blocks (1) on the... - Page 25 FONA XPan DG Plus • Slide in the carriage carefully on the column paying attention not to scratch the paint or to damage ball bearings during carriage insertion. • Push the body of the system in place to secure it to the carriage holding plate.
-
Page 26: Lifting And Securing The System
Technical Manuals 1.8.5. Lifting and securing the system Securing to the wall Depending on the construction type of the wall, suitable wall plugs must be used. Wall plugs to be provided by the installer. In case the wall is not in condition to withstand the indicated load, the adoption of reinforcing plate and connection with bolts through the wall can be considered,... -
Page 27: Mounting The Cephalometric Arm
FONA XPan DG Plus 1.8.6. Mounting the Cephalometric arm Installing the cephalometric arm The system in cephalometric version comes complete with a teleradiographic arm for cephalometry on the left-hand side. • Once the column complete with carriages has been raised and fastened on the wall... - Page 28 Technical Manuals Connecting the cephalometric arm Once the cephalometric arm has been installed, the connections to the multiplexer board, CEPH interconnection board and Gigabit Ethernet Switch must be made. Connections to the multiplexer board: • Ground cable on the metal frame (block with nut on ground provision) •...
-
Page 29: Removing Safety Bolts And Transport Bracket
FONA XPan DG Plus 1.8.7. Removing safety bolts and transport bracket The system is now vertical and secured to the wall or to the floor. Before turning the system ON: • Ensure the two safety bolts (1) on the back... -
Page 30: Electrical Connections
Technical Manuals 1.9. ELECTRICAL CONNECTIONS 1.9.1. Configuring the power supply unit PLUG ON LEFT SIDE FOR 115 V PLUG ON RIGHT SIDE FOR 230 V The system is delivered with voltage selector plug and primary fuses F501 (2) and FU303 not mounted. The system must be configured to work either at 115 V or 230 V. -
Page 31: Connecting The Motor For Vertical Movement
FONA XPan DG Plus 1.9.2. Connecting the motor for vertical movement • Pass the motor cables (supply and encoder cables) (1) through the hole on the back of the white angular support (2) , on the right side of the unit. -
Page 32: Connecting The Hand-Switch And Other Facilities
Technical Manuals 1.9.3. Connecting the hand-switch and other facilities X-Ray Switch Mains Line Cable Connector Cable X-Ray Hand Switch Entry Point for Wires of External Lights and Door Contact Strain Relief Connector Communication Cable CAT 5e On the back of the unit there are the entry points for necessary cables •... -
Page 33: Connecting The Remote Hand-Switch Option
FONA XPan DG Plus 1.9.4. Connecting the remote hand-switch option The hand switch can alternatively be mounted remotely in case the unit is located in an X-ray room with proper window on the door to enable visual contact with the patient. -
Page 34: Connecting The External Lights And Door Contact
Technical Manuals 1.9.5. Connecting the external lights and door contact The mains connection module (behind the mirror cover, right side of the unit) provides the contacts to enable the following safety conditions: • The external light turns ON when irradiation is started. The two contacts on the left of the connector X1 are normally opened and they close when the radiation is enabled. -
Page 35: Connecting The System To The Mains Line
FONA XPan DG Plus 1.9.6. Connecting the system to the mains line • Perform polarity check to have the LIVE wire connected to the mains fuse: • Turn OFF the mains room switch. • Turn OFF the system mains switch. -
Page 36: Connecting The Column To Protective Earth
Technical Manuals 1.9.7. Connecting the column to protective earth • A pin for the connection of the body of the column to protective earth is placed at the bottom of the column. • Attach the ring terminal of the yellow-green grounding conductor with nut with flat washer and lock washer in this order: flat washer, grounding conductor, flat washer, lock washer, nut. -
Page 37: System Start-Up
FONA XPan DG Plus 1.10. SYSTEM START-UP 1.10.1. Preparing the unit for test A. Switching ON the Unit By pressing the mains switch in the lower part of the vertical carriage under the mirror, the unit is supplied as indicated by the green light of the mains switch. - Page 38 Technical Manuals D Setting Tube Current Key INCREASE at the right of the display to manually raise mA level. Key DECREASE at the right of the display to manually lower mA level. The tube current can be set at 4, 5, 6.3, 8, and 10 mA. E Setting Tube Voltage Key INCREASE at the left of the display to raise kV level.
-
Page 39: Performing System Test Without Radiation
FONA XPan DG Plus 1.10.2. Performing system test without radiation NOTE: Do not connect yet the data cable to the PC. A Switching System On The unit connected to the mains is turned ON with the switch below the chin support body. -
Page 40: Tuning The Side Bearings On Vertical Travel
Technical Manuals 1.10.3. Tuning the side bearings on vertical travel Tuning side bearings might be necessary to correct lateral swinging of the body of the system (vertical travel) during arm rotation, from one side to the other side depending on the position of the tube housing assembly. This operation might... -
Page 41: Imaging System
The USB - Ethernet adapter is called Local Area Network By entering in the Network and Connection window is possible to rename it as FONA XPan DG Plus. Set the IP address of the USB - Ethernet adapter as shown below: Do right click on XPanDG Properties ... - Page 42 Select Advanced from dropdown menu; then select Connection Type from Properties, and put the value: 100Base Tx Full_Duplex. Click on Ok. At this point you can connect the Ethernet cable to the Ethernet-USB adapter and start to use the FONA XPan DG Plus...
-
Page 43: Performing Installation Of Software Modules
1.11.2. Performing installation of software modules NOTE. Do not connect the data cable to the PC until the end of software installation. The FONA XPan DG Plus system requires the following software modules: • Operating system: please refer to the PC Workstation requirements. - Page 44 Technical Manuals From the drop-down Dental OPG menu, select the installed device. Confirm by clicking on the Save options. B Unit connection to the PC • Connect the Ethernet cable from the unit to the ethernet plug of USB Ethernet adapter (connected to the PC).
-
Page 45: Ray Test
FONA XPan DG Plus 1.12. X RAY TEST 1.12.1. Taking a panoramic phantom radiograph Turn ON the system mains switch. Wait for initialization and do Reset. Select P1 program. Select 64 kV and 5 mA at control panel. Using masking tape, attach the copper filter over the X-Ray generator Mount the test phantom RETURN Arm Movement to START position, ready for exposure. -
Page 46: Taking A Cephalometric Radiograph
Technical Manuals 1.12.2. Taking a cephalometric radiograph Move the sensor in cephalometric position. Move the cephalostat in latero-lateral (LL) position. Turn ON the system mains switch. Wait for initialization and do Reset. Select P8 program. Select 70 kV and 6,3 mA at control panel. RETURN Arm Movement to START position, ready for exposure. -
Page 47: Checking Power Supply Adequacy
FONA XPan DG Plus 1.12.4. Checking power supply adequacy This test is done at the end of the installation and configuration to determine the power supply adequacy during exposure. It is done by measuring the line voltage drop during exposure, using the parameters for a typical panoramic radiography. -
Page 48: Final Work
When finished, attach the FONA logo strip. 1.13.2. Setting the unit for demostrations (when applicable) In order to prevent accidental X-ray radiation on demo unit use the switch SA301 on the Power Supply board at top of the unit or remove power fuses. -
Page 49: Putting Covers Back
Mount to complete the unit in this order: • Vertical travel upper bottom cover. • Vertical travel upper top cover. • Mirror Cover. • FONA logo strip on the chin support holder frontally. • Ceph Assembly Cover Ceph Assembly Cover... -
Page 50: Filling The Installation Report And Warranty Passport
Technical Manuals 1.13.4. Filling the installation report and warranty passport The Installation Report (see next page) must be filled by the technician responsible for the installation. The following to be filled in: Address of the Customer and telephone number Serial numbers involving: •... -
Page 51: Installation Report
FONA XPan DG Plus 1.14. INSTALLATION REPORT FONA XPan DG Plus INSTALLATION REPORT Customer: Address: Telephone: Dealer: Address: Telephone: Date of installation: SERIAL NUMBER System /(master) control Generator, tube housing assembly (THA) and high voltage (HV) generator Collimator, beam limiting device (BLD) -
Page 52: Service Instructions
Observe radiation protection guidelines as outlined in the Operating ATTENTION Instructions. X-rays are generated, when the exposure hand-switch is pressed. NEW SINCE 09.2018 Manufactured by FONA S.r.l. Via Galilei 11 - 20090 Assago (MI), Italy Distributed by FONA Dental s.r.o. Stefanikova 7 SK-811 06 Bratislava, Slovakia www.fonadental.com... -
Page 53: Functional Description
FONA XPan DG Plus 2.1. FUNCTIONAL DESCRIPTION 2.1.1. Block diagram • The mains line is connected to the terminal block on the right side of the system. • The mains power is fed to the Power Supply Unit located on top of the unit. -
Page 54: Pcb Displacement
Technical Manuals 2.1.2. PCB Displacement The Printed Circuit Boards (PCBs) are located behind the covers. The Dual Power Supply, the Power Switching Unit and the Control Board have an addictional metal shield (please see the paragraphs Plastic Covers and Metal Covers (Shields) for further information). -
Page 55: Mains Connection Module
FONA XPan DG Plus 2.1.3. Mains connection module The Mains Connection Module is placed on the right side of the unit, behind the Mirror Cover. The mains input is on the connector XC501. The On/Off button under the hand holders, enables the mains voltage passing through the filter, the varistors and the fuse F501. -
Page 56: Column Motor Driver Board
Technical Manuals 2.1.4. Column motor driver board The Column Motor Driver board is placed on the left side of the unit, behind the Mirror Cover. It supplies the motor for vertical movement of the carriage. The speed which is initially low is increased for long travels. Limit switches at top and at bottom control the displacement. -
Page 57: System Fuses
FONA XPan DG Plus 2.1.5. System fuses The equipment is protected by fuse F 501 (input power from mains), located on the top part of the mains connection module, on the right side of the vertical carriage. The circuit of the low voltage transformer is protected by fuse FU 303. The Output Power circuit (to the Power Switching Unit) is connected by fuses FU 304 and FU 305. -
Page 58: Power Supply Unit
Technical Manuals 2.1.6. Power supply unit The Dual Power Supply PCB is placed inside the DPS Metal Shield, under the top cover of the carriage. The unit can be set to work at 115 or 230 V with configuration plug and fuses (see table below). Mains power is fed via the EMI filter to the low voltage transformer (XC305) and via the relay to the line voltage rectifier. - Page 59 FONA XPan DG Plus CONNECTORS XC301 Hand Switch connection with ground wire to XC302 XC302 Connector to Power Switching XC303 300 VDC output voltage to power switching unit XC304 Connection for additional buzzer or additional X-Ray exposure lights XC305 Input of mains voltage from output of mains filter Laser supply at –...
-
Page 60: Power Switching Unit Jed 28
Technical Manuals 2.1.7. Power switching unit JED 28 During preparation and exposure, the 300 VDC (rectified mains voltage) is fed into the unit. 80 kHz pulses Pulses at 80 kHz pass to the filament regulator driver, the output voltage of which depends on the duty cycle of the driving pulses. -
Page 61: Control Unit
FONA XPan DG Plus 2.1.8. Control unit The control unit is the heart of the system. It acquires the data set by the operator during technical parameter and program type selection, manages the output signals and controls X-ray emission and movement of the rotating arm during exposure. - Page 62 Technical Manuals CONNECTORS XC101 Flat connector from the Regolation Unit Interface Serial Interface (firmware upgrade) Keyboard Display LCD Motor X Axis Motor Rotation Motor C Axis (collimator) suplly Motor D Axis (Ceph sensor) supply Encoder for Rotation (see Encoder test, Rotation Axis) XC10 Encoder for X Axis (see Encoder test, X Axis) XC11...
-
Page 63: Multiplexer Board
FONA XPan DG Plus 2.1.9. Multiplexer Board The multiplexer board controls the interface between: 1. the digital acquisition sensor 2. the computer 3. the microprocessor control board It allows executing the functions listed below. • Signal line control between the microprocessor control board and the digital sensor among which the synchronism, PC READY and digital sensor release request signals. - Page 64 Technical Manuals CONNECTORS LIGHTS Yellow LED to indicate that the digital XM01 Not used. LED-P sensor is connected on the PAN side. Yellow LED to indicate that the digital XM02 Digital sensor power supply on PAN side. LED-C sensor is connected on the CEPH side. Orange LED.
-
Page 65: Ceph Interconnection Board
FONA XPan DG Plus 2.1.10. Ceph Interconnection Board The CEPH interconnection board connects the digital sensor movement section on the CEPH side to the rest of the system, also intercepting the limit switch contacts and the two calibration buttons. The CEPH interconnection board connections are listed below. -
Page 66: Network Scheme
Technical Manuals 2.1.11. Network scheme... -
Page 67: Modbus
FONA XPan DG Plus 2.1.12. Modbus The Modbus module is a device for exchange of information from and to the Control Unit, and connected to the PC via Ethernet LAN. The Modbus connection with the workstation can be checked by entering in the command line and inserting the command ping 192.168.58.110... -
Page 68: Detachable Sensor
Technical Manuals 2.1.14. Detachable sensor The subsystem for digital images is composed of a digital sensor with a connection board to the X-ray system and a button with warning light to disengage the holding magnet. -
Page 69: Tube-Housing Assembly
FONA XPan DG Plus 2.1.15. Tube-Housing assembly Power for high voltage generation is supplied through points 4 and 5. High voltage is generated by means of a transformer plus a cascade multiplier (by 5). Filament supply is provided through points 2 and 3, via a dedicated transformer. - Page 70 Technical Manuals Filament Supply Feedback Signals Kv & mA Thermal Sensor High Voltage Supply CONNECTORS (tube head detail) XT202 Filament Supply (two wires: ZH1, ZH2) Ground connection (GND) mA feedback (mA) kV feedback (kV) TER Thermal Sensor XT201 High Voltage Supply (two wires plus ground: UN1, UN2, GND)
-
Page 71: Service Functions
FONA XPan DG Plus 2.2. SERVICE FUNCTIONS 2.2.1. PAN Alignment This function is intended to store reference positions of the rotating arm and the collimator offsets after mechanical alignment. By keeping pressed the BACK key for 5 s the system enters Service Mode. -
Page 72: Axis
Technical Manuals 2.2.1.2. X Axis The X axis is a variable allowing to set the displacement offset of the rotating arm. The NOTE plate is moved by stepped motor and controlled by three opto-sensors (encoder). The right displacement of the rotating arm is reached when the canine laser falls on the test phantom pin. -
Page 73: C Axis
FONA XPan DG Plus 2.2.1.3. C Axis NOTE The C Axis is a variable allowing to set the displacement offset of the collimator. The plate is moved by stepped motor and controlled by three opto-sensors (encoder). Each collimator slit can be adjusted independently. - Page 74 Technical Manuals C Axis - PAN Child slit Offset Press INCREASE or DECREASE key to the Right side of the display to until PAN B is shown Press the PROGRAM key to enter PAN Child Adjust offset menu. The collimator will move automatically to reach the Pan Child slit position.
-
Page 75: Rot. Dev
FONA XPan DG Plus 2.2.1.4. Rot. Dev. NOTE The rotation development variable corrects the relative movements between the motors, the pulleys and belts. The parameter acts on the angle offset of the rotating arm in order to reach -90° in the roto-translation between the position Rotation axis = 0°... -
Page 76: Coll. Dev
Technical Manuals 2.2.1.5. Coll. Dev. The collimator development parameter sets the collimator screw pitch. NOTE Three values can be set for the Coll. Dev. (1.25, 1.50 and 2.00 mm). This parameter is set in production; no reason for change it unless there is a change in the primary collimator mechanic. -
Page 77: St Kv Filter
FONA XPan DG Plus 2.2.3. ST Kv Filter This function allows the user to enable / disable the soft tissue (ST) filter for CEPH program P8. By keeping pressed the BACK key for 5 s the system enters Service Mode. -
Page 78: Ceph Formats
Technical Manuals 2.2.5. Ceph formats This function allows declaring the formats of the cephalometric collimators. This function is shown on the display only if Dip 2 on the control board is in PAN/CEPH position and allows selecting the configurations. By keeping pressed the BACK key for 5 s the system enters Service Mode. Service function can be selected using the INCREASE or DECREASE keys on the RIGHT side of the display. -
Page 79: Exposure Setting
FONA XPan DG Plus 2.2.7. Exposure setting This function is intended to assign custom anode voltage (kV) and anode current (mA) or electrical charge (mAs) values for all the available exposure programs. By keeping pressed the BACK key for 5 s the system enters Service Mode. -
Page 80: Battery Change
Technical Manuals CEPH programs Change the kV level to the desired value by pressing the INCREASE or DECREASE keys on the left side of the display. Change the mA level to the desired value by pressing the INCREASE or DECREASE keys on the right side of the display. Keep pressed the LIGHT key to store the selected value. -
Page 81: Software Info
FONA XPan DG Plus 2.2.9. Software info This function provides the software version of the control unit. By keeping pressed the BACK key for 5 s the system enters Service Mode. Service function can be selected using the INCREASE or DECREASE keys on the RIGHT side of the display. -
Page 82: Dap Setting
Technical Manuals 2.2.10. DAP setting This function is intended to enable or disable the presentation of DAP values on display at the end of the exposure. The DAP value is the absorbed dose per the irradiated area. By keeping pressed the BACK key for 5 s the system enters Service Mode. Service function can be selected using the INCREASE or DECREASE keys on the RIGHT side of the display. -
Page 83: Cam Offset
FONA XPan DG Plus 2.2.11. Cam Offset This function is intended to align the panoramic projection by checking and setting the distance of the two pins of the test phantom. The current value of Cam Setting appears on the display when entering this function. -
Page 84: Enable/Disable Thermal Control
Technical Manuals 2.2.12.1. Enable/Disable thermal control Press the PROGRAM key to enter Enable / Disable Thermal Control. Keep pressed the PROGRAM key enter selection. Press BACK key to exit Enable/Disable Thermal Control Press TEST Mode key to exit SERVICE MODE 2.2.12.2. -
Page 85: Keyboard Test
FONA XPan DG Plus 2.2.13. Keyboard Test This function is intended to display the code of the key buttons of the control panel and of the Hand-Switch for X-ray exposure. Codes for the keys are reported here below. X-Ray By keeping pressed the BACK key for 5 s the system enters Service Mode. -
Page 86: Leds Test
Technical Manuals 2.2.14. LEDS Test This function is intended to turn ON one by one all the lights on the control panel as listed in the table below. NOTE The yellow light on the X-Ray pushbutton is not included in this test. TEST GREEN YELLOW... -
Page 87: Automatic Test
FONA XPan DG Plus 2.2.15. Automatic Test This function is intended to perform a number of panoramic/cephalometric cycles with/without x-ray emission for the program and technique factors as set before entering this function. By installing the detachable sensor in PAN or CEPH position is possible to perform panoramic or cephalometric movements accordingly. -
Page 88: X-Ray Test
Technical Manuals 2.2.16. X-Ray Test This function is intended to perform irradiation without motion. By keeping pressed the BACK key for 5 s the system enters Service Mode. Service function can be selected using the INCREASE or DECREASE keys on the RIGHT side of the display. -
Page 89: Pulsed X-Ray
FONA XPan DG Plus 2.2.16.2. Pulsed X-Ray Confirm Pulsed X-Ray with PROGRAM key. INCREASE or DECREASE keys on the LEFT to change kV, 61 to 85 kV INCREASE or DECREASE keys on the RIGHT to change mA, 4 to 10 mA Press BACK key to exit Continued X-Ray Test. -
Page 90: Ceph Axis
Technical Manuals 2.2.17.2. Ceph Axis Use the two arrow keys on the the bottom right side of the keyboard to move the carriage position and verify change of status of the position sensors for Ceph Axis. Press the BACK key to exit Ceph Axis. Press the TEST Mode key to exit SERVICE MODE. -
Page 91: Ceph Alignment
FONA XPan DG Plus 2.2.19. Ceph alignment This function is intended to store reference positions of the rotating arm and the collimator offsets after mechanical alignment. By keeping pressed the BACK key for 5 s the system enters Service Mode. -
Page 92: Sec. Collim. Slit
Technical Manuals 2.2.19.2. Sec. Collim. Slit Press the INCREASE or DECREASE key on the Right side of the display until Sec. Collim. Slit is shown. Press the PROGRAM key to enter Sec. Collim. Slit. INCREASE or DECREASE keys on the LEFT to change the Sec. Collim. Slit. Only two values are allowed according to the secondary collimator window: 3 or 4 mm. -
Page 93: Ceph Axis Calib
FONA XPan DG Plus 2.2.19.4. Ceph Axis Calib. Press the INCREASE or DECREASE key on the Right side of the display until Ceph Axis Calib. is shown. Press the PROGRAM key to enter Ceph Axis Calib. Press the RETURN key to enter Ceph Axis Calib edit mode. -
Page 94: Coll. Offset
Technical Manuals 2.2.19.5. Coll. Offset Press the INCREASE or DECREASE key on the Right side of the display until Coll. Offset is shown. Press the PROGRAM key to enter Coll. Offset menu. The collimator will move automatically to reach the ceph slit position. The sensor Pan/3D will rotate in order to reach the Cephalometric exam position. -
Page 95: Kv Mod Offset
FONA XPan DG Plus 2.2.20. kV Mod Offset This function is intended to module the dose obtained in order to overcome the shield created by the spine when the tube head is in the posterior position. The black beam should be centered with the phantom support. -
Page 96: Service Procedures
Technical Manuals 2.3. SERVICE PROCEDURES 2.3.1. Plastic covers Upper cephalostat metal cover Allen screw, 3mm, 4 Mirror cover Allen screw 3mm, 4 on the back Outer sensor cover Phillips screw, 1 at the bottom Inner sensor cover Phillips screw, 1 at the bottom Inner Tube Head cover Phillips screw, 4 on the back. -
Page 97: Metal Covers (Shields)
FONA XPan DG Plus 2.3.2. Metal covers (Shields) Shield on Power Supply Unit Phillips screw, 2 on top Shield on Power Switching Phillips screw, 4 on sides Back shield on Control Unit Phillips screw, 4... -
Page 98: Pcbs/Tube Head Replacement
Technical Manuals 2.3.3. PCBs/Tube head replacement Cover to be removed Replaced Chapter Plastic Covers and Metal Covers Action needed item (Shields) Tube Head Remove Display Cover (D), Drive Upper Metal Disconnect all wires of the Tube Housing Cover (G), Shield on Power Switching unit (O), Assembly (THA) from the Power Switching Unit unlock the control unit module, and swing it out and ground wire from the frame. -
Page 99: Filament Calibration And Feedback Signal Calibration
FONA XPan DG Plus 2.3.4. Filament calibration and Feedback signal calibration RP 103 TEST POINT Vs & V TRIMMER mA SA101 R104 TRIMMER FDB Ground TEST POINT FDB TEST POINT Kv & mA The filament calibration is required every time a Tube Housing Assembly or a Power Switching Unit is replaced. -
Page 100: X-Ray Beam Alignment
Technical Manuals 2.3.5. X-Ray Beam Alignment X-Ray Beam alignment – 2D Exams 2.3.5.1. On device side Switch the unit ON Keep pressed the BACK key for 5 s to enter Service Mode Select Service function with INCREASE or DECREASE keys on the RIGHT side of the display. - Page 101 FONA XPan DG Plus The image above will appear on your screen. The white area represents the sensor area, and the black area represent the X-Ray beam that reaches the sensor Three situations may occur: • The beam is centered (optimal situation) •...
-
Page 102: X-Ray Beam Alignment - Ceph Exams
Technical Manuals The panel to the right of the alignment image shows the graph of the X-ray signal profile corresponding to the position of the red line. Vertically moving the red line, check that the level of the X-ray range is as centered as possible and that it does not move too far diagonally while the control profile is moving. - Page 103 FONA XPan DG Plus • In all other cases, set the Rotation offset value at 94° by using the kV button, on the left part of the display. Increase the offset value until the laser light reaches 75 mm distance from the center of the sensor.
- Page 104 Technical Manuals Vertical adjustment Vertical deviations are corrected by raising or lowering the cephalostat by acting on the height calibration screw (1) on the installation plate. Horizontal Adjustment If the beam is not centered, horizontal adjustment of the secondary collimator has to be done.
- Page 105 FONA XPan DG Plus Inclination Adjustment If the beam is bent, it is necessary to correct the inclination of the secondary collimator. Loose slightly the 4 M5.5 nuts holding the collimator to the supporting block and correct the alignment, and eventually block the 4 nuts.
- Page 106 Technical Manuals Earplugs concentricity correction With the cephalostat mounted latero-lateral (LL) position, take a flat field image to verify the concentricity of the earplugs support rings: • Press the RETURN key or the EXPOSURE key on the hand switch control to move the arm to the PATIENT ENTRY position. •...
-
Page 107: Collimator Alignment
FONA XPan DG Plus 2.3.5.3. Collimator alignment Horizontal correction is done through the service function Pan AlignmentC Axis (see Beam Horizontal Shift chapter PAN Alignment, C Axis) Correct the beam rotation by loosening the 3 screws (1) that secure the collimator and Beam Rotation turn it. -
Page 108: X-Ray Beam Calibration
Technical Manuals 2.3.6. X-Ray Beam Calibration X-Ray Beam calibration – 2D Exams 2.3.6.1. Calibration for Adult panoramic programs NOTE Before calibration of the system, be sure that the system is properly aligned. Switch on the equipment, and ensure that the Ethernet cable is connected to the PC. Start Oriswin DG Suite SW and click on the “Emergency Patient”. - Page 109 FONA XPan DG Plus The window above will appear. From the drop-down menu select the Exam family for which the calibration files will be created: “Panoramic Adult”. Click on the green button. Check in the equipment that collimator is in the position PAN A.
- Page 110 Technical Manuals At the end of the exam the image is saved, and it will appear automatically, as showed below. In this first page of the calibration process the Dark current image is taken, and the junction remover can be applied. Click on the “Program Options”...
- Page 111 FONA XPan DG Plus With the button P, select Program 1. With the buttons + and – select 64kV and 5mA. Put 0.5 mm copper filter in front of the opening where X-Ray beam come out. Bring the equipment in start position; now take an exam by press and keeping pressed the X-ray button.
- Page 112 Technical Manuals STEP 3: Exam Click on the button “Exam”, in the bottom part of the screen. Click on the Capture X-ray image button, in order to open acquisition image window. Take an X-ray image, in the same conditions as in Step 2 (64kV, 5mA, Program1, 0.5mm copper filter).
- Page 113 FONA XPan DG Plus Click on the button “Create”, to save the calibration file for Panoramic Adult Exams. The calibration file name is PXProgram Type_4_Sensor ID number.CAL where: • Program Type could be: PA (for Panoramic Adult), PC (for Panoramic Child), CE (for Ceph).
- Page 114 Technical Manuals The image below will appear: it is the fully calibrated image, which includes all the corrections. STEP 3: Exam Click on the button “Exam”, in the bottom part of the screen. Click on the Capture X-ray image button, in order to open acquisition image window. Take an X-ray image, in the same conditions as in Step 2 (64kV, 5mA, Program1, 0.5mm copper filter).
- Page 115 FONA XPan DG Plus The image above will appear. Click on the “Program Options”; verify that in the section “Correction file” the sensor serial number is shown. If not, fill in this field, with the serial number of the sensor (8 digits) that is shown on the acquisition module (Sensor ID, see image on pag.
-
Page 116: X-Ray Beam Calibration - Ceph Exams
Technical Manuals From the drop-down menu select the Exam family for which the calibration files will be created: “Panoramic Child”. Click on the green button. Check in the equipment that collimator is in the position PAN B. Before acquisition, select Program 2 on Control panel. Remove 0.5mm copper filter. -
Page 117: Replacement Of Position Sensors
FONA XPan DG Plus 2.3.8. Replacement of position sensors The position sensors are made of three electro-optical devices each combining a light transmitter and a light receiver. The presence of light is detected, or the absence of the same due to a non-transparent object cutting the beam of light. -
Page 118: System Messages
Digital X-Ray Sensor If FONA XPan DG Plus does not detect the presence of the X-ray sensor in either of the two positions (PAN or CEPH), the message “X-Ray Sensor Not Connected” will be shown Not Connected on the display. -
Page 119: Error Messages
FONA XPan DG Plus 2.4.2. Error messages Error 1 kV reference signal out of range • Measure the voltage reference for kV, 10 kV/V from 6.1 to 8.5 V on the Power switching Unit during exposure in X-ray Test /Continued X-ray mode. - Page 120 Technical Manuals Error 15 15 V DC supply out of range • Check the value with a voltmeter on the test point of the Power Supply Board and replace it if the value is out of the range 14.5 to 15.5 V. •...
- Page 121 FONA XPan DG Plus Error 27 Multiplexer board malfunction with sensor presence in PAN and CEPH • Detected presence of two sensors mounted on Pan and on Ceph sides (remove one in case), or 24 V supply problem to multiplexer (check connector XM14 and relevant cable) or defective multiplexer board.
-
Page 122: Other Alarms
Technical Manuals 2.4.3. Other Alarms Other Alarms Take a note of the message generated and refer to the Technical Service. • Internal Software Error, with error code xxh and address yyyyyyyh. ?? ISE ?? Switch the system OFF and ON again. C: xxh A:yyyyyyyh •... -
Page 123: Electrical Schemes
FONA XPan DG Plus 2.5. ELECTRICAL SCHEMES 2.5.1. Mains connection module... -
Page 124: Dual Power Supply
Technical Manuals 2.5.2. Dual Power Supply... -
Page 125: Driver Motor Column
FONA XPan DG Plus 2.5.3. Driver Motor Column... -
Page 126: Power Switching Unit
Technical Manuals 2.5.4. Power Switching Unit... -
Page 127: Control Unit
FONA XPan DG Plus 2.5.5. Control unit... -
Page 128: Multiplexer
Technical Manuals 2.5.6. Multiplexer... -
Page 129: Ceph Interconnection Board
FONA XPan DG Plus 2.5.7. Ceph Interconnection Board... -
Page 130: Maintenance Instructions
Needle and ball phantom • X-Ray Filter X-rays are generated, when the exposure hand-switch is pressed. ATTENTION Observe radiation protection guidelines as outlined in the Operating Instructions. NEW SINCE 09.2018 Manufactured by FONA S.r.l. Via Galilei 11 - 20090 Assago (MI), Italy... -
Page 131: Visual Check
• Verify that all labels are affixed and legible. Defaced labels must be replaced. Order same from FONA in writing stating: • Customer Name • Customer Address • All Model Numbers with Serial Numbers still readable on the unit for identification purposes... -
Page 132: Keyboard Test
Technical Manuals 3.2. KEYBOARD TEST This function is intended to display the code of the key buttons of the control panel and of the Hand-Switch for X-ray exposure. Codes for the keys are reported here below. X-Ray By keeping pressed the BACK key for 5 s the system enters Service Mode Service function can be selected using the INCREASE or DECREASE keys on the RIGHT side of the display. -
Page 133: Light And Sound Indicators
FONA XPan DG Plus 3.3. LIGHT AND SOUND INDICATORS TEST GREEN YELLOW By keeping pressed the BACK key for 5 s the system enters Service Mode Service function can be selected using the INCREASE or DECREASE keys on the RIGHT side of the display. - Page 134 Technical Manuals ATTENTION Prepare the image acquisition program on PC and establish exposure readiness. RADIATION Move to a safe position and start exposure. Test Radiation Light Check for yellow light on the hand-switch and on the control panel. Test Audible Sound Check for audible sound during irradiation. Dead Man Functionality Quit irradiation before end of panoramic exposure and verify the error message for premature termination.
-
Page 135: Phantom Radiograph
FONA XPan DG Plus 3.4. PHANTOM RADIOGRAPH 3.4.1. Panoramic Exams Turn ON the system mains switch. Wait for initialization and do Reset. Select P1 program. Select 64 kV and 5 mA at control panel. Using masking tape, attach the copper filter over the X-Ray generator. -
Page 136: Cephalometric Exams
Technical Manuals 3.4.2. Cephalometric Exams Turn ON the system mains switch. Wait for initialization and do Reset. Select P8 program. Select 79 kV and 8 mA at control panel, no filter needed. Attach the sensor in cephalometric position. Remove any object from the bite block holder. Turn the cephalostat with the earplugs in latero-lateral (LL) position. -
Page 137: Aiming Lights
FONA XPan DG Plus 3.5. AIMING LIGHTS Three LASER beams are generated as aiming lights for patient alignment: • Midsagittal vertical line (1) • Frankfurt horizontal line (2) • Lateral vertical line (focal trough, cuspid pointer) (3) LASERS are class I devices. -
Page 138: Mechanical Movements Verification
Technical Manuals 3.6. MECHANICAL MOVEMENTS VERIFICATION Use service function Automatic Test to to perform a number of panoramic cycles By pressing the mains switch in the lower part of the body of the system the unit is supplied as indicated by the green light of the mains switch. By keeping pressed the BACK key for 5 s the system enters Service Mode Service function can be selected using the INCREASE or DECREASE keys on the... -
Page 139: Anode Voltage Verification
FONA XPan DG Plus 3.8. ANODE VOLTAGE VERIFICATION Remove the covers to have access to the Power Switching unit (please refer to the paragraphs Plastic and Metal covers in the Service Manual). Connect the leads of a DC voltmeter in the range of 10 VDC from Ground to kV point. - Page 140 Technical Manuals ATTENTION RADIATION Depress the exposure key until meter reading is obtained: a value from 6.3 V to 7.7 V to be read for 70 kV anode voltage. Wait for X-ray tube cool down after each exposure. Cool • If value in range is obtained, switch the unit OFF.
-
Page 141: Anode Current Verification
FONA XPan DG Plus 3.9. ANODE CURRENT VERIFICATION Remove the covers to have access to the Power Switching unit (please refer to the paragraphs Plastic and Metal covers in the Service Manual). Connect the leads of a DC voltmeter in the range of 10 VDC from Ground to mA point. -
Page 142: Checking The X-Ray Beam Alignment
Technical Manuals ATTENTION RADIATION Depress the exposure key until meter reading is obtained: a value from 7.2 V to 8.8 V to be read for 8 mA anode current. Wait for X-ray tube cool down after each exposure. Cool • If value in range is obtained, switch the unit OFF. -
Page 143: Cephalometric Mode
FONA XPan DG Plus 3.10.2. Cephalometric Mode Switch the unit ON and verify that the digital sensor is connected in CEPH mode. Release the Nasion and turn the cephalostat with the earplugs to AP position for maximum opening so as not to interfere with the radiation beam. -
Page 144: Inspection Checklist Forms
Technical Manuals Check for full height activation The black area must occupy the full height of the acquisition window. The next image is the target image for the alignment in CEPH mode. 3.11. INSPECTION CHECKLIST FORMS Twelve ANNUAL/MAINTENANCE CHECKLIST to be filled during the inspection are provided in the following. Compile ANNUAL INSPECTION CHECKLIST yearly, and the MAINTENANCE INSPECTION CHECKLIST only in the corresponding years. -
Page 145: Forms
FONA XPan DG Plus 3.12. Forms FONA XPan DG Plus ANNUAL INSPECTION CHECKLIST Customer: Address: Dealer: Address Date of original installation: Date of inspection: SCHEDULE yes no REMARKS All manuals are present No mechanical damage noticed All labels are present and legible... - Page 146 Technical Manuals FONA XPan DG Plus MAINTENANCE INSPECTION CHECKLIST 4 year 7 year 10 year 12 year 14 year 16 year 18 year 20 year Manufacturer Model Accuracy Last calibrated AC Voltmeter DC Voltmeter SCHEDULE yes no REMARKS Test instruments as required...
- Page 147 FONA XPan DG Plus...
- Page 148 Technical Manuals *6968292320* 09.2018...
Need help?
Do you have a question about the XPan DG Plus and is the answer not in the manual?
Questions and answers