Table of Contents
Advertisement
Quick Links
User Manual: Toshiba-TMPM330
About NGX Technologies:
NGX Technologies is a premier supplier of development tools for the ARM7, ARM Cortex M0, M3
and M4 series of microcontrollers. NGX provides innovative and cost effective design solutions
for embedded systems. We specialize in ARM MCU portfolio, which includes ARM7, Cortex-M0, M3
& M4 microcontrollers. Our experience with developing evaluation platforms for NXP controller
enables us to provide solutions with shortened development time thereby ensuring reduced time to
market and lower development costs for our customers. Our cost effective and feature rich
development tool offering, serves as a testimony for our expertise, cost effectiveness and quality.
Contact Information:
NGX Technologies Pvt.Ltd.
#39/39, 'Parusha', 1
st
5th Main Road, Remco Layout,
Vijayanagar 2nd Stage, Bangalore
– 560 040. Phone : +91-80-
40925507
email:sales@ngxtechnologies.com
Table of Contents
Page | 1
TOSHIBA-TMPM330
'E' cross,
Advertisement
Table of Contents

Related Manuals for Toshiba TMPM330

Summary of Contents for Toshiba TMPM330
- Page 1 User Manual: Toshiba-TMPM330 TOSHIBA-TMPM330 About NGX Technologies: NGX Technologies is a premier supplier of development tools for the ARM7, ARM Cortex M0, M3 and M4 series of microcontrollers. NGX provides innovative and cost effective design solutions for embedded systems. We specialize in ARM MCU portfolio, which includes ARM7, Cortex-M0, M3 &...
-
Page 2: Table Of Contents
Chapter 2: CoFlash Installation & Flashing Binary codes 2.1 Installation & Configuration of CoFlash software 2.2 Flashing Binary Codes in CoFlash. Chapter 3 : TMPM330 Development Tool Setup 3.1 CMSIS-DAP and CooCox 3.2 Installation & Configuration of CooCox(CoIDE1.7.5)software 3.3 Installation & Configuration of GNU Tool Chain Chapter 4 : Configuration of ColinkEx Debugger and Programming 4.1 Configuration of CMSIS-DAP Debugger and Programming... -
Page 3: Chapter 2: Coflash Installation & Flashing Binary Codes
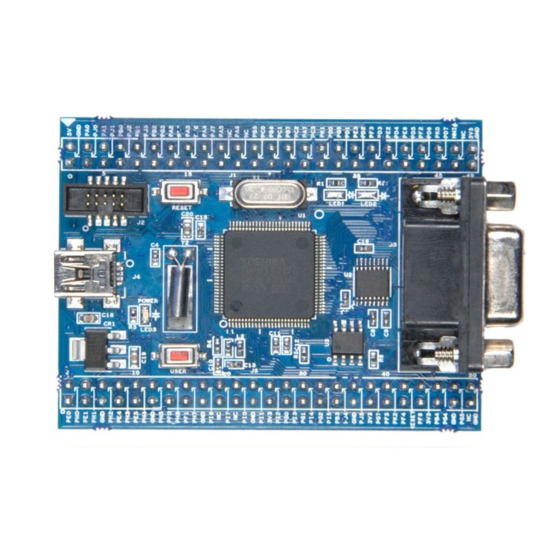
User Manual: Toshiba-TMPM330 Chapter 1: Introduction The TMPM330 is an evaluation stamp board which is exploring the complete features of the new ARM Cortex-M3 TMPM330FDFG microcontroller by Toshiba.Featuring a Toshiba TMPM330FDFG microcontroller, the MCBTMPM330 Evaluation Board offers 512KB Flash, 32KB SRAM, a 10 channel 16-bit Timer, a 12 channel 10-bit ADC, real-time clock and watchdog, 3 UARTs, 3 I2C interfaces and 79 GPIO Pins. - Page 4 User Manual: Toshiba-TMPM330 Step 2: When you open CoFlash-1.4.6.exe setup you will the following window , click on 'Next'. Step 3: Click on 'Next'. Step 4: Click on 'Next'. Page | 4...
- Page 5 User Manual: Toshiba-TMPM330 Step 5: Click on 'Install'. Step 6: Wait till Installation complete. Page | 5...
-
Page 6: Flashing Binary Codes In Coflash
2.2: Flashing Binary Codes in CoFlash. Follow the steps given below to check the binary codes. Step 1: Hardware Setup Accessories Required: 1. Toshiba-TMPM330 stamp board. 2. CMSIS-DAP board. 3. 10 pin JTAG cable. 4. 2 USB mini cable. 5. 20 to 10 pin converter 6. - Page 7 User Manual: Toshiba-TMPM330 Step 2: Hardware Connection. • Connect one end of 10-pin ribbon cable to ‘10-pin box header’ of the Toshiba-TMPM330 board and other end to the '10-Pin box header' of 20 to 10 pin converter board as shown in the following image.
- Page 8 Step 4: You will get the following window when you open CoFlash. Now click on 'config' select 'CMSIS-DAP' Adapter and select 'TMPM330FDFG' in Toshiba as shown in the following image. Step 5: Now click on 'Command' and browse the binary code.
- Page 9 User Manual: Toshiba-TMPM330 Step 6: Select BIN file and click on 'Open'.(SampleCodes click on resources to download codes). Step 7: Click on Program. Page | 9...
- Page 10 User Manual: Toshiba-TMPM330 Step 8: Next check for 'Program Done' and click on 'close'. Step 9: Verify the output as shown in image below. Page | 10...
- Page 11 User Manual: Toshiba-TMPM330 Page | 11...
-
Page 12: Chapter 3 : Tmpm330 Development Tool Setup
User Manual: Toshiba-TMPM330 Chapter 3 : TMPM330 Development Tool Setup 3.1 CMSIS-DAP and CooCox NGX’s MCU evaluation platforms are not coupled tightly with any one particular combination of IDE and debugger. The following sections will explain the setup for CooCox(CoIDE-1.7.5) and CMSIS- DAP as the IDE and debugger respectively. - Page 13 User Manual: Toshiba-TMPM330 Step 2: Step 3: Page | 13...
- Page 14 User Manual: Toshiba-TMPM330 Step 4: Page | 14...
- Page 15 User Manual: Toshiba-TMPM330 Page | 15...
- Page 16 User Manual: Toshiba-TMPM330 Step 5: Click on Install. Step 6: CooCox CoIDE(1.7.5) setup is completed, click on Finish . Page | 16...
-
Page 17: Installation & Configuration Of Gnu Tool Chain
User Manual: Toshiba-TMPM330 3.3 Installation & Configuration of GNU Tool Chain: step 1: Open the GNU Tools setup. Step 2: Select English language and click on OK as shown in below image. Page | 17... - Page 18 User Manual: Toshiba-TMPM330 Step 3: Click on Yes. Step 4: Click on Next. Page | 18...
- Page 19 User Manual: Toshiba-TMPM330 Step 5: Select ' I accept the terms of the license agreement' and click on 'Next'. Step 6: Click on 'Next'. Page | 19...
- Page 20 User Manual: Toshiba-TMPM330 Step 7: Click on 'Next'. Step 8: Wait till installation complete. Page | 20...
-
Page 21: Chapter 4 : Configuration Of Colinkex Debugger And Programming
User Manual: Toshiba-TMPM330 Step 9: GNU Tool setup is completed, click on Finish (Close All the Windows you get when u click on 'Finish'). Chapter 4 : CMSIS-DAP Debugger and Programming. 4.1: Configuration of CMSIS-DAP Debugger and Programming. The configuration flow of CMSIS-DAP Debugger is explained below:... - Page 22 6. 20 pin JTAG cable Step 2: Hardware Connection. • Connect one end of 10-pin ribbon cable to ‘10-pin box header’ of the Toshiba-TMPM330 board and other end to the '10-Pin box header' of 20 to 10 pin converter board as shown in the following image.
- Page 23 User Manual: Toshiba-TMPM330 Step 3: Open the CooCox blinky project downloaded from our website (SampleCodes click on resources to download codes). Step 4: The window opens as shown in the following image when you open CooCox Led_Blinky project. Next Right click on Led_Blinky and then select 'Configuration' as shown in the following image.
- Page 24 User Manual: Toshiba-TMPM330 Step 5: Next click on the ‘Debugger Option’, select 'CMSIS-DAP' and 'SWD' as shown in the following image. Step 6: Next click on the ' Rebuild ' , if you have not selected the GNU tool chain you will get the following warning as shown in the following image.
- Page 25 User Manual: Toshiba-TMPM330 Step 7: Click on 'Browse'. Step 8: Goto 'Local Disk (C:). Page | 25...
- Page 26 User Manual: Toshiba-TMPM330 Step 9: In 'Local Disk (C:) search for 'Program Files'. Step 10: In 'Program files' Check for GNU Tools ARM Embedded' , select 'bin' folder in '4.7 2012q4' click on OK as shown in the following image.
- Page 27 User Manual: Toshiba-TMPM330 Step 11: Click on OK. Step 12: Next click on the ‘Rebuild ’, ensure 'BUILD SUCCESSFUL' as shown in the below image. Page | 27...
- Page 28 User Manual: Toshiba-TMPM330 Step 13: Next click on 'Download Code To Flash', ensure Flash successful as shown in the below image. Once the flashing is completed, reset the board to verify the blinky code. • Blinky code is tested as shown in image below.
-
Page 29: Chapter 5: Schematic & Board Layout
User Manual: Toshiba-TMPM330 Chapter 5: Schematic & Board Layout. 5.1: Schematic & Board Layout. Click on link given below for the details of schematic and board layout. SchematicLink ( Click on resources to download the schematic). Chapter 6: Change History 6.1: Change History:... - Page 30 User Manual: Toshiba-TMPM330 About this document: Revision History author: Vivek Aggarwal Company Terms & Conditions Legal NGX Technologies Pvt. Ltd. provides the enclosed product(s) under the following conditions: This evaluation board/kit is intended for ENGINEERING DEVELOPMENT, DEMONSTRATION, and EDUCATION OR EVALUATION PURPOSES ONLY and is not considered by NGX Technologies Pvt.
- Page 31 User Manual: Toshiba-TMPM330 Technologies reserves the right to make changes to information published in this document, at any time and without notice, including without limitation specifications and product descriptions. This document replaces and supersedes all information supplied prior to the publication hereof.
Need help?
Do you have a question about the TMPM330 and is the answer not in the manual?
Questions and answers