Yeastar Technology TG100 User Manual
Gsm/3g
Hide thumbs
Also See for TG100:
- Installation manual (14 pages) ,
- User manual (62 pages) ,
- Installation manual (16 pages)

Related Manuals for Yeastar Technology TG100


Summary of Contents for Yeastar Technology TG100
- Page 1 TG100 VoIP GSM/3G Gateway User Guide Sales Tel: +86-592-5503309 E-mail: sales@yeastar.com Support Tel: +86-592-5503301 E-mail: support@yeastar.com Web: http://www.yeastar.com Version: 51.18.0.50 Revised: December 30, 2019...
- Page 2 TG100 User Guide Copyright Copyright 2006-2019 Yeastar Information Technology Co., Ltd. All rights reserved. No parts of this publication may be reproduced or transmitted in any form or by any means, electronic or mechanical, photocopying, recording, or otherwise, for any purpose, without the express written permission of Yeastar Information Technology Co., Ltd.
-
Page 3: Table Of Contents
TG100 User Guide Table of Contents About This Guide...................... 7 TG100 Gateway Overview..................8 Hardware Installation....................9 Package Contents........................9 Safety Disclaimers and Installation Warnings................. 9 Insert/Remove SIM Card......................10 Connect Antenna........................10 Connect Ethernet Line.......................10 Connect Power Supply......................11 Getting Started......................11 Log in Web Interface........................11... - Page 4 TG100 User Guide Block Incoming Numbers......................29 Block Outgoing Numbers......................30 Block both Incoming and Outgoing Numbers............... 30 Callback............................31 Set up Callback for Specific Numbers....................31 Set up Callback for All Numbers......................31 Add Callback Rules..........................32 AutoCLIP Route..........................33 Set up AutoCLIP Route........................33 Delete AutoCLIP Records........................33 Manage Messages....................
- Page 5 TG100 User Guide Upload Custom Prompts......................46 Set up System Email......................... 46 Update System Firmware......................47 Update Firmware through HTTP Server..................47 Upgrade Firmware through TFTP Server..................48 Backup and Restore........................49 Create a Backup File.......................... 49 Upload Backup Files........................... 50 Restore System Configurations......................50...
- Page 6 TG100 User Guide System Status......................69 Check Trunk Status........................69 Mobile Trunk Status..........................69 VoIP Trunk (Account) Status......................70 VoIP Trunk (Service Provider) Status....................70 Check Network Status.......................70 Check System Info........................70 Reports........................71 Call Logs............................71 View Call Logs............................. 71 Search Call Logs..........................72 Download Searched Results......................
-
Page 7: About This Guide
This guide will help you learn how to operate and manage your TG gateway. In this guide, We begin we describe every detail on the functionality and configuration of the TG100. by assuming that you are interested in TG gateway and familiar with networking and other IT disciplines. -
Page 8: Tg100 Gateway Overview
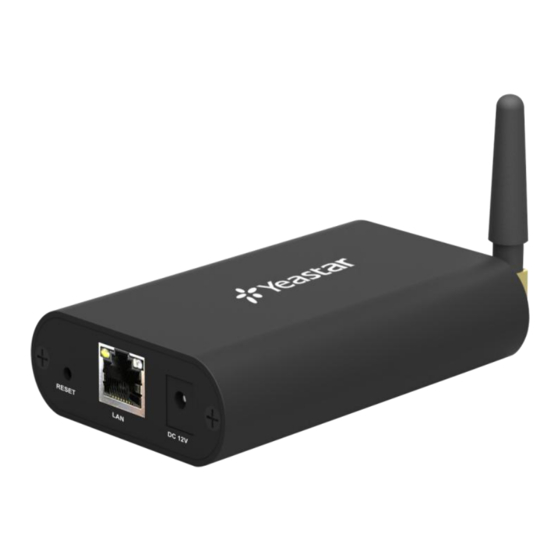
TG100 User Guide TG100 Gateway Overview Front Panel ③ ② ① Feature Description Reset Button Press and hold for 10 seconds to restore the factory defaults. ① LAN port 10/100 adaptive RJ45 Ethernet port. ② Power Inlet Connect the power supply to the port. -
Page 9: Hardware Installation
Make sure that the supply voltage matches the specifications indicated on the front panel of the device. To avoid the electric accident, do not open or remove the cover of TG100 when it is working as well as off the power. -
Page 10: Insert/Remove Sim Card
Before cleaning the TG100, cut off the power supply. Environment Install the Yeastar TG100 in a location that is clean, free from vibration, electric shock, and temperature/humidity extremes. The operating temperature should be kept below 104°F (40°C). Insert/Remove SIM Card Before powering on TG100, open the box and insert the SIM card on the back panel directly. -
Page 11: Connect Power Supply
TG100 User Guide Connect Power Supply TG100 utilizes the high-performance switch power, which supplies enough voltage and electrical energy. AC Input: 100~240V DC Output: 12V, 1A You can follow steps below to connect power supply. Procedure Connect one end of the power adapter to the power inlet on the front panel, and plug the other end to the standard electrical wall socket. -
Page 12: Web Configuration Panel
TG100 User Guide Web Configuration Panel There are 4 main sections on the Web Configuration Panel for you to check the TG100’s status and configure it. Status: Check Trunk Status, Network Status, System Info, Call Logs and System Logs. -
Page 13: Configure Mobile Module Profile
TG100 User Guide Configure Mobile Module Profile You can set a name to the mobile module to help you identify your module on TG100. After inserting a SIM card to a mobile module, you can set the module’s mobile number as the SIM card number to help you remember the SIM card number. -
Page 14: Display Caller's Mobile Number
TG100 User Guide Procedure Gateway > Mobile List > Mobile List Navigate to , select the module, and click the Enable : You can make outbound calls through the mobile module. : You can not make outbound calls through the mobile module. -
Page 15: Configure Call Progress Tone
TG100 User Guide Procedure Navigate to Gateway > Mobile List > Mobile List, click On the General section, change the RxGain and TxGain. RxGain: The received volume of the module. TxGain: The transmitting volume of the module. Click Save and Apply Changes. -
Page 16: Configure The Call Duration Of Mobile Trunk
TG100 User Guide Procedure Navigate to Gateway > Mobile List > Mobile List, and click On the General section, select Yes or No from the drop-down list of Call Progress Tone. Configure the Call Duration of Mobile Trunk You can limit call duration for each call of the mobile trunk or make a monthly talk plan for the mobile trunk. -
Page 17: Set Talk Time Alarm Of Mobile Trunk
TG100 User Guide a. Set Enable Clear Stat to Yes. b. Set Clear Period to Day, Week or Month. Set the Clear Period Time. Click Save and Apply Changes. Set Talk Time Alarm of Mobile Trunk You can set alarm of talk time for the mobile trunk to remind you that the monthly talk time of the mobile trunk is running out. -
Page 18: Configure Advanced Settings
IMSI unchangeable. The SMS center of this SIM card, TG100 will generate this by default. You can also input the number here for the carrier if it’s not the default one. Center The carrier is connected by default. You can also choose manual mode if Carrier this SIM card is supported by several carriers. -
Page 19: Connect Tg Gateway To Your Pbx (Account Mode)
IP phone side. Send check alive packets to IP phones, when it’s disabled, Qualify TG100 will ignore the reachability and the status of this account will be out of monitoring. This will be the transport method used by the account trunk. -
Page 20: Set Up A Mobile To Ip Route (Account Mode)
TG100 User Guide DTMF Mode RFC2833, Info, Inband, Auto. If this option is enabled, only the allowed IP addresses can Enable IP register the account number. In this way, VoIP security can be Restriction enhanced. g. Click Save and Apply Changes. - Page 21 TG100 User Guide (Optional) Set the Hotline number. If you set hotline to a PBX extension number, the incoming call will be routed to the extension directly. If you set the hotline to the DID number of PBX’s inbound route, the call will be routed to the destination of the inbound route.
-
Page 22: Set Up An Ip To Mobile Route (Account Mode)
Connect TG Gateway to Your PBX (Register Trunk Mode) Procedure Create one VoIP extension on your PBX. Create a register trunk on TG gateway. a. Log in TG100 web interface, navigate to Gateway > VoIP Settings > VoIP 22/75... - Page 23 TG100 User Guide Trunk, click Add VoIP Trunk. b. Set Trunk Type to Trunk. c. Choose a protocol from the Type field. The protocol should be the same as the PBX extension’s protocol. d. Set a Provider Name. e. Enter the PBX’s IP address or domain in Hostname/IP or Domain field.
-
Page 24: Set Up A Mobile To Ip Route (Register Trunk Mode)
TG100 User Guide Check the trunk status on TG gateway, go to Status> System Status >Trunk Status. If the trunk status shows , then the TG gateway and your PBX are connected. Set up a Mobile to IP Route (Register Trunk Mode) Procedure Navigate to Gateway >... -
Page 25: Set Up An Ip To Mobile Route (Register Trunk Mode)
TG100 User Guide Click Save and Apply Changes. When a call reaches the selected GSM/3G trunk, the call will be routed to the desired destination. Set up an IP to Mobile Route (Register Trunk Mode) Procedure Navigate to Gateway > Routes Settings > IP to Mobile. -
Page 26: Connect Tg Gateway To Your Pbx (Peer Trunk)
TG100 User Guide Click Save and Apply Changes. When a PBX user makes a call through the selected GSM/3G trunk, he/she will hear a dial tone. The PBX user needs to dial the destination number after hearing the dial tone. -
Page 27: Connect Tg Gateway To Your Pbx (Peer Trunk Mode)
Create one peer trunk on your PBX. Create a peer trunk on TG gateway. a. Log in TG100 web interface, navigate to Gateway > VoIP Settings > VoIP Trunk, click Add VoIP Trunk. b. Set Trunk Type to Service Provider. -
Page 28: Set Up A Mobile To Ip Route (Peer Trunk Mode)
TG100 User Guide If the status of the two peer trunks both indicates connected, then the TG gateway and your PBX are connected. Set up a Mobile to IP Route (Peer Trunk Mode) Procedure 1. Navigate to Gateway > Routes Settings > Mobile to IP. -
Page 29: Set Up An Ip To Mobile Route (Peer Trunk Mode)
TG100 User Guide desired destination. Set up an IP to Mobile Route (Peer Trunk Mode) Procedure Navigate to Gateway > Routes Settings > IP to Mobile. Click Add IP to Mobile Route. Enter a name in the Route Name field. -
Page 30: Block Outgoing Numbers
TG100 User Guide Click Save and Apply Changes. When the number 15880270666 reaches the TG gateway, the call will fail. Block Outgoing Numbers You can limit users to call specific numbers through GSM/3G trunk on TG gateway. When users try to call the blocked numbers, the call will fail. -
Page 31: Callback
TG100 User Guide call will fail.When the number 15880270666 reaches the TG gateway, the call will also fail. Callback Callback feature allows callers to hang up and get called back to TG gateway. Callback feature can reduce the cost for users who work out of the office using their own mobile phones. -
Page 32: Add Callback Rules
TG100 User Guide and disconnects the call, the system will call back the user. Procedure Navigate to Gateway > Routes Settings > Callback Settings. Select the checkbox of Allow All Numbers. Click Save and Apply Changes. Enable Callback on Mobile to IP route or IP to Mobile route. -
Page 33: Autoclip Route
TG100 User Guide Click Save and Apply Changes. AutoCLIP Route Yeastar TG gateway can automatically record failed outgoing calls to AutoCLIP route table. When the called person calls back, TG gateway will route the call directly to the original caller's extension. -
Page 34: Manage Messages
TG100 User Guide Manage Messages Send SMS Messages Manage SMS Contacts Manage Sent SMS Messages Manage Received SMS Messages SMS to Email Email to SMS Schedule SMS Clear Tasks Send USSD Messages ... -
Page 35: Manage Sms Contacts
TG100 User Guide Manage SMS Contacts Add an SMS Contact A contact list allows you to target and text contacts with common interests. Once you have all your contacts created on TG gateway, you can send SMS messages to a single contact or a group or all contacts by quick selection rather than typing in the numbers manually each time. -
Page 36: Search Sent Sms Messages
TG100 User Guide Search Sent SMS Messages You can search SMS messages by the following criteria. Date Duration: Choose the Start Date and End Date to filter the call logs. Port: The GSM/3G port to send SMS messages. ... -
Page 37: Manage Received Sms Messages
TG100 User Guide Click Yes to delete the searched records. Manage Received SMS Messages View Received SMS Messages Procedure Navigate to SMS > SMS > Inbox. Choose the desired record, click to view the detailed messages. Reply SMS Messages Procedure Navigate to SMS >... -
Page 38: Search Received Sms Messages
TG100 User Guide Search Received SMS Messages You can search SMS messages by the following criteria. Date Duration: Choose the Start Date and End Date to filter the call logs. Port: Users send SMS messages to which GSM/3G/4G port. -
Page 39: Delete Searched Results
TG100 User Guide Delete Searched Results You can search the desired SMS messages, and delete them. Procedure Navigate to SMS > SMS > Inbox. Click Delete All messages to delete the searched SMS messages. A popup window appears. Click Yes to delete the searched records. -
Page 40: Send Sms To Email
TG100 User Guide Select the GSM/3G trunk, click to edit it. Enter an email address, click Add Email. The system will deliver the SMS messages to the added email address. Click Save and Apply Changes. Send SMS to Email Procedure Create an SMS message on your mobile phone, send the message to the number of SIM card which is installed on TG gateway. -
Page 41: Configure Email To Sms Settings
TG100 User Guide a. Click Test SMTP Settings. The following window appears. b. Enter an email address to receive the test email. c. Click Test SMTP Settings. The web page will prompt “Tested successfully” if the email settings are correct. -
Page 42: Schedule Sms Clear Tasks
TG100 User Guide Format of the Email Subject port:[port]: Optional setting. If no port is specified, the TG gateway will send the SMS by the first available GSM/3G port. Example: port:3; num:[number]: Required setting. Enter the destination number. ... -
Page 43: Send Ussd Messages
TG100 User Guide Click Save and Apply Changes. Send USSD Messages Unstructured Supplementary Service Data (USSD) is sometimes referred to "Quick Codes" or "Feature codes". You can send USSD messages to subscribe services from the GSM/3G carriers. Send a USSD Message You can select the GSM/3G port, and send USSD messages to the GSM/3G carrier. -
Page 44: Change Password Of Sms Center
TG100 User Guide Select the checkbox of Enable API. Set the User Name. The 3 party software will use the user name to connect to TG gateway. Set the Password. The 3 party software will use the password to connect to TG gateway. -
Page 45: Configure System Settings
TG100 User Guide Configure System Settings Change Web Login Password Change Date and Time Upload Custom Prompts Set up System Email Update System Firmware Backup and Restore Reboot the System Reset the System ... -
Page 46: Upload Custom Prompts
TG100 User Guide 7. Click Reboot Now to reboot the TG gateway. Upload Custom Prompts The default voice prompts and announcements in the system are suitable for almost every situation. However, you may want to use your own voice prompt to make it more meaningful and suitable for your case. -
Page 47: Update System Firmware
TG100 User Guide Procedure Navigate to System > System Preferences > Email Settings. Enter a valid email address in the Email Address field. Enter the email password in the Password field. Enter the SMTP Server and SMTP Port of the email. -
Page 48: Upgrade Firmware Through Tftp Server
TG100 User Guide Click Start to start downloading the file from the HTTP server. After downloading the desired firmware file, the system will reboot automatically to take effect. Upgrade Firmware through TFTP Server Procedure Set up TFTP server. Below is an example of Tftpd32. -
Page 49: Backup And Restore
After downloading the desired firmware file, the system will reboot automatically to take effect. Backup and Restore Before resetting TG100 to factory defaults, you can backup up the configurations and restore it using this package. Note: Only configurations and custom prompts can be backed up. -
Page 50: Upload Backup Files
TG100 User Guide Upload Backup Files You can upload a backup file from your local PC, and restore the configurations of the backup file. Prerequisite The backup file must be a .tar file, and the file size must be smaller than 1.8 MB. -
Page 51: Reboot The System
TG100 User Guide Reboot the System You can reboot the system on Web interface. Procedure Navigate to System > System Preferences > Reset and Reboot. Click Reboot. The system starts to reboot immediately. Reset the System A factory reset will erase all configuration data on the system. -
Page 52: Configure System Network
2. Configure LAN settings. Option Description If this option is set to yes,TG100 will act as DHCP client to get an available IP address from your local network. DHCP Note: We recommend you to disable DHCP as you need a static IP address to establish steady connection with TG100. -
Page 53: Set Up Vlan For The Tg Gateway
running the same applications. Note: Yeastar TG100 acts as a VLAN client, you need to set up a 3-layer switch in your local network. Please configure the VLAN information first, then input the details in TG100, so that the packages via TG100 can be added the VLAN label before sending to that switch. -
Page 54: Set Up Openvpn Network
kage from the OpenVPN provider. The configuration file should be a compressed tar file. TG100 works as VPN client mode only. 3. Click Import. Set up DDNS for the TG Gateway You can set up DDNS for the TG gateway so that users can access the TG gateway by domain name instead of IP address. -
Page 55: Static Route
(distances) associated with those routes. The default gateway priority of TG100 from high to low is VPN/VLAN→LAN port. Set up Static Routes Procedure 1. Navigate to System > Network Preferences > Static Route. 2. Configure the static route. Destination: Enter the destination IP address or host that you want to assign ... -
Page 56: Configure Voip Settings
TG100 User Guide Interface: Select the network interface. The TG gateway will reach the destination address using the static route through the selected network interface. 3. Click Add, you can see the new created static route on the Routing Table. -
Page 57: Configure Sip Settings
Port used for SIP registrations, the default is 5060. TLS Port Port used for SIP registrations, the default is 5061. Whether to verify server’s certificate when TG100 works as a TLS Verify Server TLS client. By default, it is set to “No”. -
Page 58: Configure Nat Settings
TG100 User Guide Default The default duration (in seconds) of incoming/outgoing Incoming/Outgoing registration. The default value is 120. Registration Time The number of SIP REGISTER messages to send to a SIP Register Attempts Registrar before giving up. The default value is 0, which means no limit. -
Page 59: Configure Sip Codec Settings
IP address is used with this system. Please contact your ISP for more information. If External Host is configured, you can specify how often should TG100 perform a DNS query on this host. The value External Refresh Interval is specified in seconds. -
Page 60: Configure Qos Settings
TG100 User Guide Configure QoS Settings QoS (Quality of Service) is a major issue in VoIP implementations. You can configure QoS settings to guarantee that packet traffic for voice or other media connection will not be delayed or dropped due to interference from other traffic with lower priority. -
Page 61: Configure Sip Advanced Settings
Note: For security reasons, we recommend you to enable this option. No: TG100 will respond a “404 NOT FOUND” SIP packet when OPTIONS receiving an OPTION SIP packet. Response 200 Yes: TG100 will respond a “200 OK” SIP packet when receiving an OPTION SIP packet. 61/75... -
Page 62: Configure Iax Settings
Configure IAX Settings IAX is the Internal Asterisk Exchange protocol, you can connect to TG100 or register IAX trunk to another IAX server. It’s supported by the asterisk-based IPPBX. It is wise to keep the default settings provided on the system. However, for a few settings, you need to change them to suit your situation. -
Page 63: Configure General Preferences
TG100 User Guide Configure General Preferences Navigate to Gateway > VoIP Settings > General Preferences, configure global settings for the TG gateway. Check the description of general preferences settings below. Option Description The global timeout value for extensions. By default, the value Ring Timeout is 30. -
Page 64: Secure Your Gateway
TG100 User Guide Secure Your Gateway Security Center Configure Alert Settings Upload Certificate Files Configure Firewall Rules Security Center You can check TG gateway security configurations in “Security Center” page. You can also enter the relevant security settings page rapidly. -
Page 65: Configure Ip Attack Alert Settings
TG100 User Guide Configure IP Attack Alert Settings When the TG gateway is attacked by an IP address, the system will add the IP to IP Blacklist and send email notification or call notification to the desired users. Procedure 1. Navigate to System > Security Center > Alert Settings, choose IPATTACK and click 2. -
Page 66: Upload Certificate Files
TG100 User Guide Upload Certificate Files You can create TLS VoIP trunks and accounts on TG gateway. To make the TLS trunks or accounts work, you need to upload certificates to TG gateway. If you have enabled TLS Verify Client (Gateway > VoIP Settings > SIP Settings), you need to upload the TLS certificates on TG gateway. -
Page 67: Enable Firewall Function
TG100 User Guide 6. Enter the IP address and subnet mask in the IP field. For example, enter 192.168.5.0/255.255.255.0. 7. (Optional) Enter the MAC address of the target device. The format of the MAC address XX:XX:XX:XX:XX:XX. means 0-9 or A-F in hex, the A-F are not case sensitive. -
Page 68: Block All Packets And Connections
TG100 User Guide Disable Ping. 2. Click Save and Apply Changes. Block All Packets and Connections You can add Accept firewall rules for the trusted IP addresses or devices, and block all the other packets and connections. Important: You must create Accept firewall rules for the HTTP port and SSH port before you block all packets and connections, or you will fail to access the TG gateway. -
Page 69: Delete Blocked Ip Address
TG100 User Guide Delete Blocked IP Address You can delete the blocked IP address if the system blocks your trusted IP address. Procedure 1. Navigate to System > Security Center > IP Blacklist. 2. Choose the desired IP address from IP Blacklist list, click... -
Page 70: Voip Trunk (Account) Status
TG100 User Guide VoIP Trunk (Account) Status Status Description Unregistered Trunk registration failed. Registered Successful registration, trunk is ready for use. Request Sent Registering. Waiting Waiting for authentication. VoIP Trunk (Service Provider) Status Status Description Successful registration, trunk is ready for use. -
Page 71: Reports
TG100 User Guide Reports Call Logs System Logs You can check the detailed call logs and system logs, which is used to debug. Call Logs You can perform the following operations on the Call Logs page. View call logs Search call logs ... -
Page 72: Search Call Logs
TG100 User Guide Search Call Logs You can search call logs by the following criteria. Date Duration: Choose the Start Date and End Date to filter the call logs. Caller/Callee: Enter the caller/callee’s number to filter the call logs. -
Page 73: System Logs
TG100 User Guide Procedure Click Delete the records to delete the searched call logs. A popup window appears. Click OK to delete the searched call logs. System Logs You can set the system to automatically trace hardware logs, normal logs, debug logs, and web logs. -
Page 74: Trace Debug Logs
TG100 User Guide The system will start to trace the normal logs. You can check the normal log file on System Logs page. Trace Debug Logs The system support to store up to 2 debug log files. The maximum size of each log file is 10Mb. -
Page 75: Delete System Logs
TG100 User Guide Delete System Logs Procedure Navigate to Status > Reports > System Logs. Choose the desired system log file, click Capture Ethernet Packet Yeastar TG gateway provides an integrated tool to help you capture Ethernet packet on web interface. You can debug the system efficiently with this tool.
Need help?
Do you have a question about the TG100 and is the answer not in the manual?
Questions and answers