Table of Contents
Advertisement
Advertisement
Table of Contents

Related Manuals for PowerVision PowerDolphin


Summary of Contents for PowerVision PowerDolphin
- Page 1 PowerDolphin PowerDolphin User Manual V1.0 PowerVision...
-
Page 2: Table Of Contents
Download the Vision+ 2 App ......................1 .......................2 Introduction to the Product Item List ..............................2 Get to Know PowerDolphin ......................3 Get to Know the Remote Controller ..................12 Get to Know PowerSeeker ......................16 Get to Know the Bait Container ....................20 Get to Know the App ........................22 ................................32... -
Page 3: Foreword
Foreword Welcome PowerVision Tech Inc. would like to thank you for selecting and using the PowerDolphin product, which will bring you a brand-new user experience. Symbols Warning Tips Supporting Documents Read the following documents carefully before use: PowerDolphin Quick Start Guide... -
Page 4: Introduction To The Product
Introduction to the Product Item List Wizard PowerDolphin Intelligent Battery AC Adapter Blades x2 couples AC Cable Storage Bag Fishing Bait container, Remote Controller Link of Fishing Bait container Micro USB Cable PowerSeeker PowerSeeker Charging Cable Explorer PowerDolphin Intelligent Battery... -
Page 5: Get To Know Powerdolphin
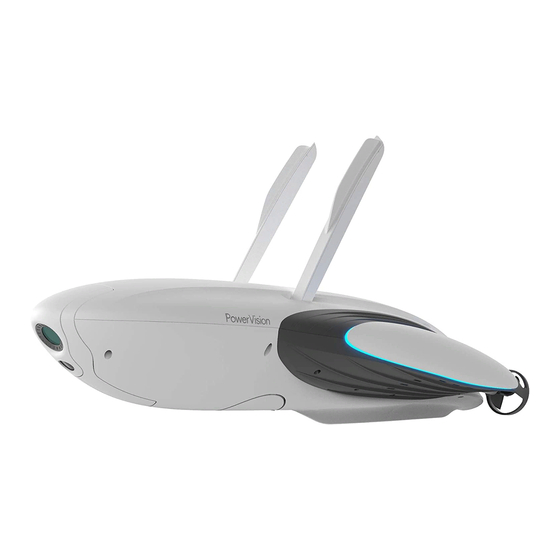
PowerDolphin is a water-surface vehicle that can sail autonomously. Equipped with a robotic camera arm the PowerDolphin can shoot 4k video and take 12 MP photos above and below the water surface. In addition, you can attach the PowerSeeker sonar to the bottom of the PowerDolphin, to locate fish, check water temps, and render terrains. - Page 6 Fish finder port • Lights Taillight Headlight 1.Headlight PowerDolphin has a 220LM LED headlight. You can turn it on or off via the LED button in the App. 2.Taillight PowerDolphin provides taillights that indicate the device status. Device Status Taillight Status...
- Page 7 PowerDolphin is equipped with a smart battery containing a superior cell and an advanced battery management system to ensure safe and reliable power supply for sailings. 1. Components Charging port Battery level button Discharging port Battery level LED light Battery-sealing ring Battery grip 2.
- Page 8 2.The battery level LED light blinks when the battery is being charged, and stops blinking when the battery is fully charged. 1. Please use the PowerDolphin charger provided by PowerVision. 2. The battery temperature can be high after sailing. Please wait until the battery cools down to room temperature before charging it.
- Page 9 • Camera 1. Overview The camera of PowerDolphin has a 132° ultra-wide-angle lens, which can take 12 MP photos and shoot 4K videos with 30 frames per second. Working with the Vision+ 2 App, it supports parameter adjusting, image preview, export, etc.
- Page 10 App. You can replace the microSD card in PowerDolphin. If you need to replace it, please use a microSD card of Class 10, UHS-1, or higher specifications, to ensure that you can shoot HD videos normally.
- Page 11 After removing and using the microSD card, remember to secure the rubber plug into place before the next sailing. • Payload System PowerDolphin has a payload system at its tail, which can tie things with a rope and release them in the specified location. Device connected m m/s 1.
- Page 12 2. To exit Cruise mode: Move the throttle stick again to regain speed control. Please enter Cruise mode in open, obstacle-free waters to prevent PowerDolphin from hitting obstacles or banks. • Auto Return PowerDolphin features three auto return functions: smart return, low-battery return, and return upon disconnection.
- Page 13 • Self-righting PowerDolphin features a self-righting function. If PowerDolphin is knocked over during sailing (and before that the device has been unlocked), the master control unit of Power- Dolphin will execute the self-righting procedure based on the position of the device. In this state, the device will not be locked automatically.
-
Page 14: Get To Know The Remote Controller
Get to Know the Remote Controller • Overview You can use the remote controller to operate your PowerDolphin wirelessly, and display real-time low latency high resolution image’s back to your mobile device through the Vision+ 2 App. In addition, the collapsible mobile device stand folds right into the remote and can hold most size iOS and android mobile phone. - Page 15 • Charging In order to charge the remote controller, use the provided micro USB cable to connect the USB port of the adapter to the micro USB port on the remote controller. The indicator light blinks when the battery is charging. The green light will stay on when the battery is fully charged.
- Page 16 5. Use a USB cable to connect the image transmission USB port at the top of the remote controller to the micro USB/Type-C/lightning port of your phone; or connect your phone to the Wi-Fi hotspot whose SSID is PDO_RC_xxx (password: 12345678). ②...
- Page 17 PowerDolphin before use. The pairing steps are as follows: 1. Connect your phone to the remote controller via Wi-Fi or a USB cable. 2. Open the Vision+ 2 App, access the product screen of PowerDolphin, and go to Settings > Remote controller settings > Remote controller pairing.
-
Page 18: Get To Know Powerseeker
App on your phone for you to view. In addition, it is compatible with Power- Ray, PowerDolphin, and other PowerVision products. When mounted on PowerDolphin, it can enable functions such as mobile fish finding and topography mapping. It is designed to provide fishing lovers with an efficient, enjoyable, and smart fishing experience. - Page 19 Charging: red light Full: green light • Installation 1. Remove the cover of PowerSeeker. 2. Screw out the upper shell, and then screw PowerSeeker into PowerDolphin. • Power On/Off and Connection...
- Page 20 If you replace PowerSeeker or add a new one, you need to pair the new PowerSeeker with PowerDolphin before use. The pairing steps are as follows: 1. Connect it to PowerDolphin via the remote controller mode or mobile device direct con- nection mode.
- Page 21 3. Scan or enter the PSN of PowerSeeker following the instructions in the App to pair it with PowerDolphin. • Separate Use Apart from use with PowerDolphin, PowerSeeker can be used separately. 1. Fasten PowerSeeker to a fishing line tightly. 2. Throw PowerSeeker into the target waters.
-
Page 22: Get To Know The Bait Container
Get to Know the Bait Container • Overview PowerDolphin can tow a 350mL bait container at its tail, and can enable long-distance bait drop and site-specific bait drop to provide fishing lovers with a smart fishing experience. Fitting button of the bait container connecting stick... - Page 23 Insert one end of the bait container connecting stick into the long slot at the bottom of PowerDolphin and the other end into the semicircular hole in the front of the bait contain- er, as shown in the figure. When the connecting stick is secured into place, the fitting pin at the bottom of PowerDolphin and the fitting button on the bait container will tighten the connecting stick automatically.
-
Page 24: Get To Know The App
• Un-installation Lift the fitting pin and pull the connecting link out of the bottom of PowerDolphin. Press and hold the fitting button on the bait container and pull the connecting link out of the bait container. PULL PUSH Get to Know the App •... - Page 25 3. Connection signal strength : When the connection to PowerDolphin is established through mobile device direct connection, it indicates the strength of the connection signal between your mobile device and PowerDolphin.
- Page 26 8. Switch between photo/video : Touch the button to switch between the photo mode and the video mode. 9. Photo/Video button : Touch the button to start/stop shooting a video. : Touch the button to take a photo. 10. Photo parameters : Touch the button to configure camera parameters.
- Page 27 15. Lock/Unlock button : By default, the device is locked when the connection is established. If you touch it, the following pop-up box will be displayed. You can swipe left to cancel and swipe right to unlock. 16. Unhook/Bait : Touch the button to execute the unhook/bait operation. 17.
- Page 28 On the left is the thumbnail of the map screen, and on the right is the thumbnail of the PowerSeeker screen. You can touch either to access the corresponding screen. : is the button for hiding the thumbnail. If you touch it, the thumbnail of the map or PowerSeeker will be hidden.
- Page 29 1. Topography mapping switch When PowerSeeker is connected, it is used to enable/disable topography mapping. When it is enabled, a bathymetric map will be drawn on the map screen. : disabled. : enabled. 2. Switch for locking the map orientation : The map orientation is locked and the map screen won't rotate.
- Page 30 8. Topography depth color adjustment : Adjust the colors of the bathymetric map. • PowerSeeker Screens Device connected 50 % Temperature Depth Distance Distance Speed Speed 500 3 1. Temperature Temperature Temperature : Indicates the current water temperature. 2. Depth Depth : Indicates the current depth.
- Page 31 : Sonar echoes are used with the underwater topography profile detected by PowerSeeker. • Smart Mode 1. Route planning : Route planning refers to the function that PowerDolphin sails along the route consisting of the waypoints you select on the map. 1. Tap enter waypoint mapping.
- Page 32 This is to prevent PowerDolphin from hitting obstacles or banks. 2. Area path scan : Area path scan refers to the function that PowerDolphin plans a route auto- matically based on the enclosed area you draw on the map, scans its topog- raphy, and draws a bathymetric map.
- Page 33 .txt format on the mobile phone. User can export the data file. Because PowerDolphin cannot avoid obstacles, you need to ensure that the enclosed area is: (1) in the waters; (2) far away from banks; (3) obstacle-free. This is to prevent PowerDolphin from hitting obstacles or banks.
-
Page 34: Use
Connect the Device There are two modes to connect to the device based on the device version: mobile device direct connection mode and remote controller mode. • Mobile device Direct Connection Mode Mobile device direct connection mode refers to connecting your mobile device to the device directly. - Page 35 3. Run the Vision+ 2 App, and the App will display "device connected" when the connec- tion is established successfully. Make sure that no other device is connected to the Wi-Fi hotspot of PowerDol- phin when connecting the remote controller to PowerDolphin.
-
Page 36: Device Activation
Device Activation You need to activate a new PowerDolphin in the Vision+ 2 App by the following steps: 1. Connect the device. 2. Log in to the Vision+ 2 App. 3. Activate your device by following the instructions in the App. -
Page 37: Maintenance
Maintenance Firmware Upgrade You can use the Vision+ 2 App to upgrade the firmware of PowerDolphin and the remote controller. The firmware of PowerDolphin and the remote controller needs to be upgraded separately, and the remote controller has three firmware modules which should be upgraded one by one. -
Page 38: Cleaning And Storage
About version1.6.9 App version version1.1.0 Device version Download Remote version Main control module version1.1.1 Wi-Fi module version1.1.1 バージョン1.1.1 映像伝送モジュール version1.1.1 Image transmission module • Firmware Upgrade Connect the device and access the "About" screen. After the firmware is downloaded, an upgrade reminder will be displayed on the right of the corresponding firmware name. -
Page 39: Replacing Blades
Charge and discharge the device every two months to maintain the battery stability if you do not use the device for a long time. Replacing Blades If the blades are worn, broken, or have other abnormalities, you need to replace them. You can replace a blade by the following steps: 1. - Page 40 Beijing Repair Center Building 33, Yungu Park, No.79, Shuangying West Road, Science and Technology Park, Changping District, Beijing TEL: +86-10-89720094 After-sales service hotline: +86-400-8701-088 support.china@powervision.me North America Repair Center 1875 S Grant St #520, San Mateo, CA 94402 TEL: 1(855) 562-6699 support.us@powervision.me...
-
Page 41: Technical Speci Cations
Technical speci cations Category Item Parameter Weight ~5 lb Dimension 21 x 9 x 5 in Waterproof Rating IPX8 (6.6 ft, 0.5 hr) Operating Temperature Range 32℉-104℉ Max Speed 10mph (~8 kn)(Still water) Max Brightness of Headlight 220LM, 6500K Vehicle 2.5 hrs (still water, speed in U mode) Max Sailing Time 20 mins (still water, speed in C or N mode) - Page 42 Item Category Parameter 2.4G: FCC/IC: ≤30 dBm CE/SRRC/MIC: ≤20 dBm Transmitte Power (EIRP) FCC/IC/CE/SRRC/MIC: ≤12 dBm FCC/IC: Remote is 11 ft above the water: 0.5 mi Remote is 5 ft above the water: 0.3 mi Max Transmission Distance CE/SRRC/MIC: (unobstructed, free of Remote is 11 ft above the water: 0.3 mi interference) Remote is 5 ft above the water: 0.2 mi...
Need help?
Do you have a question about the PowerDolphin and is the answer not in the manual?
Questions and answers