Arjo Sara Flex Instructions For Use Manual
Hide thumbs
Also See for Sara Flex:
- Instructions for use manual (96 pages) ,
- Instructions for use manual (84 pages) ,
- Instructions for use manual (45 pages)
Table of Contents
Advertisement
Advertisement
Table of Contents

Subscribe to Our Youtube Channel
Related Manuals for Arjo Sara Flex


Summary of Contents for Arjo Sara Flex
- Page 1 INSTRUCTIONS FOR USE Sara Flex 04.KL.00.EN_5 · 05/2020...
- Page 2 Mandatory to read the Instructions for Use. Design Policy and Copyright ® and ™ are trademarks belonging to the Arjo group of companies. © Arjo 2020. As our policy is one of continuous improvement, we reserve the right to modify designs without prior notice.
-
Page 3: Table Of Contents
Leg Strap attachment (optional) ..................12 Emergency Lowering ......................13 Allowed Slings with Sara Flex ....................14 Central Hook (Accessory) ....................14 Transfer from Wheelchair to Sara Flex ..................15 Prepare Sara Flex and Patient ...................15 Place Patient in Sara Flex ....................15 Raise a Patient to Standing Position ...................17 Patient Transfer ........................17... -
Page 4: Foreword
Arjo will not be held responsible for any accidents, incidents or lack of performance NOTE that occur as a result of any unauthorized Means: This is important information for the correct use of this system or equipment. -
Page 5: Intended Use
If the patient does not meet these criteria an alternative equipment/system shall be used. Sara Flex is a mobile standing and raising aid, with a Safe Working Load of 200kg (440 lb), intended to assist caregivers in hospitals, long-term care,... -
Page 6: Safety Instructions
To avoid injury, make sure that the applied load is lower than the safe working load for all products or accessories being used. CAUTION To avoid corrosion on the product do not leave Sara Flex and its accessories for extended periods in humid or wet areas. -
Page 7: Preparations
1. Visually check the package for damage. If the Left and right product looks damaged due to freight, contact Sara Flex has a left and right side. (See Fig. 1) the transport agency. Transfer direction Do NOT use the product. -
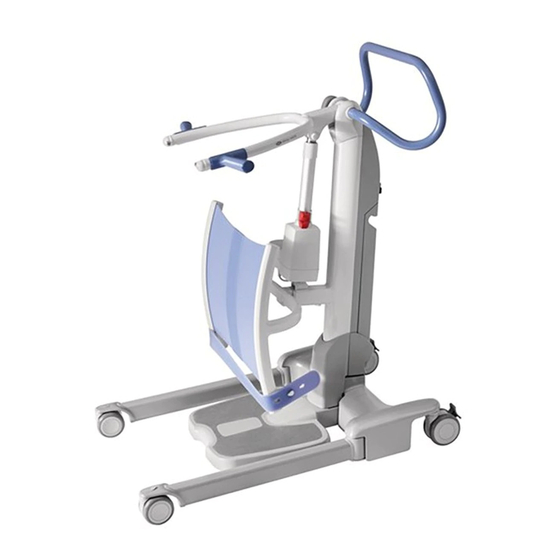
Page 8: Parts Designation
Parts Designation Maneuvering Handle Lifting Arm Patient/Resident Handle Clip Attachment Point Mast Leg Support Leg Strap Attachment Leg Strap Adjustable Footplate Chassis Leg Front Castor Central Hook (accessory) Hand Control Control Panel Emergency Emergency Lowering Handle Stop Button Motor/Actuator Power Button Battery Rear Castor... -
Page 9: Product Description / Functions
If a pressed button is released, it will stop its function immediately. Control Panel (See Fig. 3) Fig. 3 The mast-mounted control panel operates in parallel with the hand control. Sara Flex can also be controlled from the mast. Button Functions: Down Close lift legs... -
Page 10: Lcd Display
LCD Display Fig. 4 (See Fig. 4) Battery Level - see “Battery Instructions” on page 25. Usage counter Maintenance symbol Patient’s weight - see “Scale (Optional)” on page 20. At start up it takes a little time before the display looks as shown in Fig. -
Page 11: Emergency Stop Button
Press the green power button (B) to power on the equipment again. (See Fig. 6) Power Button The green power button (B) is located next to the stop button. Press the power button to switch on Sara Flex. (See Fig. 6) Fig. 7 Leg Support The leg support is made out of silicone. -
Page 12: Leg Strap Attachment (Optional)
Leg Strap attachment (optional) Fig. 9 Insert strap from the leg strap attachment. (See Fig. 9) Fig. 10 Fasten strap to the leg pad support. (See Fig. 10) Fig. 11 Repeat on the other side, if needed. (See Fig. 11) -
Page 13: Emergency Lowering
Fig. 12 In the event that the emergency lowering function needs to be activated, position the Sara Flex so that the patient can be lowered on to an appropriate surface such as a chair or bed. Stand near of the Sara Flex, on the same side as the red emergency lowering handle. -
Page 14: Allowed Slings With Sara Flex
Great care should be taken not to lower the lifting arm onto the patient or any other obstruction. If this should happen, the Sara Flex “anti-crush” system will engage, stop the motor and all downward movement will cease. If this occurs, release the “down” button immediately and press the “up”... -
Page 15: Transfer From Wheelchair To Sara Flex
Prepare Sara Flex and Patient • For sling instructions, see respective sling IFU and the sling label. • Determine if Sara Flex is the appropriate equipment to use for the patient, see “Intended Use” on page 5. • Lower the Sara Flex lifting arm to its lowest position. - Page 16 Fig. 20 5. Attach sling clips to attachment points on the Sara Flex lifting arm. (See Fig. 20) Fig. 21 6. Make sure the clips are attached securely. (See Fig. 21) Fig. 22 7. When using a transfer sling, also attach the loops on the central hook (accessory) located right under the lifting arm.
-
Page 17: Raise A Patient To Standing Position
(5 Steps) 1. Stand next to the patient and inform him/her that the Sara Flex will be raised to a standing position. 2. Check attachment points to make sure the Sara Flex is ready. -
Page 18: Transfer From Sara Flex To Toilet
. Fig. 27 6. Apply the castor brakes to keep Sara Flex in position once the patient is sitting on the toilet. (See Fig. 27) 7. Remove sling clips from Sara Flex. -
Page 19: Transfer From Sara Flex To Bed/Chair
9. Pull the Sara Flex away from the patient. 10. Remove the sling from the patient 11. Clean the Sara Flex after the transfer is complete, according to “Cleaning and Disinfection Instructions” on page 27 or according to local... -
Page 20: Scale (Optional)
Scale (Optional) WARNING To avoid injury, only use the scale to weigh hospital or care facility patients under the supervision of Nursing staff and healthcare professionals. CAUTION surface when it is powered up, to allow the scale to perform an automatic zero reset. Do not touch the lift or any of its components until the scale displays “0.0”. - Page 21 Tilt Symbol Flex to a level position so that the scale can be operated correctly (See Fig. 29). When the Sara Flex is tilted, no weight reading will be available. It is normal that the display occasionally shows a “Tilt” symbol when the lift is being moved or...
-
Page 22: Using The Scale - Weigh The Patient
Sling Weight (8 Steps) 1. Use the power button to power on the Sara Flex. 2. If the sling is already installed on the Sara Flex it has already zeroed the scale weight automatically. (See Fig. 34) Move ahead to step 5. -
Page 23: Method B - Weigh Patient With Sling
Sara Flex. Fig. 39 4. The scale will display a negative number. 5. Attach the sling back on Sara Flex. -144.0 6. Ignore the minus sign on the screen. Allow the weight reading to stabilize. The weight shown is the patient’s actual weight. -
Page 24: Changing The Units Of Measure
Changing the Units of Measure Fig. 40 (6 Steps) 1. To display the Lift Status Screen, press both dash buttons (A) at the same time. (See Fig. 40) button (B) on the hand control. (See Fig. 40) The Weight Unit screen will be displayed. Fig. -
Page 25: Battery Instructions
There is no risk of Indicator overcharging the battery. • It is recommended to remove the battery from the Sara Flex when it is not to be used for an Low battery indicator (10% charge remaining) extended period of time. - Page 26 Sara Flex or the charger. Inserting the Battery (2 Steps) Fig. 44 1. Place the battery in the battery rack. (See Fig. 44) 2. Push the top of the battery until it is in position. (See Fig. 45) Fig.
-
Page 27: Cleaning And Disinfection Instructions
Facility or the country of use. If uncertain, seek • Phenols (as per Manufacturer’s advice from the local Infection Control Specialist. Recommendation) Sara Flex should be routinely cleaned and • Quaternary Ammonium (as per Manufacturer’s disinfected between patients and at regular intervals Recommendation) while in use;... - Page 28 Cleaning (step 4-8) Fig. 47 “Detergents/Disinfectants” on page 27 on all parts of Sara Flex and on the hand control. 5. Wet a disposable towel with water and remove all traces of the detergent. For the leg support (A) and leg strap (B), use a disposable towel to remove the detergent and for the footplate (C), you may need a brush.
-
Page 29: Troubleshooting
Call Arjo for service. The control box beeps more than three times in conditions other than those mentioned above. Actuators “stalls” during operation Battery is low. -
Page 30: Care And Preventive Maintenance
Make sure all labels are attached. Visually check the hand control and cable for damage. Perform a full functionality test on Sara Flex. Check operation of the Emergency Stop/Power Button and the Emergency Lowering Handle Check battery for leakage and/or deterioration. Replace if needed. - Page 31 Caregiver Obligations Between Every Use Cleaning and disinfection • Sara Flex has to be cleaned and disinfected immediately after usage • For further disinfecting instructions, see section “Cleaning and Disinfection Instructions” on page 27. Examine the sling, strap and clips for damage or fraying as required •...
- Page 32 Make sure all labels are attached • Check if all labels are attached on the Sara Flex according to “Labels on Sara Flex” on page 37. Visually check the hand control and cable for damage • Check the hand control screen for dead pixels or any other display defects.
- Page 33 If there is any visible corrosion or damage on parts, contact your local Arjo representative for support. Personnel only Sara Flex must be serviced once a year in accordance with the Maintenance and Repair Manual. WARNING To avoid injury and/or unsafe product, the...
- Page 34 General Safe working load (SWL) Sara Flex 200 kg / 440 lb Component Weight Sara Flex complete 52 kg / 114.5 lb Battery Pack 3.8 kg / 8.4 lb Electrical Degree of protection - Electrical Shock Type BF Lift - Protection Class...
- Page 35 Safe Disposal Lead-Acid Battery Not for disposal. Environmental danger. Package Wood and corrugated cardboard, recyclable. Electric, Metal and Plastic Parts shall be separated and recycled Product according to marking on the unit. Lift systems having electrical and electronic components or an Electrical and electronic electrical cord should be disassembled and recycled per Waste of componants...
-
Page 36: Dimensions
Dimensions Measurements in mm and inches (“) 1029 (40 1/2”) 660 (26”) 27 (1 1/8”) Turning radius 23 (1”) Ø1323 (52 1/8”) 612 (24 1/8”) Ø1208 (47 1/2”) Footplate 25 (1”) -
Page 37: Labels On Sara Flex
Safe Working Load If the lift has this symbol, the scale function is installed. load of patient or any other Maximum capacity of the load that may be on Sara Flex weighing instrument IP24 Degree of protection against splashing water... - Page 38 SWL Label Scale symbol label Scale Class III data label LINAK symbol label Weighing parameters scale label Battery label (Behind battery) Data label (on the mast behind the battery)
- Page 39 STANDARDS/ DESCRIPTION CERTIFICATE EN/IEC 60601-1 Medical electrical equipment (TÜV SÜD) EN ISO 10535: 2006 Hoists for the transfer of disabled persons (TÜV SÜD) - Requirements and test methods. BS EN 45501:2015 Metrological aspects of non-automatic weighing instruments. Non-automatic weighing instruments Part1: Metrological and OIML R 76-1:2006 technical requirements.
-
Page 40: Electromagnetic Compatibility
Electromagnetic Compatibility Sara Flex has been tested for compliance with current regulatory standards regarding its capacity to block EMI (electromagnetic interference) from external sources. Nonetheless, some procedures can help reduce electromagnetic interferences: • Ensure that other devices in patient-monitoring and/or life-support areas comply to accepted emissions standards. - Page 41 100 kHz repetition 100 kHz repetition commercial or hospital IEC 61000-4-4 frequency frequency environment. If functional disturbance occurs on Sara Flex it may Power frequency be necessary to install (50/60 Hz) 30 A/m 30 A/m magnetic shielding. The 50/60 Hz...
-
Page 42: Parts And Accessories
Parts and Accessories Central Hook Disinfectant 700-27041 To order, contact local representative Leg Strap Battery AH1003006 NDA0100-20 Leg Strap Attachment Battery Charger 700-27044 NDA8200... - Page 43 AUSTRALIA FRANCE POLSKA Arjo Australia Arjo SAS Arjo Polska Sp. z o.o. Building B, Level 3 2 Avenue Alcide de Gasperi ul. Ks Piotra Wawrzyniaka 2 11 Talavera Road CS 70133 PL-62-052 KOMORNIKI (Pozna ) Macquarie Park, NSW, 2113, FR-59436 RONCQ CEDEX...
- Page 44 At Arjo, we are committed to improving the everyday lives of people affected by reduced mobility and age-related health challenges. With products and solutions that ensure ergonomic patient handling, personal hygiene, disinfection, diagnostics, and the effective prevention of pressure ulcers and venous thromboembolism, we help professionals across care environments to continually raise...
Need help?
Do you have a question about the Sara Flex and is the answer not in the manual?
Questions and answers
Can the footplate be removed from this model?