Table of Contents
Advertisement
Operation
Interior Texture Sprayers
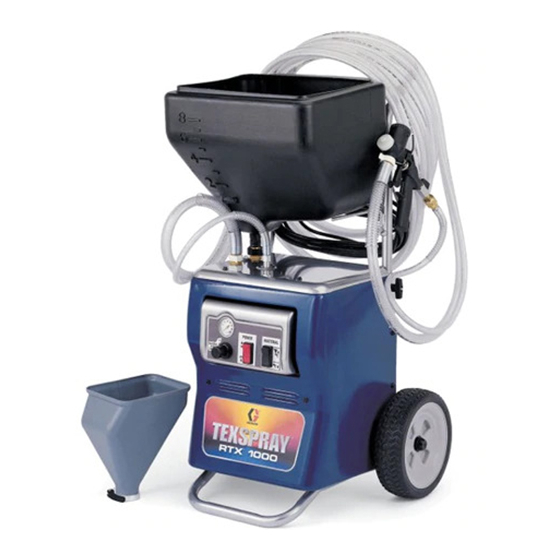
TexSpray™ RTX 750™
and RTX 1000™
For Water-Based Materials Only
Models:
246183, 246555 - RTX 750, 6 Gallon
55 psi (3.79 bar) Maximum Fluid Working Pressure
246184, 246556 - RTX 1000, 8 Gallon
60 psi (4.14 bar) Maximum Fluid Working Pressure
Read warnings and instructions.
Related Manuals
309584
309586
Graco Inc. P.O. Box 1441 Minneapolis, MN
55440-1441
ti2891a
US
C
Conforms to ANSI/UL
standard 1450
309585A
Model 246184 Shown
Advertisement
Table of Contents

Related Manuals for Graco TexSpray RTX 750


Summary of Contents for Graco TexSpray RTX 750
- Page 1 246184, 246556 - RTX 1000, 8 Gallon 60 psi (4.14 bar) Maximum Fluid Working Pressure Read warnings and instructions. ti2891a Related Manuals 309584 309586 Model 246184 Shown Graco Inc. P.O. Box 1441 Minneapolis, MN 55440-1441 Conforms to ANSI/UL standard 1450...
- Page 2 Route hoses away from traffic areas, sharp edges, moving parts and hot surfaces. • Do not expose Graco hoses to temperatures above 130 F (55 C) or below -35 F (-37 C).Store haz- ardous fluid in an approved container. Dispose of hazardous fluid according to all local, state and national guidelines.
- Page 3 WARNINGS Electric Shock Hazard To reduce the risk of electric shock: • Be sure sprayer is adequately grounded through electrical outlet. • Use only 3-wire, extension cords. • Make sure ground prongs are intact on sprayer and extension cords. Improper installation of ground- ing plug will result in a risk of electrical shock, fire or explosion that could cause serious injury or death.
-
Page 4: Component Identification
Component Identification Component Identification ti2892a Item Component Item Component Air hose outlet Touch-up hopper (3/4 gallon) Material hose outlet Nozzle storage Material flow control (RTX 1000 model Hose plug only) Hopper gun/spray gun selector switch Gun plug ON/OFF switch Material thickness gauge Air Compressor (inside) Nozzle (3 sizes available) Material/air hose... -
Page 5: Generator Requirements
Preparation Preparation Pressure Relief Procedure WARNING To reduce risk of injury, follow this procedure page 2 whenever you see this symbol throughout this manual, Also, perform this procedure whenever you: 120V AC Systems • stop spraying. • This equipment grounded outlets requires a 120V AC, •... - Page 6 Setup Setup Important • If you are going to stop spraying for more than 5 minutes, turn sprayer off to prevent shortened pump hose life. • Do not allow material to dry inside pump, hoses, gun or spray system. 3. Open air valve. WARNING page 2.
- Page 7 Setup Touch Up Hopper Attachment 8. Turn power switch ON. ti2446a • The Hose Plug must be securely fastened to bottom of gun when using the Touch Up 9. Close gun air valve. Hopper. Gun plug must be removed from top of gun. ti2699a ti2453 10.
- Page 8 Setup 7. Turn hopper 8. Open gun air valve. gun/spray gun selector switch to HOPPER GUN. ti2448a ti2592a 9. Turn power switch ON. CAUTION ti2446a Failure to change selector switch to Hopper Gun when using hopper gun will damage pump hose. 10.
-
Page 9: Mixing Material
Mixing Material Mixing Material 5. Observe the ball on the Correct material mixture is essential. The pump READY ADD WATER material. When the mate- will not operate if the mixture is too thick. rial is thin enough to spray the ball will sink com- Mix the material in a separate container before pletely into the mixture. -
Page 10: Spray Techniques
Spray Techniques Spray Techniques Recommended Nozzle Selection Chart To Get Less Material Application Try one or a combination of these methods: Nozzle Size Air Volume Simulated 6 mm, white medium to • Open air valve. Acoustic (fine to medium) high 8 mm, gray •... -
Page 11: Shut Down And Clean-Up
Shutdown and Cleanup Shutdown and Cleanup Keep pump and hose clean when switching between simulated acoustic, knockdown and orange peel applications. A dirty pump can release particles of texture into the finish. CAUTION • Turn off sprayer if you are going to stop spraying for 5 minutes or longer. •... -
Page 12: Transporting The Sprayer
Shutdown and Cleanup Removing Material Hopper from Sprayer 3. Fill hopper with clean water. Remove nozzle The material hopper can be removed for cleaning. To from gun and allow water remove material hopper: to flow through and out of gun. 1. -
Page 13: Troubleshooting
Refer to Grounding and Electrical Requirements, page 5. Gun needle plugged Clean needle and retry. Worn compressor Replace compressor. Contact a qual- ified Graco Service Center. Lines not connected Check all quick disconnect connec- tions to gun and hoses Damaged hose Replace hose... - Page 14 Troubleshooting Problem Cause Solution Speed of application slow or slower Material too thick Thin material. Nozzle too small Change nozzles to a larger size. See Recommended Nozzle Selection Chart, page 10. Too much air being used. Partially close gun air valve to reduce air flow.
-
Page 15: Technical Data
Technical Data Technical Data Main unit power requirements 120V AC, 60 hz, 15A, 1 phase Maximum fluid working pressure 60 psi, (4.137 bar) Maximum air working pressure 45 psi (3.10 bar) Compressor specifications Universal motor thermally protected, oil-less Compressor air displacement 4.5 displacement scfm at 30 psi Generator required 3500 w minimum... -
Page 16: Graco Warranty
Graco distributor to the original purchaser for use. With the exception of any special, extended, or limited warranty published by Graco, Graco will, for a period of twelve months from the date of sale, repair or replace any part of the equipment determined by Graco to be defective.
Need help?
Do you have a question about the TexSpray RTX 750 and is the answer not in the manual?
Questions and answers