Table of Contents
Advertisement
Advertisement
Table of Contents

Related Manuals for Kinetik WBP1


Summary of Contents for Kinetik WBP1
- Page 1 Blood Pressure Monitor Instruction Manual WBP1...
-
Page 2: Table Of Contents
TABLE OF CONTENTS INTRODUCTION............... 2 - 8 Support General Description Indications for Use... -
Page 3: Introduction
General Description Our manual should provide you with all the information you need Thank you for selecting Kinetik arm type blood pressure monitor (WBP1). The monitor features blood pressure measurement, pulse rate measurement to set up and use this product. -
Page 4: Safety Information
INTRODUCTION INTRODUCTION CAUTION Safety Information * Do not take any therapeutic measures on the basis of a self measurement. Never alter the dose of a The signs below might be in the user manual, labeling or other component. medicine prescribed by a doctor. Consult your doctor if you have any question about your blood pressure. They are the requirement of standard and using. -
Page 5: Lcd Display Signal
INTRODUCTION INTRODUCTION CAUTION LCD display signal * If you experience discomfort during a measurement, such as pain in the arm or other complaints, press the START/STOP button to release the air immediately from the cuff. Loosen the cuff and remove it from your arm. -
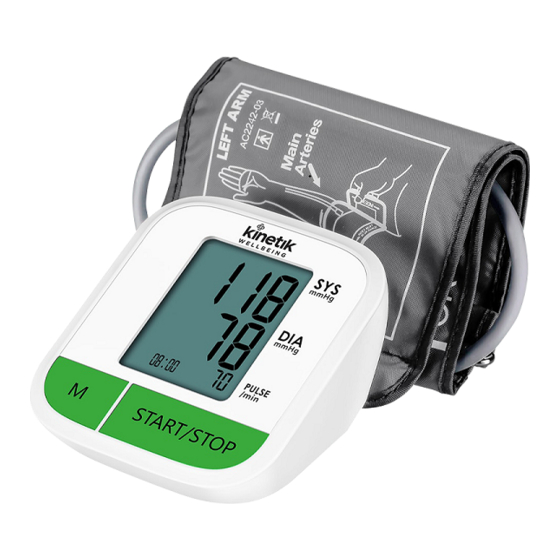
Page 6: Monitor Components
The display does not light up. 1. Blood Pressure Monitor 2. Cuff (Type BF applied part) (WBP1) (22cm~42cm) (Please use Kinetik CAUTION authorized cuff. The size of the actual cuff please Do not use new and used batteries together. refer to the label on the Do not use different types of batteries together. -
Page 7: Setting Date, Time
BEFORE YOU START BEFORE YOU START 3. Press “ ” button to confirm [YEAR]. Then the monitor Setting Date and Time. diverts to [MONTH] and [DAY] setting. It is important to set the clock before using your blood pressure mmHg monitor, so that a time stamp can be assigned to each reading that is stored in the memory. -
Page 8: Taking A Measurement
BEFORE YOU START TAKING A MEASUREMENT 5. Repeat steps 2 and 3 to set the [HOUR] and [MINUTE]. Fitting the cuff mmHg mmHg 1. Remove all Jewellery, such as watches and bracelets from your left arm. Note: If your doctor has diagnosed you with poor circulation in your left arm, use your right arm. -
Page 9: Start The Measurement
TAKING A MEASUREMENT DATA MANAGEMENT Start the Measurement Check the memory When the monitor is off, press “ ” button to turn on the 1. When the monitor is off, please press “ ” button to show the monitor, and it will finish the whole measurement. average value of the latest three records.If the records are less than 3 groups, it will display the latest record instead. -
Page 10: Delete The Readings
DATA MANAGEMENT INFORMATION FOR USER Delete the Readings Tips for Measurement If you did not get the correct measurement, you can delete all Measurements may be inaccurate if taken in the following results for the selected user by following steps below. circumstances. -
Page 11: About Blood Pressure
ABOUT BLOOD PRESSURE ABOUT BLOOD PRESSURE What are systolic pressure and diastolic pressure? Why does my blood pressure Systolic Diastolic When ventricles contract and pump blood out of fluctuate throughout the day? the heart, the blood pressure reaches its maximum blood entering blood discharging vein... -
Page 12: Troubleshooting
TROUBLE SHOOTING SPECIFICATIONS This section includes a list of error messages and frequently Battery powered mode: Power supply 6VDC 4×AAA batteries asked questions for problems you may encounter with your blood pressure monitor. If the product is not operating as you think it Display mode Digital LCD display V.A.65mm×50mm should, check here before arranging for servicing. -
Page 13: Manufacturer Information / Return Policy
Product may be returned if faulty, please contact the Retailer or Performance EN ISO 81060-1:2012 Non-invasive sphygmomanometers - Part 1: Kinetik directly if you're experiencing issues with your product. Requirements and test methods for non-automated measurement type requirements This does not affect your statutory rights. Please note the retailer's... -
Page 14: Emc Guidance
Warning: Portable RF communications equipment (including peripherals such as antenna IEC 61000-4-4 cables and external antennas) should be used no closer than 30 cm (12 inches) to any part of the equipment WBP1, including cables specified by the manufacturer. Otherwise, Surge Not application Not application degradation of the performance of this equipment could result. - Page 15 DECT; LTE Band 1, 1970 4,25; UMTS 2450 2400- Bluetooth, Pulse 2570 WLAN, modulation 802.11 217 Hz b/g/n, RFID 2450, LTE Band 7 5240 5100- WLAN Pulse 5800 802.11 modulation 5500 217 Hz 5785 0197 Kinetik WBP1 EN IB 20191004...
Need help?
Do you have a question about the WBP1 and is the answer not in the manual?
Questions and answers