Table of Contents
Advertisement
USB Video Capture User Manual
Thanks for your support, UCEC USB2.0 UVC Video Capture product. The following steps will
guides you how to set it up. Hope this device will bring you nice digital experience.
The USB Video Capture, it can capture High-quality video and audio file directly by USB 2.0
interface without sound card. And edit them, burn DVD disc, convert them, and send them to
your iPod, PSP, or Mobile Phone. And upload the video to YouTube too.
The USB Video Capture, it can capture High-quality audio file directly by USB 2.0 interface alone.
And edit them, burn Audio CD, or MP3 CD.
The USB Video Capture includes a professional video editing and converting software –
"ArcSoft ShowBiz 3.5".
It can provide best editing and converting function for you. ShowBiz 3.5 is a video-editing and
converting software that makes editing your videos as fun as shooting them. ShowBiz 3.5 helps
novice users finish stylish movies in only few steps. Share finished projects on DVD, tape, the
Web, and mobile devices.
The converting function, it help you to convert the vedio file you recorded as MPEG4, AVI, and
other file format, then you can send converted videos to your iPod, PSP, Mobile Phone, or other
vedio device.
Specification
Item Name: USB 2.0 Video Capture
Interface: USB 2.0 standard
TV System: PAL, NTSC
Recording Format: MPEG2 for Video
Converting Format Video: Apple TV, iPhone, iPod classic, iPod nano, iPod touch, WMA. ASF,
MPEG1, MPEG2, WMV
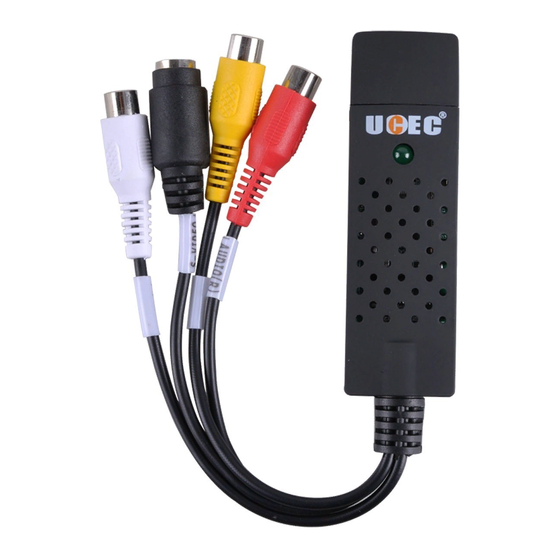
Input Composite: Video(RCA), S-Video(miniDIN 4pin), Audio L/R(RCA)
Resolution: NTSC 160×120 ~ 720×480, PAL 160×120 ~ 720×576
Rate : NTSC 30fps, PAL 25fps
Power Supply: USB Bus
Consumed Power ≤ 1.5W
Editing Software Video: ArcSoft ShowBiz 3.5
Dimension / Weight: 90(L)×44(W)×28(H)mm / 72g
Cable Length: 80cm(USB), 7cm(Video/Audio)
1
Advertisement
Table of Contents

Related Manuals for UCEC USB 2.0 Video Capture

Summary of Contents for UCEC USB 2.0 Video Capture
- Page 1 USB Video Capture User Manual Thanks for your support, UCEC USB2.0 UVC Video Capture product. The following steps will guides you how to set it up. Hope this device will bring you nice digital experience. The USB Video Capture, it can capture High-quality video and audio file directly by USB 2.0 interface without sound card.
- Page 2 2. You can directly use these editing software to capture video. You don’t need to install any drivers. Warming Tips: UCEC provides 24-hour technical email support. Please feel free to contact us if you have any questions. If you are not satisfied with our products, we can provide you with a refund.
- Page 3 Notice: 1. You maybe have to buy Video and Audio cable, and S-Video cable to connect the USB Video Capture with your analog video device. You need to buy the Scart Video/Audio adapter if the output of your video source device is Scart type. The following devices can be used as analog video sources: Video recorder, DVD player, Video camera, Set-top box, Game player and any device that provides an analog video signal...
- Page 4 How to install ShowBiz 3.5 1. Note: If you have any antivirus software enabled, please disable it during the installation of the software. Before you first connect the USB Video Capture to your computer, please insert the “CD-ROM” into your CD drive. Then you should find a picture of software running.
- Page 5 2. You need enter user name and serial number (you can find out the serial number on CD-ROM bag). 3. System will install the software, and you can choose destination location and folder. Then click “Next” to continue installation.
- Page 6 4. Click “finish” to complete setup, restart your computer if needed. Sounds setup: Finally, you need to set the Sounds on your computer. Click right mouse button on the taskbar, Click “Sounds”.
- Page 7 Click “Recording”. Click “2-AV TO USB2.0”. Click “Listen” Click“Apply”, Sound setup complete.
- Page 8 How to use the ShowBiz 3.5 1. Now, you need to set software for capturing and editing video and audio. 2. Double click “ShowBiz 3.5” icon on your desktop, and click Capture button to enter into the capture panel. On the capture panel, please set “Source”...
- Page 9 Click “Device Setting” to adjust Brightness, Contrast, Hue and Saturation Control for a good picture quality. After all that, you can browse the video on the window of the player software. Edit video Please click “Edit” key or close the player window to edit your video files. The first, plesae select the video file you want to edit, then you can choose the various effects to edit them according to your needs.
- Page 10 Edit video Save, convert or upload videos You can click “Produce” button to enter into the fowlling panel, then you can select function to handle your recorded video , audio file, or pictures according to your needs. As creating video file: The first, please select the file you want to create, and click “Create File”...
- Page 11 Also, you can creaste your video file with DVD model, or upload them to a YouTube Get help file For more detailed instructions for using ShowBiz3.5, please click “Option” button on panel to select Help to get them.
- Page 12 How to uninstall ShowBiz 3.5 If you want to uninstall the ShowBiz 3.5, please insert the installation CD into the CD-ROM, Then you should find a picture of software running. Please select“Install ShowBiz 3.5”,and select“Remove”to uninstall ShowBiz 3.5.
- Page 14 2.Choose whether to select extra “ Realsense Source ” according to your needs. Generally you just have to click“Install”to continue. Wait for a few minutes, click “Finish”to finish the installation of OBS Studio. 2. When you run OBS Studio first time, you can use Auto-configuration Wizard or not. You can also configure manually your setting by clicking the settings button in the main window.
- Page 15 OBS Studio Tutorial Finally, you need to set the Sounds on your computer.
- Page 16 1. Connect the RCA cable to your DVD, VCR, VHS audio and video connectors. 2. Insert UCEC Video Capture Card, the computer will detect automatically. 3. Open OBS STUDIO and point "+" at the source. 4.Select to add "Video Capture Device" and click "OK" in the sources box.
- Page 17 5.In the Device box, the default is your camera lens. Here we need to select "AV To USB2.0".
- Page 18 6 Next, click on "Configure Crossbar". and select Input "1 Video Composite in" 7. Click "Configure Video" to select the video standard you want. Please note that if the video appears to be unclear and distorted, try a different video standard. Normally select "PAL_I"...
- Page 19 8. You can adjust Brightness, Contrast, Hue and Saturation Control to get good picture quality. 9.In the Device box, you need to drag the scroll bar to the bottom and choose “Capture audio only” in the Audio Output Mode. Then you need to check the “Use custom audio device”...
- Page 20 10.Mute all audio sources (except the video capture device) in the audio section. 11.When you start playing VHS videos, you can adjust the image size and position to fit and be centered in the black "canvas." If you want to crop some of the original image, Hold down the "ALT"...
- Page 21 12. Video recording a. After the video comes out, you can click “Start Recording” to record the video. (Please note that it is not possible to hear the video sound during recording, but when you saved the video it will be heard) a.Click Stop Recording to stop recording the video B.Click "File"...
- Page 22 Some Personalized Settings 1. You can set a variety of video formats: click on the upper left corner of the "File", appear drop-down menu, select "Settings" 2. In the "Settings" interface, select "Output", you can select the recording video save path, set the output format of the recorded video.
- Page 23 3. In the "Audio" interface, select “Sample Rate”of 44.1KHz for the better sound quality. In order to ensure that the recording process is not affected by the microphone, the following options are selected "Disabled Select OK to finish.
Need help?
Do you have a question about the USB 2.0 Video Capture and is the answer not in the manual?
Questions and answers
program ShowBiz3.5 won't run, it gives the error message below Although there are no other applications open