Table of Contents
Advertisement
Quick Links
T-Tiny/T-Micro Taximeter User Guide © Aquila Electronics Limited
Aquila T-Tiny
Taximeter User Guide
Instructions in this manual refer to both T-Tiny+ and
T-Micro models except where indicated
This manual describes the operation of the T-Tiny
Taximeters once correctly installed and configured by an authorised
Aquila Taximeter Dealer. Aquila Electronics Limited reserve the right
to change the specification of its products without notice. If any
further information is required, please contact your local dealer.
+
- T-Micro
+
and T-Micro
N00523 Issue 5. May 2018
Advertisement
Table of Contents

Related Manuals for Aquila T Series


Summary of Contents for Aquila T Series
- Page 1 T-Micro Taximeters once correctly installed and configured by an authorised Aquila Taximeter Dealer. Aquila Electronics Limited reserve the right to change the specification of its products without notice. If any further information is required, please contact your local dealer.
-
Page 2: Table Of Contents
Contents 1 Differences Between the T-Tiny+ and T-Micro..........1 2 The Basics of the T-Tiny Taximeter..............2 Basic Operation of the T-TINY................3 3 Operating Modes....................4 3.1 Standby Mode...................4 3.2 FOR HIRE Mode..................5 3.3 HIRED Mode.....................6 3.4 STOPPED Mode..................8 4 Tariffs and Options..................9 4.1 Tariffs......................9 4.2 Tariff Code....................9 4.3 Receipt Programs..................9... -
Page 3: Differences Between The T-Tiny+ And T-Micro
1 Differences Between the T-Tiny+ and T-Micro The T-Micro is a lower cost version of the T-Tiny+, and it has some differences in its functional specification: Feature T-Tiny+ T-Micro Serial Ports The T-Tiny+ has 2 The T-Micro has no RS232 serial ports for RS232 serial ports. -
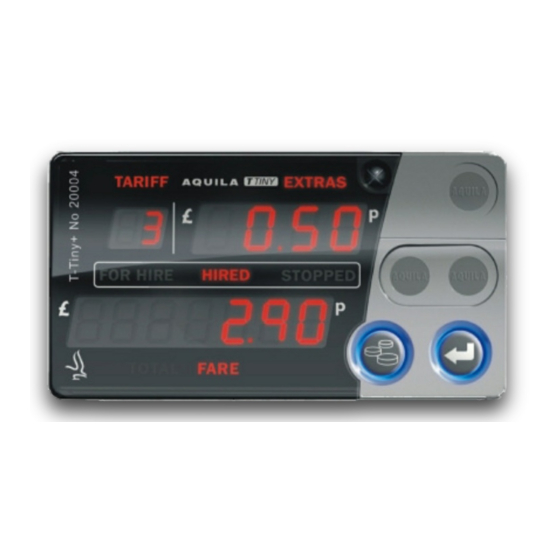
Page 4: The Basics Of The T-Tiny Taximeter
2 The Basics of the T-Tiny Taximeter Extras Display Rate Display Tariff Seal: This sealing point secures the Tariff Programming connector. Meter Seal: This sealing point secures the screw holding the T-TINY’s front and rear case together and prevents access to internal parts. -
Page 5: Basic Operation Of The T-Tiny
Press ENTER to turn the meter on and get ready for the first journey (go to FOR HIRE mode). Press EXTRAS to add extras. Hold EXTRAS down and press BACK to clear extras (if allowed in tariff) Press ENTER to start the journey (go to HIRED MODE) Press ENTER to end the... -
Page 6: Operating Modes
3 Operating Modes 3.1 Standby Mode When the T-TINY is first powered up, it enters STANDBY mode. The display is completely blank except for a dash which appears in the Rate Digit if the vehicle moves. Access to the User Menu system is available from Standby mode. (See section 5) ... -
Page 7: For Hire Mode
FOR HIRE Mode In FOR HIRE mode, the T-TINY displays the currently selected rate and allows manual rate selections to be made if these are included in the tariff. Optional Feature: The T-TINY may optionally display a time of day clock in the Fare Display if allowed in the tariff. -
Page 8: Hired Mode
3.3 HIRED Mode HIRED mode is the mode in which the T-TINY calculates the fare based on a combination of time and distance. As soon as the meter is placed in HIRED mode, it begins to calculate the fare based on the tariff programmed into it. - Page 9 Functions in HIRED Mode If enabled in the tariff program, the MONEY button can be pressed and held down for 2 seconds to pause the fare calculation. In this case the fare is “frozen” until the MONEY button is pressed for 2 seconds again. To indicate that the fare is paused, the HIRED and STOPPED legends flash alternately.
-
Page 10: Stopped Mode
3.4 STOPPED Mode The T-TINY is normally placed in STOPPED mode at the end of the journey and left there until the passenger has paid the fare. In this mode, the time element of the fare calculation is stopped, but the taximeter continues to calculate the fare on the basis of distance only. -
Page 11: Tariffs And Options
Aquila tariff is uniquely numbered This number can be displayed in the “Info” user menu (See section 5.3.4). If given this number, staff at Aquila can quickly find out how your T-TINY has been programmed and answer any queries you may have. -
Page 12: The User Menus
5 The User Menus The T-TINY’s user menus allow: Information to be read out of the meter, including the totals information Certain functions of the meter and meter/vehicle interface to be tested Certain features of the meter to be enabled, disabled or configured The User Menus are available when the T-TINY is in FOR HIRE or STANDBY modes. -
Page 13: User Menus: Totals
5.1 User Menus: Totals The T-TINY stores running totals of your earnings and other journey information for later recall. To access the totals, press ENTER from the “Totals” prompt. Totals item. See table in Section 4.1.2 Totals set. See table in Section 4.1.1. - Page 14 5.1.1 The 3 Sets of Totals Three separate sets of totals are stored: Display Description “Temporary Totals”. These may be reset by any user. “Permanent Totals”. “Last Journey” totals. This set represents the last journey only. 5.1.2 Items in each set of Totals Each set of totals includes the following items: Included In Last Display...
-
Page 15: User Menus: "Print Out" (Not Supported On T-Micro Model)
5.2 User Menus: “Print Out” (Not supported on T-Micro Model) The “Print Out” menu option is only available if a receipt programme has been inserted into the T-TINY. Its correct use also requires the connection of a suitable Receipt Printer. Assuming that a receipt printer is connected to the T-TINY and switched on, a receipt may be printed: ... - Page 16 5.3.2 Display Brightness This menu entry allows the brightness of the button backlights to be changed. Press ENTER to Press MONEY to move change the display to the next item. brightness. 5.3.3 Serial Number This entry shows the T-TINY’s serial number which should match the number printed on the front panel.
- Page 17 Pressing ENTER at this point displays the “Tariff Event Counter”, which gives a count of the number of times the tariff has been re-programmed. Press MONEY to move Press and hold ENTER to the next item. to view event counter. 5.3.5 Receipt Number (Not Supported on T-Micro Model) See section 4.3 for details of the receipt number.
- Page 18 You may need to tell your dealer the software version in the event of a query. 5.3.7 Time of Day You can change the time between 12hour and 24hour format here. You can also make minor adjustments to the time to allow for the accuracy of the T-TINY’s clock.
- Page 19 5.3.9 Calibration The T-TINY is programmed by your dealer with a number of pulses per mile/kilometre. This item allows you to check the value. Pressing ENTER at this point displays the “Calibration Event Counter”, which gives a count of the number of times the calibration has been re- programmed.
- Page 20 The initial display shows a pulse count of “0” with the text “PULS”. To start the pulse count, press the ENTER button. To stop the pulse count, press the ENTER button To clear the pulse count back to “0”, press ENTER again. When the Pulse Count is in the active “counting”...
-
Page 21: Power Interruptions
6 Power Interruptions If power to the T-Tiny is interrupted, it saves its status and resumes operation when the power is restored as described here. 6.1 Short Power Interruptions (Less than 19 seconds) If the T-Tiny was in HIRED or STOPPED when power was removed, the existing journey is resumed when power is restored. -
Page 22: The T-Tiny's Battery And Clock
7 The T-TINY’s Battery and Clock Since the T-TINY has a “real time clock”, it has an internal “battery” which maintains the clock when the meter is removed from a source of power. The T-TINY clock will continue to keep time for a period of over 12 months. 7.1 Setting the Clock If the T-TINY’s battery is discharged, the clock should be set when it is first connected to power. - Page 23 Once the date has been confirmed, the time of day must be set: “Daylight Saving” – See below for details. One part of the time Press ENTER while flashes. holding down Press ENTER Press and release MONEY to change to confirm the MONEY to move to the value of the time setting.
- Page 24 Index battery..........20 Totals...........10 Beep..........18 Clearing........12 calendar dates.......9 last journey.......12 Calibration........17 permanent.........12 clock..........5 temporary........12 setting........20 User Menus.........10 Date..........16 Date Stop........6 daylight saving......21 dead-stop........7 error messages......4 Extras..........Display........2 Multiple........7 Fare..........Display........2 Fare Display........6 FOR HIRE Mode......5 HIRED Mode........6 Menu..........Info........10, 13 Totals........11 pause..........7 Print Out.........10, 13 Pulse Count.........17...
- Page 25 Tel: +44 1785 823635 Sales@aquila-electronics.co.uk Aquila Electronics Limited www.aquila-electronics.co.uk Staffordshire. England.
Need help?
Do you have a question about the T Series and is the answer not in the manual?
Questions and answers