Samsung HW-M550 User Manual
Hide thumbs
Also See for HW-M550:
- Full manual (631 pages) ,
- User manual (478 pages) ,
- Full manual (150 pages)
Table of Contents
Advertisement
Available languages
Available languages
Quick Links
Advertisement
Chapters
Table of Contents

Related Manuals for Samsung HW-M550


Summary of Contents for Samsung HW-M550
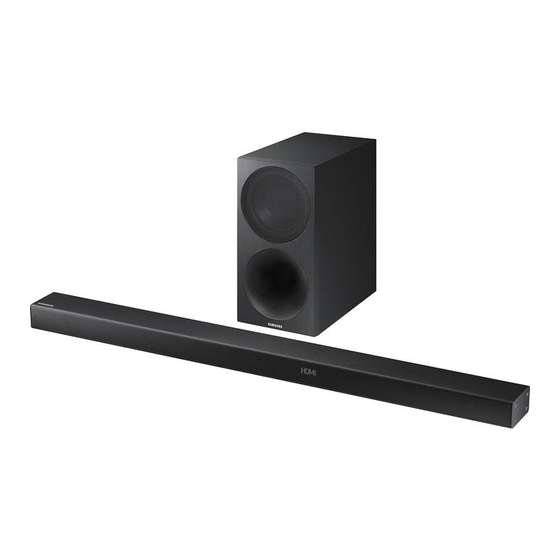
- Page 1 USER MANUAL HW-M550...
- Page 2 SAFETY INFORMATION SAFETY WARNINGS WARNING • To reduce the risk of fire or electric shock, do TO REDUCE THE RISK OF ELECTRIC SHOCK, DO not expose this appliance to rain or moisture. NOT REMOVE THE COVER (OR BACK). CAUTION NO USER-SERVICEABLE PARTS ARE INSIDE. REFER SERVICING TO QUALIFIED SERVICE •...
- Page 3 QR code. To see the manual on 2 hours until the unit has reached room your PC or mobile device, download the temperature before using. manual in document format from the website. (http://www.samsung.com/support) Design and specifications are subject to change without prior notice. ENG - iii...
-
Page 4: Table Of Contents
CONTENTS Checking the Components Inserting Batteries before using the Remote Control (AA batteries X 2) ------------------------- Product Overview Front Panel / Right Side Panel of the Soundbar ------------------------- Bottom Panel of the Soundbar ------------------------- Connecting the Soundbar Connecting Electrical Power ------------------------- Connecting the Soundbar to the Subwoofer -------------------------... - Page 5 Connecting a Mobile Device Connecting via Bluetooth ------------------------- Using the Remote Control How to Use the Remote Control ------------------------- Adjusting the Soundbar volume with a TV remote control ------------------------- Installing the Wall Mount Installation Precautions ------------------------- Wallmount Components ------------------------- Detaching the Soundbar from the Wall ------------------------- Troubleshooting Licence...
-
Page 6: Checking The Components
4. • For Soundbar wall mounting components, see page 18. • HDMI cables is sold separately. To purchase, contact a Samsung Service Centre or Samsung Customer Care. Inserting Batteries before using the Remote Control (AA batteries X 2) Slide the battery cover in the direction of the arrow until it is completely removed. -
Page 7: Product Overview
02 PRODUCT OVERVIEW Front Panel / Right Side Panel of the Soundbar Right Side of the Soundbar Position the product so that the SAMSUNG logo Volume is located on the top. Power Display Bottom Panel of the Soundbar DIGITAL AUDIO IN... -
Page 8: Connecting The Soundbar
03 CONNECTING THE SOUNDBAR Connecting Electrical Power Use the power components (1, 2, 3) to connect the units to electrical outlets in the following order: 1.) Subwoofer 2.) Soundbar Main Unit. See the illustrations below. • For more information about the required electrical power and power consumption, refer to the label attached to the product. -
Page 9: Connecting The Soundbar To The Subwoofer
Soundbar unit is connected properly. Connect again. See the instructions for Connection failed manual connection on page 6. Red and See the contact information for the Blinking Malfunction blue Samsung Service Centre in the manual. ENG - 5... -
Page 10: Manually Connecting The Subwoofer If Automatic Connection Fails
• If the connection process fails, the blue indicator will flash continuously. Go to Step 1 and start again. Expand to true wireless surround sound by connecting the Samsung Wireless Rear Speaker Kit (SWA-8500S) to your Soundbar (Sold separately). For more information, see the Samsung Wireless Rear Speaker Kit manual. -
Page 11: Connecting To Your Tv
04 CONNECTING TO YOUR TV Hear TV sound from your Soundbar through wired or wireless connections. • When the Soundbar is connected to a selected Samsung TVs, the Soundbar can be controlled using the TV’s remote control. – When using optical cable, this feature can be supported by 2017 Samsung Smart TVs that support Bluetooth. -
Page 12: Connecting A Tv Using An Hdmi Cable
Auto Power Link Auto Power Link automatically turns on the Soundbar when the TV is turned on. 1. Connect the Soundbar and a TV with a digital optical cable. 2. Press the (Source) button on the right side panel or on the remote control, and then select “D.IN”. -
Page 13: Method 2. Connecting Wirelessly
3. Select Bluetooth mode on the TV. (For more information, see the TV’s manual.) 4. Select “[AV] Samsung Soundbar Mxxx M-Series” from the list on TV’s screen. An available Soundbar is indicated with “Need Pairing” or “Paired” on the TV Bluetooth device list. - Page 14 What are the BT READY and BT PAIRING statuses? • BT READY : In this mode, you can search for previously connected TVs or connect to the Soundbar from a previously connected mobile device. • BT PAIRING : In this mode, you can connect to a new device (while in “BT” mode, press and hold the (Source) button for more than 5 seconds on the right side of the Soundbar or on the remote control.) NOTES...
-
Page 15: Connecting An External Device
05 CONNECTING AN EXTERNAL DEVICE Connect to an external device via a wired or wireless network to play the external device’s sound through the Soundbar. Connecting using an Optical or Analogue Audio (AUX) Cable Right Side of the Soundbar BD / DVD player / Set-top box / Game console DIGITAL AUDIO IN (OPTICAL) -
Page 16: Connecting Using An Hdmi Cable
Connecting using an HDMI Cable Bottom of Soundbar External Device HDMI IN HDMI OUT HDMI Cable (not supplied) HDMI OUT (TV-ARC) HDMI IN HDMI Cable (ARC) (not supplied) HDMI Right Side of the Soundbar 1. Connect an HDMI cable (not supplied) from the HDMI IN jack on the back of the product to the HDMI OUT jack on your digital device. -
Page 17: Connecting A Usb
If an update is offered, you can update the firmware by connecting a USB device with the firmware update stored on it to the USB port on your Soundbar. For more information about how to download update files, go to the Samsung Electronics website at (www.samsung.com Support). - Page 18 4. Play music files from the device, connected via Bluetooth, through the Soundbar. If the device fails to connect • If the previously connected Soundbar listing (e.g. “[AV] Samsung Soundbar Mxxx M-Series”) appears in the list, delete it. • In “BT” mode, press and hold the (Source) button for more than 5 seconds on the right side panel of the Soundbar or on the remote control to switch to “BT PAIRING”...
- Page 19 08 USING THE REMOTE CONTROL How to Use the Remote Control Turns the Soundbar on and off. Power You can select from TREBLE, BASS, or AUDIO SYNC. • To control the volume of the treble or bass Sound Control sound, select TREBLE or BASS in Sound Settings, and then adjust the volume between -6~+6 by using the Up/Down buttons.
- Page 20 • If you press the Bluetooth POWER button again to turn off the BT function, “OFF-BLUETOOTH POWER” appears in the Soundbar’s display. • If the “D.IN” mode is on and the Soundbar is connected to a Samsung smart TV released in 2017 or later, the Soundbar can be controlled with the TV remote control.
- Page 21 • After installing the Soundbar, you can adjust the Soundbar’s volume using the IR remote control that came with a Samsung TV. (If you do not want to use this function, when the Soundbar is on, press and hold the Surround button for 5 seconds. “OFF-TV REMOTE” appears in the Soundbar’s display and the function turns off.)
- Page 22 09 INSTALLING THE WALL MOUNT Installation Precautions • Install on a vertical wall only. • Do not install in a place with high temperature or humidity. • Verify whether the wall is strong enough to support the product’s weight. If not, reinforce the wall or choose another installation point.
- Page 23 1. Place the Wall Mount Guide against the wall 3. Push a pen tip or sharpened pencil tip surface. through the centre of the A-TYPE images on • The Wall Mount Guide must be level. each end of the Guide to mark the holes for •...
- Page 24 6. Use the two Screws (M4 x L12) to attach both • The left and right mounts are different shapes. Make sure to position them Bracket-Wall Mount L and R to the correctly. Soundbar’s bottom. For a proper fit, make sure to align the bumps on the Soundbar to the holes on the brackets.
- Page 25 Detaching the Soundbar from the Wall 1. To separate the Soundbar from the wall mount, push it in the direction of arrow, tilt it up slightly, and then pull it away from the wall as shown. • Do not hang onto the installed unit and avoid striking or dropping the unit.
- Page 26 10 TROUBLESHOOTING Before seeking assistance, check the following. The unit will not turn on. Is the power cord plugged into the outlet? ; Connect the power plug to the outlet. A function does not work when the button is pressed. Is there static electricity in the air? ;...
- Page 27 11 LICENCE 12 OPEN SOURCE LICENCE NOTICE To send inquiries and requests regarding open sources, contact Samsung via Email Manufactured under license from Dolby (oss.request@samsung.com). Laboratories. Dolby, Dolby Audio, Pro Logic, and the double-D symbol are trademarks of 13 IMPORTANT Dolby Laboratories.
- Page 28 (supporting Dolby® Digital), DTS NOTES • Samsung Electronics Co., Ltd reserves the right to change the specifications without notice. • Weight and dimensions are approximate. • For more information about the power supply and power consumption, refer to the label attached to the product.
- Page 29 INFORMATIONS RELATIVES À LA SÉCURITÉ AVERTISSEMENTS AVERTISSEMENT • Afin de diminuer les risques d’incendie ou de POUR ÉVITER LES RISQUES DE CHOC choc électrique, n’exposez pas cet appareil à ÉLECTRIQUE, NE DÉMONTEZ PAS LE CAPOT. la pluie ou à l’ humidité. L’APPAREIL NE CONTIENT PAS DE PIÈCES ATTENTION RÉPARABLES PAR L’UTILISATEUR ;...
- Page 30 Web. été stocké à basse température. (http://www.samsung.com/support) Si vous devez transporter l’ensemble pendant l’hiver, attendez environ 2 heures La présentation et les spécifications peuvent faire que l’appareil ait atteint la température de la...
- Page 31 SOMMAIRE Contrôle des Composants Insertion des piles avant l’utilisation de la télécommande (Piles AA X 2) ------------------------- Présentation du Produit Panneau avant / Panneau côté droit de la Soundbar ------------------------- Panneau inférieur de la Soundbar ------------------------- Connexion de la Soundbar Connexion de l’alimentation électrique ------------------------- Connexion de la Soundbar au Caisson de basse...
- Page 32 Connexion à un Appareil Mobile Connexion via Bluetooth ------------------------- Utilisation de la télécommande Comment utiliser la télécommande ------------------------- Réglage du volume de la Soundbar avec une télécommande de téléviseur ------------------------- Installation du Support Mural Précautions d’installation ------------------------- Composants de fixation au mur ------------------------- Retrait de la Soundbar du mur -------------------------...
-
Page 33: Contrôle Des Composants
4. • Pour les composants de fixation murale de la Soundbar, consultez la page 18. • Le câble HDMI est vendu séparément. Pour l’achat, contactez un Centre de service Samsung ou le Service client de Samsung. -
Page 34: Présentation Du Produit
02 PRÉSENTATION DU PRODUIT Panneau avant / Panneau côté droit de la Soundbar Côté droit de la Soundbar Placez le produit de sorte que le logo SAMSUNG se Volume trouve sur le dessus. Alimentation Affichage Panneau inférieur de la Soundbar... -
Page 35: Connexion De La Soundbar
03 CONNEXION DE LA SOUNDBAR Connexion de l’alimentation électrique Utilisez les composants d’alimentation (1, 2, 3) pour connecter les unités aux prises électriques dans l’ordre suivant : 1.) Caisson de basse 2.) Unité principale Soundbar. Reportez-vous aux illustrations ci-dessous. •... -
Page 36: Connexion De La Soundbar Au Caisson De Basse
Rouge Activé Reconnectez. Reportez-vous aux Échec de la connexion instructions sur la connexion manuelle à la page 6. Reportez-vous aux informations de Rouge et Clignotement Dysfonctionnement contact du Centre de service Samsung bleu dans le manuel. FRA - 5... -
Page 37: Connexion Manuelle Du Caisson De Basse Si La Connexion Automatique Échoue
• Si le procédé de connexion échoue, l’indicateur bleu clignote en continu. Passez à l’étape 1 et recommencez. Passez au vrai son surround sans fil en connectant votre kit d’enceintes arrière sans fil Samsung (SWA-8500S) à votre Soundbar (vendue séparément). Pour plus d’informations, reportez-vous au manuel du kit d’enceintes arrière sans fil Samsung. FRA - 6... -
Page 38: Connexion À Votre Téléviseur
04 CONNEXION À VOTRE TÉLÉVISEUR Écoutez le son du téléviseur depuis la Soundbar via des connexions câblées ou sans fil. • Lorsque la Soundbar est connectée à un téléviseur Samsung TV sélectionné, la Soundbar peut être contrôlée à l’aide de la télécommande du téléviseur. -
Page 39: Connexion D'un Téléviseur À L'aide D'un Câble Hdmi
Auto Power Link Le Auto Power Link active la Soundbar lorsque le téléviseur est mis sous tension. 1. Raccordez la Soundbar au téléviseur à l’aide d’un câble optique numérique. 2. Appuyez sur la touche (Source) sur le panneau côté droit ou la télécommande puis sélectionnez «D.IN». -
Page 40: Méthode 2. Connexion Sans Fil
3. Sélectionnez le mode Bluetooth sur le téléviseur. (Pour plus d’informations, reportez-vous au manuel du téléviseur.) 4. Sélectionnez «[AV] Samsung Soundbar Mxxx M-Series» dans la liste sur l’écran du téléviseur. Une Soundbar disponible est indiquée «Need Pairing» ou «Paired» dans la liste des appareils Bluetooth sur le téléviseur. - Page 41 Que signifient les états BT READY et BT PAIRING? • BT READY : Dans ce mode, vous pouvez rechercher les téléviseurs connectés précédemment ou connecter la Soundbar à partir d’un appareil mobile connecté précédemment. • BT PAIRING : Dans ce mode, vous pouvez procéder à la connexion à un nouvel appareil. (En mode «BT», appuyez et maintenez enfoncée la touche (Source) pendant plus de 5 secondes sur le côté...
-
Page 42: Connexion À Un Appareil Externe
05 CONNEXION À UN APPAREIL EXTERNE Raccordez un appareil externe via un réseau câblé ou sans fil pour écouter le son de l’appareil externe via la Soundbar. Connexion à l’aide d’un câble audio Optique ou Analogique (AUX) Côté droit de la Soundbar Lecteur BD/DVD / Boîtier décodeur / Console de jeu DIGITAL AUDIO IN... -
Page 43: Connexion À L'aide D'un Câble Hdmi
Connexion à l’aide d’un câble HDMI Partie inférieure de la Soundbar Appareil externe HDMI IN Câble HDMI HDMI OUT (non fourni) HDMI OUT (TV-ARC) HDMI IN Câble HDMI (ARC) (non fourni) HDMI Côté droit de la Soundbar 1. Raccordez un câble HDMI (non fourni) de la prise HDMI IN au dos du produit à la prise HDMI OUT de votre appareil numérique. -
Page 44: Connexion D'un Périphérique Usb
5 minutes. Mise à jour du Logiciel Samsung peut proposer des mises à jour pour le microprogramme du système de la Soundbar prochainement. Si une mise à jour est proposée, vous pouvez mettre à jour le microprogramme en connectant le périphérique USB contenant la mise à... - Page 45 4. Lisez des fichiers musicaux à partir de l’appareil, connecté via Bluetooth, via la Soundbar. Si la connexion de l’appareil échoue • Si la liste de Soundbar connectées précédemment (par ex. «[AV] Samsung Soundbar Mxxx M-Series» apparaît dans la liste, supprimez-la.
- Page 46 08 UTILISATION DE LA TÉLÉCOMMANDE Comment utiliser la télécommande Allume et éteint la Soundbar. Alimentation Vous pouvez sélectionner parmi TREBLE, BASS, ou AUDIO SYNC. • Pour contrôler le volume des aigus et des graves, sélectionnez TREBLE ou BASS dans Commande les paramètres audio, puis réglez le volume, sonore de -6 à...
- Page 47 Les fonctions Anynet+ et de Auto Power Link sont contrôlées respectivement par les touches Droite et Gauche. – Anynet+ : Si la Soundbar est connectée à un téléviseur Samsung via un câble HDMI, vous pouvez contrôler votre Soundbar avec une télécommande de téléviseur Samsung.
- Page 48 Réglage du volume de la Soundbar avec une télécommande de téléviseur Utilisez le menu du téléviseur pour régler l’enceinte TV d’un téléviseur Samsung sur les enceintes externes. (Pour plus d’informations, reportez-vous au manuel d’utilisateur du téléviseur.) •...
- Page 49 09 INSTALLATION DU SUPPORT MURAL Précautions d’installation • Installez sur un mur vertical uniquement. • N’installez pas dans un endroit à température élevée ou humide. • Vérifiez si le mur est suffisamment robuste pour supporter le poids du produit. Sinon, renforcez le mur ou choisissez un autre point d’installation. •...
- Page 50 1. Placez le Guide de fixation murale contre le 3. Appuyez avec la pointe d’un stylo ou d’un mur. crayon bien taillé au centre des images • Le Guide de fixation murale doit être de A-TYPE à chaque extrémité du guide pour niveau. marquer les trous des vis portantes, puis •...
- Page 51 6. Utilisez les deux Vis (M4 x L12) pour fixer le • Les fixations droite et gauche ont des formes différentes. Veillez à bien les Support de fixation murale G et D à l’arrière positionner. de la Soundbar. Pour une bonne fixation, veillez à aligner les excroissances de la Soundbar et les trous des supports.
- Page 52 Retrait de la Soundbar du mur 1. Pour retirer la Soundbar de la fixation murale, poussez-la dans la direction de la flèche, inclinez-la légèrement et retirez-la du mur comme indiqué sur l’image. • Ne la suspendez pas à l’unité installée et évitez de heurter ou de faire chuter l’unité.
- Page 53 10 DÉPANNAGE Avant de contacter l’assistance, veuillez lire ce qui suit. L’unité ne s’allume pas. Le cordon d’alimentation est-il branché dans la prise murale? ; Branchez la fiche secteur sur la prise. Une fonction ne répond pas lorsque la touche est enfoncée. De l’électricité statique est-elle présente dans l’air? ; Débranchez la fiche secteur et rebranchez-la. Des distorsions sonores se font entendre en mode BT.
- Page 54 11 LICENCE 12 AVIS DE LICENCE LIBRE Pour toute requête et demande concernant les sources ouvertes, contactez Samsung via e-mail à Manufactured under license from Dolby l’adresse (oss.request@samsung.com). Laboratories. Dolby, Dolby Audio, Pro Logic, and the double-D symbol are trademarks of 13 REMARQUE Dolby Laboratories.
- Page 55 (prise en charge de Dolby® Digital), DTS REMARQUES • Samsung Electronics Co,, Ltd se réserve le droit de modifier les caractéristiques sans préavis. • Le poids et les dimensions sont approximatifs. • Pour plus d’informations sur l’alimentation et la consommation électriques, reportez-vous à...
- Page 56 INFORMAÇÕES DE SEGURANÇA COMPONENTES AVISO INCLUÍDOSAVISOS DE • Para reduzir o risco de fogo ou de choque elétrico, não exponha este aparelho à chuva SEGURANÇA ou à humidade. PARA REDUZIR O RISCO DE CHOQUES CUIDADO ELÉCTRICOS, NÃO RETIRE A TAMPA POSTERIOR. •...
- Page 57 Se transportar a (http://www.samsung.com/support) unidade no Inverno, aguarde aproximadamente 2 horas para que a A conceção e as especificações estão sujeitas a unidade fique à...
- Page 58 CONTEÚDOS Verificação dos Componentes Inserção das pilhas antes de utilizar o controlo remoto (2 pilhas AA) ------------------------- Descrição geral do Produto Painel frontal/painel direito do Soundbar ------------------------- Painel inferior do Soundbar ------------------------- Ligar o Soundbar Ligar à corrente elétrica ------------------------- Ligar o Soundbar ao subwoofer ------------------------- – Ligação automática entre o subwoofer e o Soundbar ------------------------- –...
- Page 59 Ligar um Dispositivo Móvel Ligar através de Bluetooth ------------------------- Utilização do Controlo Remoto Como utilizar o controlo remoto ------------------------- Ajuste do volume do Soundbar com o controlo remoto de um televisor ------------------------- Instalação do Suporte de Parede Precauções para a instalação ------------------------- Componentes do suporte de parede ------------------------- Retirar o Soundbar da parede ------------------------- Resolução de Problemas Licenças...
-
Page 60: Verificação Dos Componentes
18. • O cabo HDMI é vendido em separado. Para adquirir, entre em contacto com o centro de assistência técnica ou o atendimento ao cliente da Samsung. Inserção das pilhas antes de utilizar o controlo remoto (2 pilhas AA) Deslize a tampa das pilhas na direção da seta até ser totalmente removida. Insira 2 pilhas AA (1,5 V) orientadas corretamente em função da polaridade. -
Page 61: Descrição Geral Do Produto
02 DESCRIÇÃO GERAL DO PRODUTO Painel frontal/painel direito do Soundbar Lado direito do Soundbar Posicione o produto de forma que o logótipo SAMSUNG fique Volume localizado na parte superior. Ligar/Desligar Ecrã Painel inferior do Soundbar DIGITAL AUDIO IN DIGITAL AUDIO IN DIGITAL AUDIO IN DIGITAL AUDIO IN (OPTICAL) (OPTICAL) (OPTICAL) -
Page 62: Ligar O Soundbar
03 LIGAR O SOUNDBAR Ligar à corrente elétrica Utilize os componentes elétricos (1, 2, 3) para ligar as unidades às tomadas elétricas pela seguinte ordem: 1.) Subwoofer 2.) Unidade principal do Soundbar. Consulte as ilustrações abaixo. • Para obter mais informações sobre a potência elétrica necessária e o consumo de energia, consulte a etiqueta no produto. -
Page 63: Ligar O Soundbar Ao Subwoofer
Estabeleça uma nova ligação. A ligação falhou Consulte as instruções relativas à ligação manual na página 6. Consulte as informações de contacto do Vermelho A piscar Ocorreu uma avaria centro de assistência técnica da Samsung e azul contidas no manual. POR - 5... -
Page 64: Ligação Manual Do Subwoofer Em Caso De Falha Da Ligação Automática
6. Quando a ligação for estabelecida com sucesso, o indicador azul na parte de trás do subwoofer para de piscar e fica aceso de forma contínua. • Se a ligação falhar, o indicador azul piscará continuamente. Volte ao Passo 1 e comece novamente. Obtenha um verdadeiro som surround sem fios ligando o Kit de colunas traseiras sem fios (SWA-8500S) ao Soundbar (vendido em separado). Para obter mais informações, consulte o manual do Kit de colunas traseiras sem fios da Samsung. POR - 6... -
Page 65: Ligar Ao Televisor
(Origem) no painel direito ou no controlo remoto e, em seguida, selecione o modo ” D.IN”. • Quando o Soundbar é ligado a uma Samsung Smart TV lançada após o ano 2017, a função Bluetooth POWER liga-se automaticamente para permitir que o Soundbar seja controlado através do controlo remoto do televisor. -
Page 66: Ligar Um Televisor Através De Um Cabo Hdmi
Auto Power Link A função Auto Power Link liga automaticamente o Soundbar quando o televisor é ligado. 1. Ligue o Soundbar e um televisor com um cabo ótico digital. 2. Prima o botão (Origem) no painel direito ou no controlo remoto e, em seguida, selecione “D.IN”. -
Page 67: Método 2. Ligar Sem Fios
3. Selecione o modo Bluetooth no televisor. (Para obter mais informações, consulte o manual do televisor.) 4. Selecione “[AV] Samsung Soundbar Mxxx M-Series” na lista exibida no ecrã do televisor. Os Soundbars disponíveis são identificados pela mensagem “Need Pairing” ou “Paired” na lista de dispositivos Bluetooth do televisor. Para ligar ao Soundbar, selecione a mensagem e estabeleça uma ligação. - Page 68 O que são os estados BT READY e BT PAIRING? • BT READY : Neste modo, pode pesquisar televisores anteriormente ligados ou estabelecer uma ligação ao Soundbar a partir de um dispositivo móvel anteriormente ligado. • BT PAIRING : Neste modo, pode estabelecer uma ligação a um dispositivo novo. (No modo “BT, mantenha premido o botão (Origem) no lado direito do Soundbar ou no remoto controlo durante mais de 5 segundos.)
-
Page 69: Ligar Um Dispositivo Externo
05 LIGAR UM DISPOSITIVO EXTERNO Estabeleça uma ligação a um dispositivo externo através de uma rede com ou sem fios para reproduzir o som do dispositivo externo através do Soundbar. Ligar através de um cabo áudio ótico ou analógico (AUX) Lado direito do Soundbar Leitor de DVD ou Blu-Ray/descodificador/ consola de jogos DIGITAL AUDIO IN (OPTICAL) OPTICAL OUT Cabo ótico USB (5V 0.5A) - AUDIO -... -
Page 70: Ligar Através De Um Cabo Hdmi
Ligar através de um cabo HDMI Parte inferior do Soundbar Dispositivo externo HDMI IN Cabo HDMI HDMI OUT (não fornecido) HDMI OUT (TV-ARC) HDMI IN Cabo HDMI (ARC) (não fornecido) HDMI Lado direito do Soundbar 1. Ligue um cabo HDMI (não fornecido) da tomada fêmea HDMI IN na parte de trás do produto à tomada fêmea HDMI OUT no dispositivo digital. 2. -
Page 71: Ligar Um Dispositivo Usb
à porta USB do Soundbar. Para obter mais informações sobre como pode transferir ficheiros de atualização, aceda ao website da Samsung Electronics em (www.samsung.com Support). Em seguida, introduza ou selecione o modelo do seu Soundbar, selecione Software e Aplicações e, em seguida, selecione Transferências. - Page 72 • No modo “BT”, mantenha premido o botão (Origem) no painel direito do Soundbar ou no remoto controlo durante mais de 5 segundos para mudar para o modo “BT PAIRING”. Em seguida, selecione “[AV] Samsung Soundbar Mxxx M-Series” na lista de pesquisa do dispositivo Bluetooth. Para obter mais informações sobre lig\ações Bluetooth, consulte “Ligar um televisor através de Bluetooth” nas páginas 9 - 10.
- Page 73 08 UTILIZAÇÃO DO CONTROLO REMOTO Como utilizar o controlo remoto Permite ligar e desligar o Soundbar. Ligar/Desligar Pode selecionar TREBLE, BASS, ou AUDIO SYNC. • Para controlar o volume de sons agudos ou graves, selecione TREBLE ou BASS em Controlo de Definições de Som e defina o nível entre -6 e +6 através dos botões Cima/Baixo.
- Page 74 • Se premir novamente o botão Bluetooth POWER para desligar a função BT, “OFF - BLUETOOTH POWER” surge no ecrã do Soundbar. • Se o Soundbar estiver no modo “D.IN” e estiver ligado a uma Samsung Smart TV lançada após o ano 2017, é possível controlá-lo através do controlo remoto do televisor.
- Page 75 “OFF-TV REMOTE” surge no ecrã do Soundbar e a função desliga-se.) Para ajustar o volume apenas através do controlo remoto do televisor Samsung, mantenha premido o botão Surround durante mais de 5 segundos até que a mensagem “SAMSUNG-TV REMOTE” surja no ecrã do Soundbar.
- Page 76 09 INSTALAÇÃO DO SUPORTE DE PAREDE Precauções para a instalação • Instale apenas em paredes verticais. • Não instale em locais expostos a altas temperaturas ou a uma elevada percentagem de humidade. • Verifique se a parede é suficientemente resistente para suportar o peso do produto. Caso não seja, deve reforçar-se a parede ou optar-se por outro local para instalar o produto.
- Page 77 1. Coloque o Guia de suporte de parede 3. Utilize a ponta de uma caneta ou um lápis encostado à superfície da parede. afiado para furar o centro das imagens de • O Guia de suporte de parede deve ficar A-TYPE, em cada extremidade do Guia, para nivelado. assinalar os orifícios dos parafusos de •...
- Page 78 6. Utilize dois Parafusos (M4 x L12) para fixar os • Os suportes esquerdo e direito têm formas diferentes. Certifique-se de que Suporte de parede E e D à parte inferior do os posiciona corretamente. Soundbar. Para um ajuste adequado, certifique-se de que alinha as saliências no Soundbar com os orifícios nos suportes.
- Page 79 Retirar o Soundbar da parede 1. Para retirar o Soundbar do suporte de parede, empurre-o na direção da seta, incline-o ligeiramente para cima e, em seguida, afaste-o da parede, conforme mostrado. • Não se apoie na unidade instalada e evite chocar contra a unidade ou deixá-la cair. •...
- Page 80 10 RESOLUÇÃO DE PROBLEMAS Antes de solicitar assistência, verifique o seguinte. A unidade não se liga. O cabo de alimentação está ligado à tomada? ; Ligue a ficha à tomada. Uma função não funciona quando o botão é premido. Há eletricidade estática no ar? ; Desligue a ficha da tomada e volte a ligá-la. Ocorrem falhas de som no modo BT . ; Consulte as secções relativas à ligação através de Bluetooth nas páginas 9 e 14. O som não é reproduzido.
- Page 81 LICENÇA DE OPEN SOURCE Manufactured under license from Dolby Para enviar pedidos e perguntas sobre software Laboratories. Dolby, Dolby Audio, Pro Logic, open source, contacte a Samsung por e-mail and the double-D symbol are trademarks of (oss.request@samsung.com). Dolby Laboratories. 13 NOTA IMPORTANTE For DTS patents, see http://patents.dts.com.
- Page 82 (suporta Dolby® Digital), NOTAS • A Samsung Electronics Co., Ltd reserva-se ao direito de alterar as especificações sem aviso prévio. • O peso e as dimensões indicados são aproximados. • Para obter mais informação sobre a fonte de alimentação e o consumo de energia, consulte a etiqueta no produto.
- Page 83 معلومات السالمة تحذيرات السالمة تحذير للحد من خطر نشوب الحريق أو التعرض لصدمة • لتقليل مخاطر التعرض لصدمة كهربية، ال تقم بإزالة .كهربية، ال تعرض هذا الجهاز لألمطار أو الرطوبة .)الغطاء (أو الغطاء الخلفي فال توجد أجزاء يمكن للمستخدم صيانتها بالداخل. وإنما تنبيه...
- Page 84 حالة نقل الوحدة خالل فصل الشتاء، انتظر لمدة الحاسوب الشخصي أو جهاز المحمول، قم بتنزيل ساعتين تقريب ً ا حتى تصل درجة حرارة الوحدة إىل .الدليل بصيغة مستند من الموقع اإللكتروني .درجة حرارة الغرفة قبل االستخدام )http://www.samsung.com/support( .التصميم والمواصفات عرضة للتغيير دون إشعار مسبق iii - ARA...
- Page 85 المحتويات التحقق من المكونات ------------------------- )AA إدخال البطاريات قبل استخدام وحدة التحكم عن ب ُ عد (بطاريتان بحجم نظرة عامة حول المنتج ------------------------- Soundbar اللوح األمامي / اللوح األيمن الجانبي في ------------------------- Soundbar اللوح السفلي من Soundbar توصيل توصيل الطاقة الكهربائية ------------------------- ...
- Page 86 التوصيل بجهاز محمول Bluetooth التوصيل عبر تقنية ------------------------- استخدام التحكم في ب ُ عد كيفية استخدام التحكم عن ب ُ عد ------------------------- ------------------------- . باستخدام جهاز التحكم عن ب ُ عدSoundbar تعديل مستوى الصوت بوحدة تركيب حامل التثبيت بالحائط احتياطات التركيب ------------------------- مكونات...
- Page 87 .18 بالحائط، انظر صفحةSoundbar للتعرف عىل مكونات حامل تثبيت • .Samsung أو مركز خدمة العمالء أو مركز خدمة عمالءSamsung منفصلة. للشراء، تواصل معHDMI ت ُ باع كبالت • )AA إدخال البطاريات قبل استخدام وحدة التحكم عن ب ُ عد (بطاريتان بحجم...
- Page 88 نظرة عامة حول المنتج Soundbar اللوح األمامي / اللوح األيمن الجانبي في Soundbar الجانب األيمن من ضع المنتج بحيث يكون ظاهر ً اSAMSUNG شعار مستوى الصوت .عىل الجزء العلوي الطاقة الشاشة Soundbar اللوح السفلي من DIGITAL AUDIO IN DIGITAL AUDIO IN...
- Page 89 SOUNDBAR توصيل توصيل الطاقة الكهربائية :استخدم مكونات الطاقة (1، 2، 3) لتوصيل الوحدات بالمنافذ الكهربائية بالترتيب التالي . األساسية. انظر الصور التوضيحية أدناهSoundbar 2.) وحدة 1.) مضخم الصوت .لمزيد من المعلومات عن مصدر الطاقة المطلوب واستهالك الطاقة، راجع الملصق المرفق مع المنتج •...
- Page 90 استعداد (في حالة إيقاف تشغيل . الرئيسيةSoundbar بوحدة ) الرئيسيةSoundbar وحدة تشغيل األحمر أعد محاولة التوصيل مرة أخرى. لقراءة تعليمات فشل التوصيل .6 التوصيل اليدوي، انظر صفحة انظر معلومات جهة االتصال لمركز خدمة عمالء األحمر األعطال الوميض . في الدليلSamsung واألزرق 5 - ARA...
- Page 91 .في حالة فشل عملية التوصيل، سيضيئ المؤشر األزرق باستمرار. انتقل إىل الخطوة األوىل ثم ابدأ من جديد • الخلفيةSamsung استمتع بالصوت المحيطي الالسلكي عن طريق التوصيل بطقم مكبرات صوت ( ت ُباع بشكل منفصل). لمزيد من المعلومات، انظر دليلSoundbar ) بوحدةSWA-8500S( الالسلكية...
- Page 92 التوصيل بالتلفزيون الخاص بك . عن طريق توصيالت سلكية والسلكيةSoundbar استمع إىل صوت التلفزيون من ، يمكن التحكم في السماعات من باستخدامSamsung عندما تكون السماعة متصلة بجهاز تلفزيون مح د َّ د من • .جهاز التحكم عن ب ُ عد الخاص بالتلفزيون...
- Page 93 Auto Power Link . عند تشغيل التلفزيونSoundbar قم بتشغيل ارتباط الطاقة التلقائي في . بكبل رقمي بصريSoundbarقم بتوصيل التلفزيون و (المصدر) الموجود عىل يمين اللوح األيمن الجانبي أو جهاز التحكم عن ب ُ عد ثم حدد وضع اضغط عىل زر ."D.IN"...
- Page 94 أوSoundbar (المصدر) ألكثر من 5 ثوان في اللوح األيمن الجانبي من "، اضعط باستمرار عىل زرBT" في وضع • "[AV] Samsung Soundbar Mxxx M-Series" ". ثم حددBT PAIRING" جهاز التحكم عن ب ُ عد لالنتقال إىل وضع .من قائمة البحث بالتلفزيون 9 - ARA...
- Page 95 ؟BT PAIRING وBT READY ما هي حاالت Soundbar : في هذا الوضع، يمكنك البحث عن أجهزة التلفزيون المتصلة من قبل أو التوصيل بوحدةBT READY • .من أجهزة المحمول المتصلة من قبل "، اضغط باستمرار عىلBT" : في هذا الوضع، يمكنك التوصيل بجهاز جديد. (في وضعBT PAIRING •...
- Page 96 التوصيل بجهاز خارجي .Soundbar التوصيل بجهاز خارجي عبر شبكة سلكية أو السلكية لتشغيل صوت الجهاز الخارجي عبر .) أو تناظريAUX( التوصيل باستخدام كبل صوتي Soundbar الجانب األيمن من / DVD / مشغلBD مشغل جهاز استقبال / جهاز كونسول لأللعاب DIGITAL AUDIO IN (OPTICAL) OPTICAL OUT...
- Page 97 HDMI التوصيل باستخدام كبل Soundbar الجزء السفلي من الجهاز الخارجي HDMI IN HDMI كبل HDMI OUT )(غير متوفر HDMI OUT (TV-ARC) HDMI كبل HDMI IN (ARC) )(غير متوفر Soundbar الجانب األيمن من HDMI HDMI OUT الموجود في أسفل المنتج بالمقبسHDMI IN (غير مز و َّ د) من مقبسHDMI قم بتوصيل كبل .الموجود...
- Page 98 بتحديث البرنامج الثابت المخزن عليهUSB في حالة توفر تحديث، يمكنك تحديث البرنامج الثابت عن التوصيل بجهاز .Soundbar بجهازUSB إىل منفذ Samsung Electronics لمزيد من المعلومات حول كيفية تنزيل ملفات التحديث، اذهب إىل الموقع اإللكتروني .)Support www.samsung.com( .، حدد برامج وتطبيقات ثم تنزيالت. قد يختلف اسم الخيارSoundbar ثم أدخل أو حدد طراز جهاز...
- Page 99 "، اضعط باستمرار عىل زرBT" في وضع • "[AV] Samsung Soundbar Mxxx M-Series" ". ثم حددBT PAIRING" جهاز التحكم عن ب ُ عد لالنتقال إىل وضع .Bluetooth من قائمة البحث عن أجهزة " في صفحاتBluetooth لمزيد من المعلومات حول توصيالت البلوتوث، راجع "االتصال بالتلفزيون عبر...
- Page 100 استخدام التحكم في ب ُ عد كيفية استخدام التحكم عن ب ُ عد . وإيقاف تشغيلهSoundbar تشغيل ا لتشغيل .AUDIO SYNC أوBASS أوTREBLE يمكنك تحديد أوTREBLE للتحكم في مستوى صوت في وضع • في إعدادات الصوت ثم ضبط مستوىBASS التحكم...
- Page 101 .Auto Power Link وAnynet+ يمكنك تشغيل أو إيقاف تشغيل . بالضغط عىل أزرار اليمين أو يسار عىل التواليAuto Power Link وAnynet+ يتم التحكم في ، يمكنكHDMI عن طريق كبلSamsung TV بجهازSoundbar : في حالة توصيلAnynet+ – . اضغطSamsung TV باستخدام جهاز التحكم عن ب ُ عد بجهازSoundbar التحكم في...
- Page 102 باستخدام جهاز التحكم عن ب ُ عد سريعSoundbar ، يمكنك تعديل مستوى صوتSoundbar بعد تركيب • Soundbar . (إذا كنت ال ترغب في استخدام هذه الوظيفة عندما يكونSamsung TV االستجابة الذي يأتي مع جهاز " في شاشةOFF-TV REMOTE" لمدة 5 ثوان. سيظهرSurround وضع التشغيل، فاضغط باستمرار عىل زر...
- Page 103 تركيب حامل التثبيت بالحائط احتياطات التركيب .التركيب عىل في وضع عمودي فقط • .ال تقم بتركيب الجهاز في األماكن ذات درجات الحرارة العالية أو الرطوبة • التحقق ما إذا كان الجدار قوى بالقدر الكاف لدعم وزن المنتج. إذا كان غير ذلك، قم بتدعيم الحائط أو اختيار نقطة •...
- Page 104 ضع طرف القلم أو طرف القلم الحاد عىل منتصف ضع دعامة التثبيت بالحائط في مواجهة سطح عىل كل طرف للدعامة لتحديدA-TYPE صور .الحائط الفتحات لدعم البراغي، ثم قم بإزالة دعامة التثبيت .يجب أن تكون دعامة التثبيت بالحائط مستوية • .بالحائط...
- Page 105 ) لتركيب كل منM4 x L12( استخدم 2 من البراغي يختلف شكل وحدة التثبيت عىل الحائط اليمنى • عن شكل وحدة التثبيت اليسرى. تأكد من وضع دعامة التثبيت عىل الحائط اليسرى ودعامة التثبيت .وحدتي التثبيت بشكل صحيح .Soundbar عىل الحائط اليمنى بالجزء السفلي من ولضبط...
- Page 106 من الحائطSoundbar فك عن دعامة الحائط، ادفعه فيSoundbar لفصل اتجاه السهم ثم قم بإمالته قليال ً واسحبه بعيد ً ا عن .الحائط كما هو موضح عدم تعليق الوحدة الم ث ّ بتة وتجنب االصطدام أو • .سقوط الوحدة .تثبيت...
- Page 107 استكشاف المشاكل وإصالحها .قبل البحث عن المساعدة، راجع ما يلي .الوحدة ال تعمل هل تم توصيل سلك الطاقة في مأخذ التيار الكهربائي؟ .قم بتوصيل قابس التيار الكهربي من مأخذ التيار الكهربي .ال تعمل الوظيفة عند الضغط عىل الزر هل يوجد كهرباء ساكنة في الهواء؟ .افصل...
- Page 108 إشعار ترخيص الت ر اخيص المصدر المفتوح إلرسال االستفسارات والطلبات المتعلقة بالمصادر عبر البريدSamsung المفتوحة، يرجى االتصال بشركة Manufactured under license from Dolby .)oss.request@samsung.com( اإللكتروني Laboratories. Dolby, Dolby Audio, Pro Logic, and the double-D symbol are trademarks of مالحظة هامة عن...
- Page 109 المواصفات والدليل المواصفات 5V/0.5A األساسيةSoundbar وحدة 6.2 كجم الوزن )PS-WM30( مضخم الصوت 2.7 كجم األبعاد األساسيةSoundbar وحدة 5.78 ملمx 54.0 x 1010.5 عام × (العرض × االرتفاع )PS-WM30( مضخم الصوت 0.873 ملمx 392.0 x 200.0 )العمق درجة...
- Page 110 © 2017 Samsung Electronics Co., Ltd. All rights reserved. Contact SAMSUNG WORLD WIDE If you have any questions or comments relating to Samsung products, please contact the SAMSUNG customer care Centre. Country Contact Centre Web Site Country Contact Centre ...