Advertisement
Table of Contents
- 1 Table of Contents
- 2 Introduction , Attention
- 3 How to Install the Battery
- 4 Sonar Sensor Using Induction
- 5 Applied Mode
- 6 Sonar Sensor Introduction
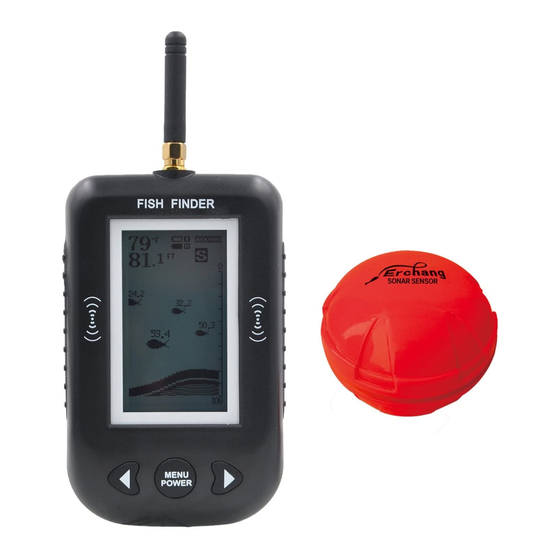
- 7 Display Interface
- 8 Menu Key Introduction
- 9 Parameter Settings
- 10 Analysis of Frequently Asked Questions
- 11 The Product Maintenance
- 12 The Prodct Specification
- Download this manual
Advertisement
Table of Contents

Summary of Contents for Erchang FISH FINDER
- Page 1 Operation Guide F3...
-
Page 2: Table Of Contents
Content Introduction , Attention………………………………1 How To Install The Battery…………………………2-3 Sonar Sensor Using Induction……………………4-5 Applied Mode…………………………………………5 Sonar Sensor Introduction…………………………5-7 Display Interface……………………………………7-8 Menu Key Introduction… … … … … … … … … … 8-9 Parameter Settings……………………………….9-18 Analysis of Frequently Asked Questions………..18-20 The Product Maintenance………………………20-21 The prodct specification……………………………21... -
Page 3: Introduction , Attention
1.Introduction : Thanks for choosing the Fish Finder of our company.This unit is designed for the fishing lovers. The unit can be used in rivers, lakes,or sea.We offer 12 months’ maintenance with any damages by non-human factors;The specific warranty terms refer to the guarantee lists.To familiarize yourself better with the product’s operation and maximize the... -
Page 4: How To Install The Battery
3. The handheld host drop into the water. 3.How to install the battery 3.1The host battery installation steps are as follows: 1.Open the back cover of batters. 2.Install 4 “AAA” batteries. Be certain that the batteries compartment. There are aligned as per the diagram within the battery house. 3.Slide the battery cover towards the top of the unit until it is completely closed. - Page 5 NOTE: 1. There are two ports of the charging line, USB port connects 5V DC power supply,another connects the DC female. 2. When the probe’s battery is lower than 3.2V, the battery indicator symbol on the host screen will twinkle. It means the probe should stop working and need to charge.
-
Page 6: Sonar Sensor Using Induction
4.Sonar Sensor Using Induction: You can refer to the chart! This product is designed with user-friendliness in mind. Attach the sensor to the fishing rod’s extreme and throw them into water as you do with float and baits. After switching on the main unit’s power on, you are ready to fish. -
Page 7: Applied Mode
5 Applied mode: 5.1.Sonar Graphic Mode: Fish finder renders real-time conditions of the water bottom with sonar graphic. Throw the sensor into water, drag it slowly at a stable speed, and you can view accurate information displayed on the screen, including water bottom contour, structure, depth, fish location, etc. - Page 8 it in a dry and insulated place after using. If you store it in a wet or conducted place, the humidity or conductor will cause the sonar sensor power on automatically. Please clean the sonar sensor with clean water and dry it in the air before storing. Sensor Working Theorem: The sensor working theorem is the electrical conductivity of water.
-
Page 9: Display Interface
6.3.Sonar Sensor Maintenance And store: 1. Do not place the sonar sensor in a wet area when not using, the dampness may turn on the sensor itself automatically. The battery will be depleted fast. Also avoid placing it on a metal board! 2. -
Page 10: Menu Key Introduction
Display Interface Introduction : 8.Menu key introduction: The key design style of the product is simple and easy to operate, you can very convenient to complete the function as you want . POWER KEY , turn on/off the power. Press the switch button for two seconds and then release, the power will on.The unit start working. -
Page 11: Parameter Settings
will be pauseed refreshing. RIGHT KEY - Right key is a parameter setting key. After starting menu, different parameters can be set. In addition, hold the right key, the screen will be pauseed refreshing. NOTE:1.Simulation Mode refer to simulation test,the depth of water and fish are simulated.In order to make the beginner to learn and use this product more easily. - Page 12 the “SENSTIVITY”setting of options,and then through the left and the right button to set the sensitivity. 3.The unit has 10-degree sensitivity for user to select(10% is the lowest,100% is highest). 9.2 Backlight Setting The unit has white LED backlight.You can use it at night or under weak light.To extend the battery life, please use this function only when you really need it.
- Page 13 3.The unit has 11-degree Back-light for user to select(10% is the lowest,100% is highest,off is shut off Back-light). 9.3 Depth Range Setting Depth range is the biggest depth of detect range.The biggest depth detect rang is displayed at the right of the bottom. If the detected rang is out of the biggest rang, nothing will be displayed at the location except the depth.Adjust the water bottom display wide is the depth range setting mainly funtion.For example,the water depth is 5 meters, and the depth...
- Page 14 the “DEPTH RANGE” setting of options.Then through the left and the right button to set the depth range. 3.Depth range setting determines the width of the bottom on the display screen.(For example, if the actual depth is 2m,the depth range you can set 3m.) There are six depth ranges(3,6,9,18,36,AUTO) for user to select.
- Page 15 9.5 Depth Alarm Setting Depth alarm is designed for user to set a number (2-30M) of depth.When the test depth is equal or less than the setting,it will alarm! Operation: 1.Press the on / off menu button, enter the menu selection interface. 2.Continue to press on / off menu button, until the display interface on the “DEPTH ALARM”...
- Page 16 9.6 LCD Contrast Setting Contrast is the backgroud color deree of LCD display.This function can make your visual more suitable.Different environment or observation angle will effect the display of LCD. You can adjust the contrast as you want. Operation: 1.Press the on / off menu button, enter the menu selection interface. 2.Continue to press on / off menu button, until the display interface on the “CONTRAST”...
- Page 17 9.7 Chart Speed Setting Chart speed is adjust the screen scan speed.The unit have 10 grades ("100%" is the fast)for user to choose.In general, you should set the chart speed highest.Thus it can up-date the detected underwater information in time. Operation: 1.Press the on / off menu button, enter the menu selection interface.
- Page 18 9.8 unit setting The unit setting includes depth and temperature unit, it is a measure used to switch the water depth and temperature (M / °C and FT / °F). Operation: 1.Press the on / off menu button, enter the menu selection interface. 2.Continue to press on / off menu button, until the display interface on the “UNIT”setting of options.Then through the left and the right button to set the depth and temperature unit .
- Page 19 9.9 Mode Set Up Mode set up is the unit work modes for user to select.It has two modes(demo,work). Operation: 1.Press the on / off menu button, enter the menu selection interface. 2.Continue to press on / off menu button, until the display interface on the “MODE”setting of options.Then through the left and right button to set the work mode.
-
Page 20: Analysis Of Frequently Asked Questions
on the “ORIGINAL”setting of options.Then through the left and right button to set the original. After the selection is "yes", about 5 seconds to complete the factory settings. 10.Analysis of Frequently Asked Questions: 10.1.Can not power on 1 ) Please make sure the battery power is enough, and the battery is correctly installed. - Page 21 4) Fishing on ice or "shoot-through" the hull of a boatboat . Depth shows the number of unstable or displayed as "--", please confirm the hull and water no bubble.The bubble will lead to the fish finder can not work normally unable to obtain depth data.
-
Page 22: The Product Maintenance
8) Speed over 8 km / h will lead to this situation.Please reduce the speed ! 11.The Product Maintenance: In order for your fish finder more attractive and durable, we recommend you follow the below steps : 11.1.For the shell Cleaning the product's outer case with a cloth dipped mild detergent except for the screen , and then dry it up. -
Page 23: The Prodct Specification
Remove the batteries before storage! 11.4.Working temperature The low temperature will cause damage to the electronic part, the working environment temperature not lower than - 20 ℃ ( - 4 degrees Fahrenheit). 12.The prodct specification: 12.1.Display Display: Dot Matrix LCD Display Size: 50x45mm Display Dot Number : 128*96 Display Contrast: 10~100%...
Need help?
Do you have a question about the FISH FINDER and is the answer not in the manual?
Questions and answers
che suono emette il dispositivo in caso di presenza di pesci? come si distingue se sono piccoli o grandi ? grazie