Table of Contents
Advertisement
Hardware User's Manual
Rotarod
References:
LE8205 (76-0770), LE8305 (76-0771), LE8505 (76-0772), LE8355 (76-0773)
Version:
V20/02/2015
Panlab, s.l.u
C/Energía, 112
08940 Cornellà de Ll.(Barcelona)
Spain
www.panlab.com
International Calls: +34 934 750 697
Domestic Call: 934 190 709
Fax: +34 934 750 699
Info@panlab.com
Advertisement
Table of Contents

Summary of Contents for Panlab Rotarod LE8205
- Page 1 Hardware User’s Manual Rotarod References: LE8205 (76-0770), LE8305 (76-0771), LE8505 (76-0772), LE8355 (76-0773) Version: V20/02/2015 Panlab, s.l.u International Calls: +34 934 750 697 C/Energía, 112 Domestic Call: 934 190 709 08940 Cornellà de Ll.(Barcelona) Fax: +34 934 750 699 Spain Info@panlab.com...
- Page 2 Some symbols may have more than one interpretation by professionals unaccustomed to their usage. PANLAB reserves the right to modify, in part or in total, the contents of this document without notice.
-
Page 3: Symbols Table
1. SYMBOLS TABLE Recognising the symbols used in the manual will help to understand their meaning: DESCRIPTION SYMBOL Warning about operations that must not be done because they can damage the equipment Warning about operations that must be done, otherwise the user can be exposed to a hazard. -
Page 4: Unpacking And Equipment Instalation
3. UNPACKING AND EQUIPMENT INSTALATION WARNING: Failure to follow the instructions in this section may cause equipment faults or injury to the user. A. No special equipment is required for lifting but you should consult your local regulations for safe handling and lifting of the equipment. B. - Page 5 PC Control Some of these instruments are designed to be controlled from a PC. To preserve the integrity of the equipment it is essential that the attached PC itself conforms to basic safety and EMC standards and is set up in accordance with the manufacturers’...
-
Page 6: Maintenance
4. MAINTENANCE WARNING: Failure to follow the instructions in this section may cause equipment fault. PRESS KEYS SOFTLY – Lightly pressing the keys is sufficient to activate them. Equipment does not require being disinfected, but cleaned for removing urine, feces and odor. -
Page 7: Table Of Contents
TABLE OF CONTENTS SYMBOLS TABLE GOOD LABORATORY PRACTICE UNPACKING AND EQUIPMENT INSTALATION MAINTENANCE INTRODUCTION EQUIPMENT DESCRIPTION 6.1. FRONT PANEL 6.2. REAR PANEL 6.3. ROTAROD EQUIPMENT CONNECTION WORKING WITH THE EQUIPMENT 8.1. CHANGING SETTINGS 8.2. SELECTION OF THE WORKING MODE 8.3. PREPARING THE INSTRUMENT 8.4. -
Page 8: Introduction
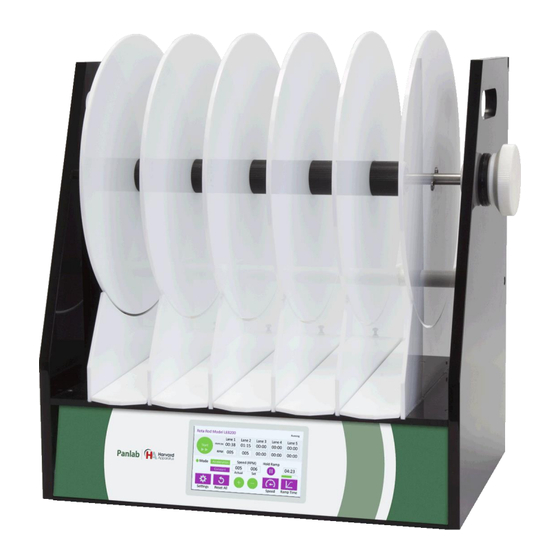
5. INTRODUCTION The LE8205 (76-0770), LE8305 (76-0771), LE8505 (76-0772) and LE8355 (76-0773) ROTAROD units facilitate easy testing of motor activity in rodents. Drug administration, central nervous system damage, disease effects on motor co- ordination or fatigue can be assessed by measuring the time during which the animal continues walking in a rotating rod. - Page 9 Simply connect the PC and the ROTAROD with the interconnection cable, and the data generated from the rod will be automatically sent to the PC. Panlab’s Sedacom software program needs to be installed previously on the PC (must be purchased separately).
-
Page 10: Equipment Description
6. EQUIPMENT DESCRIPTION 6.1. FRONT PANEL Start/ Stop button Working mode Rod speed Lane counters Hold Ramp button Settings screen Reset Speed increase/decrease button Speed screen Ramp screen Figure 2. Front Panel Start/Stop button: to start or stop the experiment. ... -
Page 11: Rear Panel
Reset button: Clears the lane counters indicators to zero. Speed increase/decrease button: Increments/decrements by one unit the rod speed. Applies only to constant speed working mode. Speed screen: Displays the Set Speed screen. Applies only to constant speed working mode. -
Page 12: Rotarod
6.3. ROTAROD EXTENSION HOOD ROTATING DRUM DRUM LOCKING SCREW LEVERS TRANSPARENT LID Figure 4. Rotarod main parts The Rotarod LE8305 (76-0771) and the LE8505 (76-0772) have a turning rod with 4 slots. The LE8205 (76-0770) features 5 slots and the LE8355 (76-0773), 2 slots. Rodents (rats or mice depending of the instrument model) are placed in these slots. -
Page 13: Equipment Connection
7. EQUIPMENT CONNECTION The equipment connection is shown in the picture 5. Figure 5. Equipment connection The connections and necessary cables are listed in the following table. FROM CABLE 1 Rotarod USB-B type PC USB Port USB Cable 2 AC-DC adapter mains Mains Power cord 3 Rotarod power jack AC-DC adapter Jack cable... -
Page 14: Working With The Equipment
8. WORKING WITH THE EQUIPMENT Once the equipment is turned on, the start-up screen appears after a few seconds: Figure 6. Start-up screen 8.1. CHANGING SETTINGS The following options can be modified thorough the Settings screen: Figure 7. Settings options ... -
Page 15: Selection Of The Working Mode
Figure 8. Backlight settings screen Upgrade software: Used to update the firmware to the latest version. System Information: Displays the Rotarod model type, the firmware version number and serial number of the device. 8.2. SELECTION OF THE WORKING MODE A) CONSTANT MODE Figure 9. - Page 16 The starting point of the TIMERS is determined when the relevant LEVER is lifted; each TIMER works independently from the others. The end point of each TIMER is determined when the relevant LEVER is lowered. B) ACCELERATION MODE The motor increases speed automatically and lineally from 4 up to 40 rpm, thus producing a constant acceleration of the rod.
- Page 17 ACCELERATION: Figure 11. Screen in acceleration mode running This is the second state after pressing the Hold Ramp button in this mode. The motor ramps from 4 to 40 rpm, following the predetermined SLOPE TIME once the Hold Ramp button has been pressed. ...
- Page 18 ACCELERATION-CONSTANT: Figure 12. Screen in acceleration-constant mode running This is the third optional state reached after pressing the Hold Ramp button again in this mode. The motor stops the acceleration and keeps running constantly in the current rod speed.
-
Page 19: Preparing The Instrument
8.3. PREPARING THE INSTRUMENT Figure 13. Placing the animal in the roll Holding the animal by its tail, swing them up from a position lower than the rod, so that they find themselves walking inside. It is advisable to set the cylinder in motion before placing the animals on the rod. -
Page 20: Conducting Experiments
8.4. CONDUCTING EXPERIMENTS 1) Turn on the instrument using the POWER switch. 2) Lower the LEVERS, this will prevent the timer counters from beginning. 3) Select the desired working mode. a) CONSTANT 1) Establish the desired initial rod speed using the “+”, “-”or “Speed” buttons. The rod will not begin rotating until the “Start”... - Page 21 Time elapsed for the subject in Lane 1 Current selected rod speed Figure 15. Display running in Constant mode b) ACCELERATION 1) The DISPLAY will indicate that the unit remains in WAITING mode. Now select the RAMP TIME using the “Ramp Time” (the acceleration is automatically calculated from this time to reach max rotation speed).
- Page 22 3) Place the animals in their respective lanes on the rod, as shown in Section 8.3. 4) Manually lift the LEVERS for the respective lanes that will be used. If there are no LEVER lifted when the “Hold Ramp” button is pressed in the next step, the display will show the message “Raise levers to activate lanes”...
- Page 23 7) If the START/STOP BUTTON is pressed again, it will interrupt the experiment, halting the acceleration process. The display will continue to show the last time at any of the subjects fell from the rod. c) ACCELERATION-CONSTANT 1) Begin the experiment in Acceleration mode following the steps 1) to 5) as described above.
-
Page 24: Tranfering Data To A Pc (Sedacom)
9. TRANFERING DATA TO A PC (SEDACOM) The purchase of the Sedacom software option is needed for transferring the data to a computer (please contact your local provider for more information). The Sedacom software reference is composed by a USB Flash key containing the software Installer, License for use and Sedacom User’s Manual. -
Page 25: Maintenance
10. MAINTENANCE 10.1. REMOVING PARTS Use the screws on both top sides to remove it. 1. The cleft on the roll must fit with the one on the box. 2. Use the white screw to fix the roll. It must fit with the hole in the box. -
Page 26: Cleaning The Unit
10.2. CLEANING THE UNIT WARNING: Do not use organic solvents to clean the unit, as they may damage the Perspex sheets or crack the acrylic front panel of the liquid crystal display. A dampen cloth and water can be used to clean the equipment and then a dry cloth should be used to dry it. -
Page 27: Troubleshooting
11. TROUBLESHOOTING This table provides instruction to solve the most frequent problems. PROBLEM SOLUTION Check that all levers are down. If all levers are down check that there is not any lever pusher blocked. If so clean it The display shows the message according to our recommended cleaning “Place all levers down”... -
Page 28: Preventive Maintenance
12. PREVENTIVE MAINTENANCE EXPERIMENT 4 MONTHS LEVERS CLEANING ROD CLEANING PLATFORM CLEANING TRANSPARENT BOTTOM LID CLEANING LEVERS STRENGTH ADJUSTMENT If levers fall with same force adjustment is not necessary. Rotarod... -
Page 29: Specifications
13. SPECIFICATIONS AC TO DC ADAPTER Input voltage: 100-240V~ Frequency: 50-60 Hz Output voltage: 30V= Max. output current: 1,666A Polarity: ENVIRONMENTAL CONDITIONS Operating temperature: 10°C to +40°C Operating relative humidity: 0% to 85% RH, non-condensing Storage temperature: 0°C to +50°C, non-condensing COMUNICATIONS OUTPUT Standard Interface: Connector:... - Page 30 Consequently, this product can incorporate the CE and FCC marking: En conséquence, ce produit peut incorporer le marquage CE et FCC: En representación del fabricante: Manufacturer’s representative: Carme Canalís En représentation du fabricant: General Manager Panlab s.l.u., a division of Harvard BioScience Cornellà de Llobregat, Spain Rotarod...
- Page 31 04/06/2014 Rotarod...
Need help?
Do you have a question about the Rotarod LE8205 and is the answer not in the manual?
Questions and answers