
Related Manuals for Panasonic SQ4-C11


Summary of Contents for Panasonic SQ4-C11
- Page 1 Controller for Safety Liquid Leak Sensor SQ4-A Series SQ4-C11 Instruction Manual MJE-SQ4C11 N.0050-11V 2016.1 panasonic.net/id/pidsx/global...
- Page 2 (MEMO) © Panasonic Industriar Devices SUNX Co., Ltd. 2016...
- Page 3 Thank you for purchasing Panasonic Industrial Devices SUNX’s controller SQ4-C11 for safety liquid leak sensor SQ4-A sereis. Read this instruction manual carefully and thoroughly for the correct and optimum use of this device. Kindly keep this manual in a convenient place for quick reference.
-
Page 4: Table Of Contents
Chapter 5 Troubleshooting ······························································· 29 Chapter 6 Specifications / Dimensions ·············································· 31 6-1 Specifications ···············································································31 6-2 Option ························································································33 6-3 Dimensions··················································································34 Chapter 7 Others ············································································ 35 7-1 Glossary ·····················································································35 7-2 CE Marking Declaration of Conformity ···············································36 © Panasonic Industriar Devices SUNX Co., Ltd. 2016... -
Page 5: Chapter 1 Introduction
■ Before using this device, check whether the device performs properly with the functions and capabilities as per the design specifications. ■ In case of disposal, dispose this device as industrial waste. © Panasonic Industriar Devices SUNX Co., Ltd. 2016... - Page 6 Otherwise, fire, failure or malfunction may occur. ● Do not disassemble or modify this device. Otherwise, failure, malfunction, injury or fire may occur. If repair or modification is performed not by Panasonic Electric Works SUNX, the warranty is not applied.
- Page 7 ● After maintenance or adjustment, and before starting operation, test this device following the procedure specified in “Chapter 4 Maintenance.” ● Clean this device with a clean cloth. Do not use any volatile chemicals. © Panasonic Industriar Devices SUNX Co., Ltd. 2016...
-
Page 8: Applicable Standards / Regulations
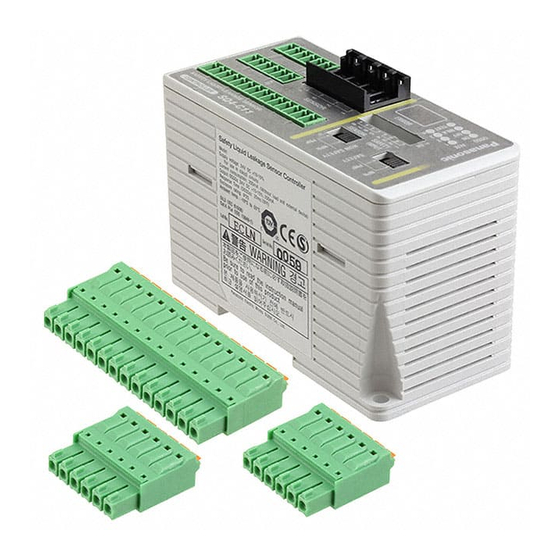
1-4 Confirmation of Packed Contents □ Main device 1 unit □ Instruction manual (this document) 1 pc. □ Terminal blocks (6 poles) 2 pcs. □ Terminal blocks (14 poles) 1 pc. © Panasonic Industriar Devices SUNX Co., Ltd. 2016... -
Page 9: Chapter 2 Before Using This Device
Lights for interlock goes OFF for an error or when control output 1 / 2 [INLK] (OSSD 1 / 2) is ON. Test input indicator (Orange) Lights when test input terminal is open (effective). [TEST] © Panasonic Industriar Devices SUNX Co., Ltd. 2016... - Page 10 Common terminal for control output 1 / 2 COM+ (OSSD 1 / 2) return in NPN output Common terminal for control output 1/2 COM- (OSSD 1 / 2) return in PNP output +24V © Panasonic Industriar Devices SUNX Co., Ltd. 2016...
- Page 11 It is connected to the SO+ terminal when the safety input 1 / 2 is in the contact mode. It is connected to the SO- terminal when the safety input 1 / 2 is in the contact mode. © Panasonic Industriar Devices SUNX Co., Ltd. 2016...
-
Page 12: Mounting / Removal
Step 3 While maintaining the condition in the procedure 2, lift up the controller to remove it. Flathead screwdriver DIN rail stopper Take care that if the controller is lifted with the stopper remained inside, the tabs crack © Panasonic Industriar Devices SUNX Co., Ltd. 2016... - Page 13 Also the controller can be mounted with M4 pan head screw (length: 12mm or more) (purchase separately). The tightening torque should be 1.2N·m or less. Mounting holes dimension 40mm M4mm M4 pan head screw (length: 12mm or more) (Purchase separately) 92mm © Panasonic Industriar Devices SUNX Co., Ltd. 2016...
-
Page 14: Wiring
6) In case a surge is generated, take countermeasures such as connecting a surge absorber to the origin of the surge. 7) Power supply unit corresponding to CLASS 2 (only for requiring TÜV Mark conformation). © Panasonic Industriar Devices SUNX Co., Ltd. 2016... -
Page 15: I/O Circuit Diagrams
Control NPN output type Sensor 3 circuit SQ4-A□-N Sensor 4 Reset Non-safety output polarity selection switch <Reference> KA and KB are external devices (forced guide relay, magnet contactor or monitored valve). © Panasonic Industriar Devices SUNX Co., Ltd. 2016... - Page 16 Approx. 30 to 60 μs Approx. 30 to 60 μ s Approx. 20 μ s Approx. 20 μ s Control output 2 (OSSD 2) Approx. 30 to 60 μ s Approx. 30 to 60 μ s © Panasonic Industriar Devices SUNX Co., Ltd. 2016...
-
Page 17: Connecting To The Terminal Block Of The Controller
(lead wire) while pressing the release button. ● 0.2 to 1.5mm (AWG 24 to 16) is recommend for single wire or stranded wire (lead wire). Lead wire Flathead screwdriver Ferrule (sleeve) terminal (Purchase separately.) Release button © Panasonic Industriar Devices SUNX Co., Ltd. 2016... -
Page 18: Connection / Removal Of Controller And Safety Liquid Leak Sensor Sq4-A Series
• Place pliers parallel to the easy insulation displacement connector and crimp the connector as shown in the figure below. • Be careful not to damage the wire with pliers. • Crimp the connector carefully so that the wire may not be disconnected. Pliers © Panasonic Industriar Devices SUNX Co., Ltd. 2016... - Page 19 Step 6 Depending on No. of the safety liquid leak sensor connecting, set the sensor connection number setting switches as table below. Sensor connection Switch No. No. of the sen- number setting sor connecting switches 1 unit 2 units 3 units 4 units © Panasonic Industriar Devices SUNX Co., Ltd. 2016...
- Page 20 When pulling out the easy insulation displacement connector, be sure to hold the lock release lever. in case pulling out without holding the lock release lever, the connector or the cable may break. © Panasonic Industriar Devices SUNX Co., Ltd. 2016...
-
Page 21: Chapter 3 Functions
(white) of safety leak sensor is broken. Mount the reset button a place where the entire dangerous zone can always be known and the button can be operated outside the dangerous zone. © Panasonic Industriar Devices SUNX Co., Ltd. 2016... -
Page 22: Auto Reset
(From EN 60204-1) <Time chart> Sensor detection output 20ms or less 30ms or more 100ms or less Control output 1 / 2 (OSSD 1 / 2) © Panasonic Industriar Devices SUNX Co., Ltd. 2016... -
Page 23: Test Input Function
Control output 1 / 2 (OSSD 1 / 2) Do not use the test input function for the purpose of stopping the machine in which this device is mounted. Otherwise, death or injury may occur. © Panasonic Industriar Devices SUNX Co., Ltd. 2016... - Page 24 SO-. Safety sensors can be connected to this device. [Semiconductor input mode] <PNP output> Control output polarity Safety sensor Power supply selection switch Control output 1 (OSSD 1) Safety input mode Control output 2 (OSSD 2) setting switch © Panasonic Industriar Devices SUNX Co., Ltd. 2016...
- Page 25 = 7ms + 20ms + 10ms =37ms When connecting control output terminal Y1 of other SQ4-C11 and safety input terminal SIN1, and connecting control output terminal Y2 of other SQ4-C11 and safety input terminal SIN2, it can also be used as serial connection. SIN1...
- Page 26 Use the safety contact with two NC (normal close) contacts and connect wires to both safety inputs 1 / 2. Note that only one side connection does not lead to normal operation. © Panasonic Industriar Devices SUNX Co., Ltd. 2016...
-
Page 27: Lockout Cancel Function
2) Reset operation from reset input terminal. <Manual reset> After short circuit between X1 and X2 30ms or more, open again. <Auto reset> After open between X1 and X3 30ms or more, short circuit again. © Panasonic Industriar Devices SUNX Co., Ltd. 2016... -
Page 28: Chapter 4 Maintenance
3) When the location or installation environment of this device is changed 4) When wires or routing method of wires are changed 5) When FSD (Final Switching Device) parts are changed 6) When FSD (Final Switching Device) settings are change © Panasonic Industriar Devices SUNX Co., Ltd. 2016... -
Page 29: Chapter 5 Troubleshooting
Parts.” trol output terminals Y1 and Y2 Wire control output terminals Y1 and Y2 wires. correctly. Refer to “2-4 Wiring.” Output circuit is damaged. Output circuit error Replace this device. © Panasonic Industriar Devices SUNX Co., Ltd. 2016... - Page 30 Setting of control output polarity selection switch and Match the control output 1 / 2 (OSSD 1 / 2) and output output polarity of sensor are not matched polarity of sensor Connected sensor is broken Replace the sensor. © Panasonic Industriar Devices SUNX Co., Ltd. 2016...
-
Page 31: Chapter 6 Specifications / Dimensions
Interlock function / lockout Incorporated cancel function Test input function Incorporated External device monitor function Incorporated Safety input function Incorporated Control output polarity Incorporated selection function Non-safety output polarity Incorporated selection function © Panasonic Industriar Devices SUNX Co., Ltd. 2016... - Page 32 Notes: 1) PFHd: Probability of dangerous failure per hour 2) MTTFd: Mean time to dangerous failure 3) Safe failure fraction 4) Hardware failure tolerance 5) Do not use or storage in environment of more than atmospheric pressure at sea level. © Panasonic Industriar Devices SUNX Co., Ltd. 2016...
- Page 33 Options 6-2 Option ● Easy insulation displacement connector: 5 pieces / set Model No. Applicable sensor Description CN-EP2 SQ4-A21-□ For PVC cable CN-EP3 SQ4-A22-□ For PFA cable © Panasonic Industriar Devices SUNX Co., Ltd. 2016...
-
Page 34: Dimensions
Dimensions 6-3 Dimensions (Unit: mm) 2-ø4.4 mounting hole 37.5 35.5 DIN-rail 35mm width matching (6.5) (72.2) (82.5) © Panasonic Industriar Devices SUNX Co., Ltd. 2016... -
Page 35: Chapter 7 Others
It is one of the safe status of this device. Operation is stopped if Lockout the self-diagnosis function determines that an irrecoverable failure (OSSDs do not operate normally, etc.) has occurred. © Panasonic Industriar Devices SUNX Co., Ltd. 2016... -
Page 36: Ce Marking Declaration Of Conformity
CE Marking Declaration of Conformity 7-2 CE Marking Declaration of Conformity Itemized Essentials of EU Declaration of Conformity Manufacturer’s Name: Panasonic Industrial Devices SUNX Co., Ltd. Manufacturer’s Address: 2431-1, Ushiyama-cho, Kasugai, Aichi 486-0901, Japan EU Representative’s Name: Panasonic Marketing Europe GmbH Panasonic Testing Center EU Representative’s Address: Winsbergring 15, 22525 Hamburg, Germany... - Page 37 Revision History First edition: October 1, 2010 Second edition: November 10, 2010 Third edition: January 5, 2011 Forth edition: June 1, 2011 Fifth edition: January 20, 2013 Sixth edition: January 15, 2016 © Panasonic Industriar Devices SUNX Co., Ltd. 2016...
- Page 38 (MEMO) © Panasonic Industriar Devices SUNX Co., Ltd. 2016...
- Page 39 (2) Any Products found to be defective must be shipped to Panasonic Electric Works SUNX with all shipping costs paid by Pur- chaser or offered to Panasonic Electric Works SUNX for inspection and examination. Upon examination by Panasonic Electric Works Panasonic Electric Works SUNX, Panasonic Electric Works SUNX will, at its sole discretion, repair or replace at no charge, or refund the purchase price of, any Products found to be defective.
- Page 40 ■ Overseas Sales Division (Head Office): 2431-1 Ushiyama-cho, Kasugai-shi, Aichi, 486-0901, Japan ■ Telephone: +81-568-33-7861 ■ Facsimile: +81-568-33-8591 panasonic.net/id/pidsx/global For sales network, please visit our website. © Panasonic Industrial Devices SUNX Co., Ltd. 2016 January 2016 PRINTED IN JAPAN MJE-SQ4C11 No.0050-11V...