
Summary of Contents for Russelectric RTS03 Series
- Page 1 O & M Manual Type RTS03 Bypass-Isolation Transfer Switches Russelectric Inc. South Shore Park, Hingham, Massachusetts 02043 Service 800 654-3020 90E1720004 rev. B www.russelectric.com...
-
Page 3: Table Of Contents
O&M Manual –90E1720004 Table of Contents List of Figures ................................5 Section 1 Hazard Categories and Special Symbols ....................6 Section 2 Introduction ............................. 7 General Description ............................... 7 Identification................................8 RTS03 Model Numbering System ........................... 8 Section 3 Safety Precautions ........................... 9 Section 4 Receiving, Handling and Storage ...................... - Page 4 O&M Manual –90E1720004 Setting the Clock.............................. 40 Setting Daylight Savings..........................40 Entering the Switch Designation........................40 Setting Timers..............................41 Setting Voltage and Frequency Setpoints for S1 (VFS1) and S2 (VFS2)............41 Setting Transition Mode on a Closed Transition Switch ................. 41 Setting Pre and Post for Elevator Contacts ......................
-
Page 5: List Of Figures
O&M Manual –90E1720004 List of Figures Figure 1: Lifting with an Overhead Crane and Eyebolts ................... 10 Figure 2: Lifting with an Overhead Crane, Integral Lifting Angles and Cables or Chains ........11 Figure 3: Lifting with Sling Rigging......................... 11 Figure 4: Forklift Safety Strap........................... -
Page 6: Hazard Categories And Special Symbols
Please Note: Electrical equipment should be installed, operated, serviced, and maintained only by qualified personnel. No responsibility is assumed by Russelectric Inc. for any consequences arising out of the use of this material. -
Page 7: Introduction
The parts are then painted utilizing a polyester powder coating applied by the electrostatic method and cured in a baking oven and is designed to stand up to normal industrial environments. Russelectric Transfer Switches are listed to UL1008, Underwriters Laboratories® (UL®). -
Page 8: Identification
O&M Manual –90E1720004 Identification Each Russelectric bypass-isolation transfer switch is identified by a unique combination of model and serial numbers. These numbers, along with the electrical rating data, are provided on a nameplate affixed to the bypass-isolation transfer switch and control system. -
Page 9: Safety Precautions
O&M Manual –90E1720004 Section 3 Safety Precautions This section contains important safety precautions that must be followed before attempting to lift, move, install, use, or maintain Russelectric bypass-isolation transfer switches and associated components. HAZARD OF ELECTRIC SHOCK, EXPLOSION, OR ARC FLASH ... -
Page 10: Receiving, Handling And Storage
Figure 1: Lifting with an Overhead Crane and Eyebolts Handling with Lifting Angles Russelectric provides optional lifting angles for heavy switches. Use rigid spreaders or a spanner bar to provide vertical lift on the lifting angles. This will help to avoid damaging the frame or finish. -
Page 11: Handling With Sling Rigging
O&M Manual –90E1720004 Figure 2: Lifting with an Overhead Crane, Integral Lifting Angles and Cables or Chains Follow these instructions to handle the switch: 1. Use load-rated cables or chains with safety hooks or shackles. Do not pass cables or chains through holes in lifting straps. 2. -
Page 12: Cradle/Rollout
See Section 8 for removing or withdrawing the cradle or rollout. Storage If the Russelectric bypass-isolation transfer switch is to be stored before being placed into service, perform the steps listed below. 1. Unpack the equipment to check for completeness and condition. - Page 13 If necessary, use additional heat to keep the equipment dry. Contact Russelectric Services at 1-800-654-3020 if the internal heaters are not adequate for your location. 6. If optional internal heaters are supplied with the bypass-isolation transfer switch, connect them to an external power source.
-
Page 14: Installation
O&M Manual –90E1720004 Section 5 Installation Before installing Russelectric bypass-isolation transfer switches, read and understand: 1. All precautions in this manual. 2. All manuals for associated components. 3. All drawings and diagrams included with the equipment. Installing the Bypass-Isolation Transfer Switch When correctly installed the: 1. -
Page 15: Anchoring The Switch -Seismic
NOTE: When connecting power cables, use 90 °C insulated conductors based on the ampacity of 75 °C conductors unless otherwise indicated by supplemental instructions. Russelectric bypass-isolation transfer switches are provided with compression or mechanical type lugs for terminating the main power cables. -
Page 16: Torque Values For Mechanical Lugs
O&M Manual –90E1720004 type and size of cable involved. Refer to the NEC requirements for more information regarding minimum bending radii of cables. 3. Securely lace and support the line and load cables as directed in “Conductor Restraint for Short-Circuit Current Rating“, on page 17. Note: This helps avoid strain or load on the terminals. -
Page 17: Conductor Restraint For Short Circuit Current Rating
O&M Manual –90E1720004 Conductor Restraint for Short Circuit Current Rating HAZARD OF CONDUCTOR MOVEMENT UNDER SHORT CIRCUIT CONDITIONS Restrain conductors in the bypass-isolation transfer switch based on Table 2. Failure to follow this instruction can result in equipment damage. Refer to Table 2 to determine if cable restraints are required. -
Page 18: Figure 8: Wrapping The Space Between Cables
O&M Manual –90E1720004 2. Wrap the rope several times (Figure 8) until the space between the conductors are completely filled. a. Weave the final rope loop underneath the previous loop. b. Bring the rope through the right-hand space. c. Pull the rope taut. 3. -
Page 19: Figure 11: Securing Cables To Supports (Optional)
O&M Manual –90E1720004 Support channel shown Figure 11: Securing Cables to Supports (optional) end (A) end (B) Figure 12: Tying the Rope Ends Together Section 5 Installation Page 19 of 52... -
Page 20: Connect The Controls And Wiring
O&M Manual –90E1720004 Connect the Controls and Wiring 1. Locate the customer control terminal block TB5 (Figure 13) located behind the upper door. TB5 Terminal Block Figure 13: Locate the TB5 Terminal Block 2. Refer to the wiring diagrams supplied with the switch for proper field connections to the TB5 terminal block. -
Page 21: Transfer Switch Inspection And Testing Before Operation
O&M Manual –90E1720004 Transfer Switch Inspection and Testing Before Operation After the Russelectric bypass-isolation transfer switch and components have been installed and all control and primary connections made; perform a final inspection and test before placing the switch into service. -
Page 22: Check The Equipment Ground-Fault Systems
Note: If the resistance reads less than one megohm while testing with the branch circuit devices in the Open position, the system may be unsafe and should be investigated. Consult Russelectric Services at 1-800-654-3020 to help you correct any problems. -
Page 23: Pre-Energizing Checkout Procedure
O&M Manual –90E1720004 Section 6 Pre-Energizing Checkout Procedure Conduct a complete inspection before the switch is energized to ensure that all components function and operate properly. Complete every step of the checkout procedure listed before energizing the transfer switch. 1. Check all field-installed bus bar connections. 2. - Page 24 O&M Manual –90E1720004 12. On switches containing an electronic trip circuit breaker, set the tripping characteristic curve of the adjustable electronic trip unit per the job requirements, or as outlined in the respective instruction manual. 13. Verify that all grounding connections are correctly made. If the transfer switch is used as a service entrance, double check to see that the main bonding jumper is connected.
-
Page 25: Energizing The Bypass-Isolation Transfer Switch
Note: This procedure does not replace startup by a qualified Russelectric field service technician; such service should be scheduled by calling Russelectric services at 1-800-654- 3020. - Page 26 O&M Manual –90E1720004 l. Verify that the transfer switch transfers to the S2 source by check the status on the RPTCS OIP. m. Cancel the load test and verify that the engine shuts down. n. Take the bypass switch out of bypass to the non-bypass position. o.
-
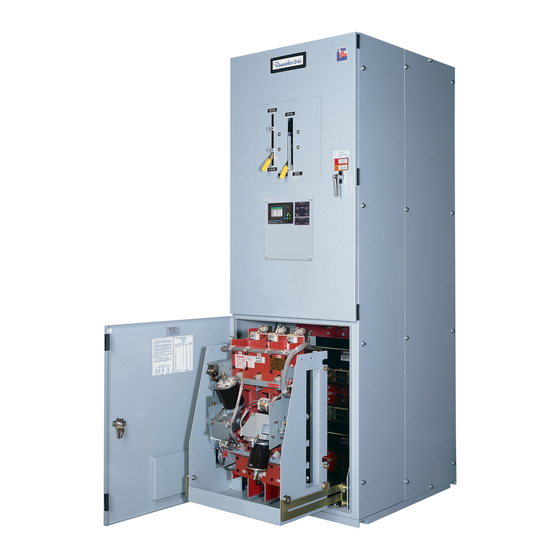
Page 27: Operation
O&M Manual –90E1720004 Section 8 Operation This section describes the proper operation of the bypass-isolation transfer switch. Bypass Switch The bypass/isolation switch provides three sets of fully-rated contacts for bypassing the transfer switch to either source. A manual operator is used to operate the contacts. There are also auxiliary contacts for the control system and customer use. -
Page 28: Bypass Mode
O&M Manual –90E1720004 Source Motor Finger Clusters Load Source Figure 15: Transfer Switch Cradle Bypass Mode RTS03-ABL (Load Break) Operation Load break bypass-isolation switches allow the transfer switch to be bypassed and isolated for repair or inspection, regardless of the position and condition of the transfer switch. It is designed to break power to the load while being bypassed. -
Page 29: To Bypass The Transfer Switch
O&M Manual –90E1720004 To Bypass the Transfer Switch HAZARD OF ELECTRIC SHOCK, EXPLOSION, OR ARC FLASH When in bypass mode and with the transfer switch racked in “not isolated”, the “S1” and “S2” sources are still connected to the transfer switch. -
Page 30: Isolating The Transfer Switch
O&M Manual –90E1720004 Bypass to Bypass to S1 Position S2 Position Figure 17: Bypass Position Isolating the Transfer Switch The bypass switch must be in the bypassed position to either S1 or S2. 1. Grasp the isolating handle then pull down all the way, the transfer switch will now be disconnected. -
Page 31: Withdrawing The Transfer Switch 100-800A
O&M Manual –90E1720004 Withdrawing the Transfer Switch 100-800A Once the transfer switch is isolated it can then be withdrawn from the enclosure. 1. Grasp the rails on either side of the cradle near the bottom and slide them out see figure 19. -
Page 32: Returning The Transfer Switch To Service
O&M Manual –90E1720004 be isolated while still in the enclosure, but keep the switch rolling out of the enclosure. The roll-out stop is removable, allowing the switch to be installed or removed from the enclosure. WARNING: The 1000-4000A transfer switch rollout weighs between 1500 and 5,000 pounds. -
Page 33: Internal Manual Operation
O&M Manual –90E1720004 2. Grasp the isolating handle and push up until the switch is fully engaged. Note: Depending on the position of the transfer switch and the RPTCS controller status the transfer switch may automatically transfer as soon as it is connected. RTS03-ABL (Load Break) 3. -
Page 34: Figure 20: Transfer Switch Position Indicators
O&M Manual –90E1720004 Position Indicator 100-800A Transfer Switches 1000-3000A Transfer Switches Figure 23: Transfer Switch Position Indicators 3. Locate the manual operators on the end of the electrical operators. 100-800A Transfer Switches 1000-3000A Transfer Switches Figure 24: Internal Manual Operators 4. -
Page 35: External Manual Operation (Emo)
O&M Manual –90E1720004 External Manual Operation (EMO) Open transition transfer switches can be supplied with an optional external manual operator. HAZARD OF ELECTRIC SHOCK, EXPLOSION, OR ARC FLASH Only properly trained personnel should perform this procedure. Failure to follow these instructions will result in death or serious injury. -
Page 36: Rptcs Control System
O&M Manual –90E1720004 RPTCS Control System Note: The following is a brief overview of the basic setup and control tasks of the RPTCS controller. There are many other control features, internal and external accessories that may be included. Please refer to Instruction Manual 90E1730001 and the specific project documents for more information on these features. -
Page 37: Summary Of Function Key Operations
O&M Manual –90E1720004 Summary of Function Key Operations Summary of Function Key Operations Summary of Function Key Operations DOWN key: UP key: HOME key: ESCAPE key: DOWN key: UP key: HOME key: ESCAPE key: Scroll down Scroll up Single press Single press closes pop-up, Scroll down Scroll up... -
Page 38: Summary Of Led Indicators
O&M Manual –90E1720004 Summary of LED Indicators Summary of the 7 LED Indicators Summary of the 7 LED Indicators TD ACTIVE LED (Red): ALARM LED (Red): TD ACTIVE LED (Red): ALARM LED (Red): S1 Available LED (Green): Indicates that the controller Indicates that there is a S1 Available LED (Green): Indicates that the controller... -
Page 39: Summary Of The Graphical Display
There are three levels of access in the RPTCS. The default setting for “level 1” is “11111” and “level 2” is “22222” these passcodes can be reset. The “level 3” passcode is a Russelectric factory passcode that you cannot reset. -
Page 40: Setting The Date
O&M Manual –90E1720004 Setting the Date Go to setpoints\config\system. Scroll to set date and press <enter>. A passcode dialog box appears; enter level #1 passcode. Press <enter> again and a set date dialog box appears. Use the <right and left arrow soft keys> and the <up and down arrow soft keys> to select the date. Press <enter>... -
Page 41: Setting Timers
O&M Manual –90E1720004 Setting Timers Note: All timers are set at the factory either as default factory settings or as a specified setting. Please refer to the specification sheet provided with the switch for these settings. Go to Setpoints\operation\timers. “Delay for generator start” is automatically highlighted. Press <enter>. -
Page 42: Setting Pre And Post For Elevator Contacts
O&M Manual –90E1720004 Setting Pre and Post for Elevator Contacts Go to setpoints\operations\timer. Use the <down arrow function (hard) key> scroll down to “Pre-load Control Timer” and press <enter> A passcode dialog box appears; enter level #1 passcode. Press <enter> again and a dialog box appears which allows you to set the timer. Use the <up and down arrow function (hard) keys>... -
Page 43: Performing A Load Test Or A No Load Test
O&M Manual –90E1720004 Performing a Load Test or a No Load Test Press the green test button on the face of the controller; this will bring up the exerciser\test screen. Press the grayed-out (disabled/inactive) <Xfer Load soft key> and a passcode dialog box pops up. -
Page 44: Maintaining The Bypass-Isolation Transfer Switch
Inspect the equipment immediately after abnormal or stressful operating conditions occur or after the equipment experiences a fault current. These inspection and maintenance guidelines cover only Russelectric bypass-isolation transfer switches. If conditions cannot be established and documented, then the harsh operating condition must be assumed. -
Page 45: Normal Operating Conditions
O&M Manual –90E1720004 Absence of dust or debris either airborne or settled. Relative humidity averaging less than 70%. Absence of vibrations or seismic activity. Circuit Loading Continuous loading (with 100% rated devices) is between 20- 80% of the equipment ratings. -
Page 46: General Inspection And Cleaning
O&M Manual –90E1720004 The effect of solar radiation is significant. The equipment is exposed to hot and/or humid climate. The equipment is exposed to damaging fumes, vapors, steam, salt air, and/or oil vapors. The equipment is exposed to seismic shock or abnormal vibrations or tilting. Circuit Loading ... -
Page 47: Bus Bar Joints, Lug Terminations, And Insulating Materials
Damage to plating can result in overheating. Replace damaged part. Contact Russelectric Inc. Field Services at 1-800-654-3020. Failure to follow this instruction can result in equipment damage. 1. Bus bar joints are maintenance-free. Do not retighten them after the pre-energizing checkout procedure is complete. -
Page 48: Section 10 Adverse Circumstances
Do not clean or repair a transfer switch that has been exposed to large volumes of water or submerged at any time. Current-carrying parts, insulation systems, and electrical components may be damaged beyond repair. Do not energize the equipment. Contact Russelectric Field Services at 1-800-654-3020. -
Page 49: Section 11 Insulation Resistance Chart
O&M Manual –90E1720004 Section 11 Insulation Resistance Chart Always use a 500 or 1000 VDC megohm meter when testing insulation resistance. Note: The Neutral–Ground column is provided to record the results of the pre-energizing checkout procedure only. HAZARD OF ELECTRIC SHOCK, EXPLOSION, OR ARC FLASH ... -
Page 50: Section 12 Maintenance Log
O&M Manual –90E1720004 Section 12 Maintenance Log Date Description Section 12 Maintenance Log Page 50 of 52... - Page 52 O&M Manual –90E1720004...
- Page 53 Data Form -RPTCS Automatic Transfer Switch Low Voltage Customer St Josephs Hospital Job No. 37968-1A/B Address 350 W.Thomas Rd, Phoenix. AZ Date 1/9/2015 Customer Device ID BYPASS Equip. Loc. Parking garage Ambient (if avail.) °F Humidity Model No. RTS03-ABOB2254AMF1 Ser. No. 37968-1A/B Voltage 480.00 V...
- Page 54 Data Form -RPTCS Automatic Transfer Switch Low Voltage 5.4 Accessories X(F,T,K, or L)1 X(F,P or K)7 X(F,K or L)14 CS1P, CS2P Ammeter, Voltmeter X(K or L)2 X(F,P,K or C)8 X(F,K or L)15 CS1PO, CS2PO OC.RTM X(K or L)3 X(K or L)9 X(T,K or L)16 CS2P, CS2PC BTR, LSR, LTR...
- Page 55 Marking 37968-1A/B Description: Russelectric model RTS03-ABOB2254AMF1-RPTCS01 dual motor operated, microprocessor based, automatic transfer switch, rated 225 amperes, to be used on a 277/480 volt AC 3-phase, 4-wire, 60HZ service, with switched neutral and a two-source, overlapping bypass/isolation switch arranged to bypass the load to either source-1 or source-2.
- Page 56 Accessory List (Internal): Internal feature of the microprocessor. Acc. No. Function VFS1 Programmable Setpoints: Under voltage sensing of source-1 to restore at 90% and fail at 80%. Over voltage sensing to pick up at 110% and drop out at 108%. Under frequency sensing is adjustable from 45.0 HZ to 60.0 HZ.
- Page 57 Acc. No. Function CS1P Auxiliary contact closed in source-1 position. Quantity of 2. Wired to terminal strip for customer connection. CS2P Auxiliary contact closed in source-2 position. Quantity of 2. Wired to terminal strip for customer connection. Form "C" contact to initiate engine starting or other customer functions. (Internal) CS1A Form "C"...
- Page 58 Hingham, MA 02043 General Notes - Schematic Diagrams Box selected indicates type of RPTCS controller provided Controller Type 1 Controller Type 2 Controller Type 3 Controller Type 4 Controller Type 5 1. All contacts shown with Source 1 and Source 2 power de-energized.
Need help?
Do you have a question about the RTS03 Series and is the answer not in the manual?
Questions and answers