
Related Manuals for Respironics ComfortFull 2


Summary of Contents for Respironics ComfortFull 2
- Page 1 Comfor tFull 2 1067749 JDH 03/31/2010 © 2010 Koninklijke Philips Electronics N.V. All rights reserved. INSTRUCTIONS FOR USE...
-
Page 2: Table Of Contents
2 full face Mask Table of Contents Package Contents Intended Use Warnings Contraindications and Disposal Symbols Before Use Cleaning Instructions System One Resistance Control Removing and Attaching the Headgear Achieving the Right Fit Removing the Headgear and Mask Tubing Quick Release... - Page 3 ComfortFull 2 mask • Headgear • Mask assembly • Instructions for use • Quick Start fitting tips note: Not all packages contain listed items. Please contact your Home Care Provider or Respironics for additional items or replacement parts. ComfortFull 2...
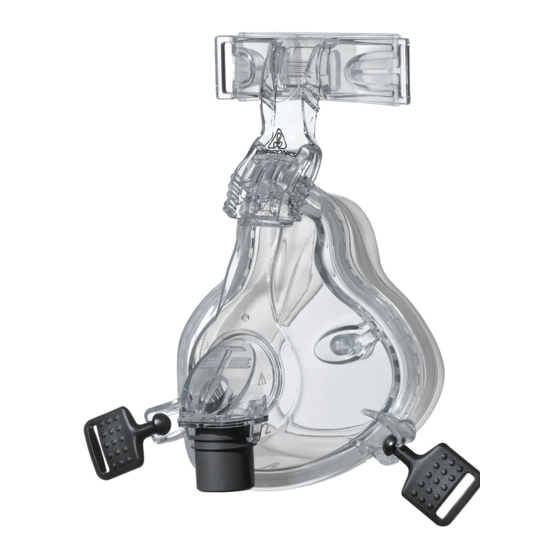
- Page 4 2 full face Mask figure 1 A = StabilitySelector B = Exhalation Port (Do not block) C = Entrainment Valve D = Elbow Swivel E = Tubing Quick Release F = Quick Clip Socket G = Port Cap H = Cushion...
-
Page 5: Intended Use
Intended Use The ComfortFull 2 Full Face Mask is intended to provide an interface for application of CPAP or bi-level therapy to patients. The mask is for single patient use in the home or multi-patient use in the hospital/institutional environment. -
Page 6: Warnings
Warnings • This mask is not suitable for providing life support ventilation. • This mask is designed for use with CPAP or bi- Warning: level systems recommended by your health care Indicates the possibility professional or respiratory therapist. Do not wear of injury to the user this mask unless the CPAP or bi-level system is or operator... - Page 7 This mask is not recommended if the patient is taking a prescription drug that may cause vomiting • If an additional exhalation device is added to the patient circuit, you may need to adjust the pressure level to compensate for the additional leak of the exhalation device. ComfortFull 2...
- Page 8 • Hand wash prior to first use. Inspect the mask for damage or wear (cracking, crazing, tears, etc). Discard and replace any components as necessary. • Use of a nasal or full face mask may cause tooth, gum, or jaw soreness or aggravate an existing dental condition.
-
Page 9: Symbols
Symbols Symbol Description Consult instructions for use General caution or warning Note System One Resistance Control ComfortFull 2... -
Page 10: Before Use
Before Use • Hand wash the mask to remove particles that may have accumulated during shipping or storage. • Read and understand the instructions completely. • Verify that the entrainment valve functions correctly. • Wash face. • Remove the quick fit tips. Comfort Tip If you have sensitive skin, you can condition the mask before use. -
Page 11: Cleaning Instructions
Do not place the headgear into the dryer. Inspect all parts for damage or wear; replace any parts that have visibly deteriorated (cracking, crazing, tears, etc). Replace the mask if the cushion becomes hardened. ComfortFull 2... - Page 12 For multi-patient use in the hospital/institutional environment, use the Mask Cleaning and Disinfection Instructions to reprocess the mask between patients. These instructions can be obtained by visiting www.sleepapnea.com or contacting Customer Service at 1-800-345-6443 (USA or Canada) or 1-724-387-4000. InstructIons for use...
-
Page 13: System One Resistance Control
If your provider has locked the resistance compensation setting, you can view the setting but cannot change it, and the screen will display a lock symbol. If your provider has disabled the resistance compensation, you will not see this setting. ComfortFull 2... -
Page 14: Removing And Attaching The Headgear
Removing and Attaching the Headgear Please use one of the following methods to remove or attach the headgear. figure 2 Undo EZPeel Tabs. • Method one: Undo the four EZPeel tabs (Figure 2) on the headgear and pull the straps out of the slots in the forehead support and on the Quick Clips. - Page 15 To attach, press the ball into the socket. figure 4 Disconnect the Forehead Support—Press center tab and squeeze ribbed sides of the support arm. ComfortFull 2...
-
Page 16: Achieving The Right Fit
Achieving the Right Fit Open the headgear to a large setting and adjust the forehead arm (Figure 5) to the highest position. To adjust, gently squeeze the arms of the StabilitySelector and slide the arm upwards. figure 5 To make it easier to place the mask and Adjust the headgear on your face, we recommend forehead arm. - Page 17 Put on the mask (Figure 7). Simply hold the mask cushion gently over your nose and mouth. Pull the headgear on over your head. Connect the Quick Clip if detached. figure 7 Put on the Mask. ComfortFull 2...
- Page 18 First, adjust the top headgear straps evenly and at the same time using the EZPeel tabs on the headgear The forehead pad should be touching your forehead lightly. Adjust the bottom strap so that the mask is sitting gently on your face. The headgear should stay loose.
- Page 19 Turn on the airflow. Lie down and breathe normally through your nose, keeping your lips closed. If the forehead support does not rest comfortably against your forehead, tighten the top headgear strap. figure 9 Connect the tubing to the swivel elbow. ComfortFull 2...
- Page 20 Assume different sleeping positions (Figure 10) and move your head around. If there are any air leaks make any final adjustments. Some air leakage is normal. Do not overtighten the figure 10 headgear. Overtightening the headgear may Lie down and assume cause discomfort or irritation.
-
Page 21: Removing The Headgear And Mask
The mask elbow is equipped with a Tubing Quick Release (Figure 12). Simply squeeze the quick release tabs and the grey swivel will disengage from the mask and come loose with the tubing. figure 12 Tubing Quick Release ComfortFull 2... - Page 22 Comfort Tips You may need to adjust the StabilitySelector on the forehead support arm (Figure 13) to reduce leaks or reduce pressure points at the bridge or above the lip. Follow these tips to adjust for leaks: • For leaks around the bridge of the nose or into the eyes gently squeeze the arms of the StabilitySelector and adjust to a lower position.
-
Page 23: Replacing The Forehead Pad
Next, pull the pad in the opposite direction to release the connection track on the other side from its connection slot. figure 14 Replace the forehead pad A = Connection Track B = Connection Slot C = Forehead Support D = Forehead Pad ComfortFull 2... -
Page 24: Specifications
to attach: Slide one of the new pad’s connection note for Home tracks on the new pad into its connection slot care Providers on the support. Pull the pad in the opposite If a nasogastric (NG) direction (toward the center) and slide the other tube or similar device is connection track into its connection slot to lock the in place, use the optional... - Page 25 Intentional Leak Whisper Swivel II ComfortFull 2 60.0 50.0 40.0 30.0 20.0 10.0 Pressure Drop cm H o (hPa) 50 SLPM 100 SLPM All mask sizes: Deadspace Small 280 cc Medium 392 cc Large 434 cc ComfortFull 2...
- Page 26 storage conditions: -4º to 140º F (-20º to +60º C) 15% to 95% relative humidity, non-condensing InstructIons for use...
- Page 27 Reorder Numbers 1004880 ComfortFull 2 Mask with Premium Headgear, S 1004872 ComfortFull 2 Mask with Premium Headgear, M 1004950 ComfortFull 2 Mask with Premium Headgear, L 1010868 ComfortFull 2 Mask only, S 1010869 ComfortFull 2 Mask only, M 1010870 ComfortFull 2 Mask only, L...
-
Page 28: Limited Warranty
LIMIteD WArrAntY respironics, Inc. warrants that its mask systems (including mask frame and cushion) (the “Product”) shall be free from defects of workmanship and materials for a period of ninety (90) days from the date of purchase (the “Warranty Period”). - Page 29 AnD You MAY ALso HAVe otHer rIGHts, WHIcH VArY froM stAte to stAte. to exercise your rights under this limited warranty, contact your local authorized respironics, Inc. dealer or respironics, Inc. at 1001 Murry ridge Lane, Murrysville, Pennsylvania 15668, 1-800-345-6443 (usA and canada only) or 1-724-387-4000.
Need help?
Do you have a question about the ComfortFull 2 and is the answer not in the manual?
Questions and answers