
Related Manuals for barebones STR-556


Summary of Contents for barebones STR-556
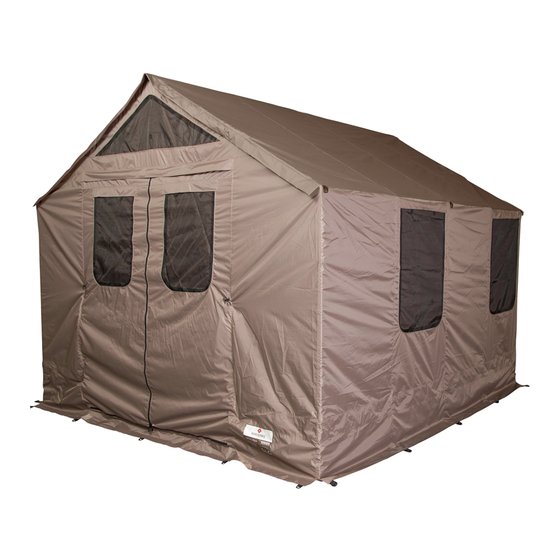
- Page 1 Little Big Horn Tent #STR-556 14513 S 980 W Ste 100 Bluffdale, UT 84065 1-855-895-7040 Info@barebonesliving.com...
- Page 2 SET UP CARE AND INSTRUCTIONS Thank you for your purchase of the Barebones Little Big Horn Tent. Uses- The Little Big Horn Tent is perfect for extended camping trips and even temporary shelter. We recommend storage during the winter to prolong the life of the cover.
- Page 3 We suggest you take all the parts out and count them: 10 - A Poles 15 - Triangle Joints 27 - B Poles 6 - Foot Joints 4 - C Poles 4 - Swivel Joints 2 - D Poles 4 - Corner Joints 27 - E Poles Storage Bag 2 - F Poles...
- Page 4 How to assemble the joints and poles : Single pole inserts: 1- Insert straight end of pole into joint (A straight end has no step down at the popple) 2- Press down lower popple to engage in the joint hole 3- (You may have to press the popple a couple of times to engage fully) Double pole inserts:...
- Page 5 Diagram of Pole and Joint Assembly...
- Page 6 Please wear gloves when assembling poles and joints. STEP 1 : ASSEMBLE ROOF TRUSS Parts Needed : (A) Pole A (B) Pole B (E) Pole E (G) Triangle joint ASSEMBLE TRUSSES 1) Insert (E) pole into (B) pole. 2) Insert assembled poles on both side of (G) joint, and engage popple into joint. 3) Build five total.
- Page 7 STEP 2 : CONTINUE ROOF ASSEMBLY 1) Insert (E) pole into (G) joint of Truss one, secure with popple. 2) Attach Truss 2 to end of (E) pole and continue as in diagram below. 3) Use (A) poles in the middle and (B) and (E) poles on the ends as shown. Pole B Pole A Pole A...
- Page 8 STEP 3 : ASSEMBLE 2 CROSS BEAMS Parts Needed : (B) Pole (E) Pole (I) Swivel joint Pole B Pole E 1) Attach the (E) pole to the (B) pole. 2) Attach swivel joints to the ends and secure the popple. 3) Attach cross bar assembly to each roof end as shown below.
- Page 9 STEP 4 : BUILD 2 WALLS Parts Needed : (B) Pole x 14 (G) Triangle joint x 10 (E) Pole x 14 (H) Foot joint x 6 (A) Pole x 8 (J) Corner joint x 4 Pole B 1) Insert (E) pole into (B) pole to create upright pole. 2) Build 10 total.
- Page 10 STEP 5 : ATTACH WALLS TO ROOF 1) Prop up one wall by the side of the roof. 2) Lift one side of the roof up and engage all 5 poles of the roof with the (G) joints. 3) Secure the popples.
- Page 11 HINT: (For an easier way to put on the cover if you are setting this tent up alone, lay the cover on the roof BEFORE putting up the second wall and lift it up with the roof as you attach the walls) 4) Lift the other side wall and attach to the roof.
- Page 12 STEP 6 : ATTACH FRONT AND REAR FLOOR POLES Parts Needed : (C) Pole x 4 (D) Pole x 2 (F) Pole x 2 1) Connect 4 poles in this pattern: (D,C,C,F) to create floor pole. 2) Create 2 floor poles and attach as shown.
- Page 13 STEP 7 : DRAPE COVER 1) Unfold the cover, throw it up over the roof and pull it down around the frame.
- Page 14 STEP 8 : PUT DOWN FLOOR AND CONNECT TO COVER 1) Unfold the Floor and lay it out inside the tent with the wide notch on the door side. 2) Tuck the floor under all the edges of the frame under the bottom of the wall crosspoles. 3) Line up the foot holes in the floor and Buckle the floor and the cover together.
- Page 15 Always secure the tent properly to the ground. Never leave the tent unattended without being properly staked and tied down. In extreme weather, the tent may need extra stakes and rope. ( You can also purchase the Barebones High Wind kit for extra security).
Need help?
Do you have a question about the STR-556 and is the answer not in the manual?
Questions and answers