
Related Manuals for XODO PK3


Summary of Contents for XODO PK3
- Page 1 Smart Home Kit PK3 User Manual Read before installing or using this product. Keep this guide for future reference. Visit Con�xo.com for literature updates!
-
Page 2: Table Of Contents
Welcome Thank you for purchasing Xodo Smart home products! We are commi�ed to bringing you excellence with smart technology products that make life more comfortable, convenient, and provide a more dynamic healthy lifestyle. Table of Contents Welcome Package Contents Specifica�ons Introduc�on... -
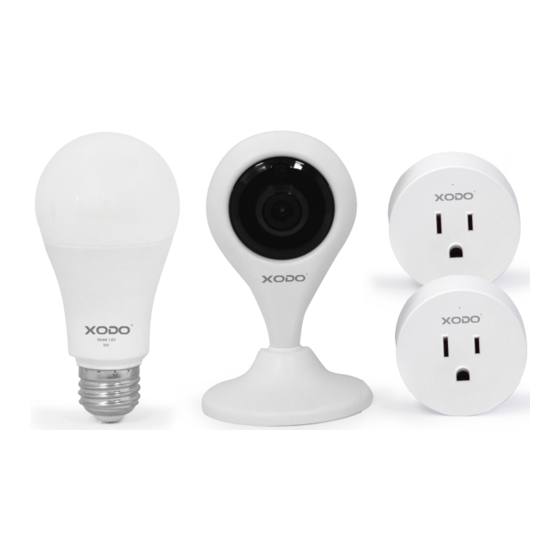
Page 3: Package Contents
What’s included in the box You will find the following contents included to help you get started: Package Contents E4 Smart Home Camera×1: Micros USB Wall Charger×1, Micro USB Cable×1, Moun�ng Screw Sets×3 LB3 Smart Bulb×1 WP1 Smart Plug×2... -
Page 4: Specifica�Ons
Smart WiFi Camera E4 Specifica�ons Product Name: Xodo Smart WiFi Camera Model: E4 Power Input: 5V 1A(Min) Total Power Consump�on: 5W(Max) Support System: Android or IOS Resolu�on: 1920 x 1080 Video Compression: H.264 High Profile WiFi: IEEE 802.11 b/g/n 2.4GHz Audio: Two-way talk, noise cancella�on... -
Page 5: Introduc�On
WiFi Bulb Introduc�on Lampshade Radiator Lamp Holder Smart Camera Introduc�on SD Card Port Reset Bu�on Light sensor Lens IR LED Micro USB Port Smart Camera Components IR LED —The infrared light measures ambient light and will increase video playback brightness. Light Sensor —... -
Page 6: Installa�On
Smart Plug Introduc�on 1. Manual control bu�on 2. Power indicator 3. Output AC outlet 4. Input AC plug WiFi Smart Plug Components Bu�on — Press to turn on/off the Plug Output AC plug — Charging via charger Input AC plug — Plug in a normal socket Indicator Light Blinking blue: Configura�on status Blue light ON: Smart plug is working... -
Page 7: Xodo Smart App
Download and Install the Xodo Smart APP Download and install the APP. It can be also be found by searching "Xodo Smart" by Con�xo Inc. in the App Store (for IOS) or Google Play Store (for Android). Xodo Smart Connect LB3 The welcome screen will appear and then you will be asked to login or register a profile. - Page 8 Adding Devices When detec�ng devices manually, power on the device and confirm the indicator light is blinking rapidly. (Hold the reset bu�on for 5 seconds) Once you confirm the smart device is ready, press the “Confirm indicator rapidly blink” bu�on. Con�nue on to the next step. Pressing the “Help” bu�on will offer some troubleshoo�ng guidelines to follow.
- Page 9 Detec�ng Device When detec�ng devices manually, power on the device and confirm the indicator light is blinking rapidly. • Once you confirm the smart device is ready, press the “Confirm indicator rapidly blink” bu�on. Con�nue on to the next step. •...
- Page 10 Connect to a WiFi network The next step to connect the smart device is to connect to a WiFi network. • If the proper network is not listed on this page, select the “Change Network” link to see a list of available networks. •...
- Page 11 • Press the Completed bu�on at the bo�om of screen to con�nue to next step. Home Screen Updated Now that your device has been added, it will show on the home screen along with all other paired Xodo Smart Products. Now you are all set.
- Page 12 White Mode The White Mode screen will allow basic controls over the standard ligh�ng mode. • Bright controls the brightness • Color Temp allows the light to take different moods Color Mode Color Mode allows addi�onal controls over the ligh�ng •...
- Page 13 Scene Mode Scene Mode allows addi�onal controls for preset ligh�ng • Each light mode will provide different ligh�ng effects to choose from. Schedule Add schedules to give an automated response from the smart light. • Program �mes to turn the bulb on or off •...
- Page 14 Le� Time This will keep the bulb in ON posi�on for a specific dura�on of �me. 1. Click "Le� �me". 2. Select the switch that needs to be set. 3. First configure the hours (le�). 4. Next configure minutes (right). 5.
-
Page 15: Configure The Light Bulb Se�Ngs
8. Firmware Informa�on allows to check so�ware or install updates to device. 9. Remove device will remove the smart strip from the Xodo Smart app and remove pairing. This is necessary if pairing with a new device. 10. Restore Factory Se�ng allows to reset the Surge Protector to factory se�ng. - Page 16 Installa�on of Smart WiFi Camera 1. Rotate the base counterclockwise 2. Take the base out and put it where and take it out. you want to install it. 3. Install the base. 4. Mount the camera on the base and turn it clockwise.
-
Page 17: Connect E4
Connect E4 The welcome screen will appear and then you will be asked to login or register a profile. Register an account by entering your email address and se�ng up a profile or logging in with an exis�ng account. Adding Devices You will be able to manually add a device. - Page 18 Detec�ng Device When detec�ng devices manually, power on the device and confirm you hear the “Didi” sound. Once you confirm the smart device is ready, press the “nest step” bu�on. Con�nue on to the next step. Pressing the “Help” bu�on will offer some troubleshoo�ng guidelines to follow.
- Page 19 Scan with Camera Screens The pairing process will ask for your to use the doorbell to scan a QR barcode on the screen. Press “Con�nue” to begin. The QR barcode will appear on the screen. Hold doorbell camera in front of the QR barcode un�l you hear a beep. Press the “Heard the beep”...
- Page 20 Connec�ng A�er you hear the beep and con�nue on, the “Connec�ng” screen will appear. It will usually register within by approximately 30% range. The Device found will checkmark green, then Ini�alizing device will complete. A�er connec�ng process completes it will con�nue on toward the next screen.
- Page 21 Home Screen Updated Now that your device has been added, it will show on the home screen along with all other paired Xodo Smart Products. Now you are all set. Camera Home Screen The home screen will show the live camera feed along with camera controls.
-
Page 22: Configure The Camera Se�Ngs
7. Memory Card se�ngs will display info regarding the removeable memory module. 8. Firmware Informa�on allows to check so�ware or install updates to device. 9. Remove device will remove the doorbell from the Xodo Smart app and remove pairing. This is necessary if pairing with a new device. -
Page 23: Connect Wp1
Connect WP1 The welcome screen will appear and then you will be asked to login or register a profile. Register an account by entering your email address and se�ng up a profile or logging in with an exis�ng account. Adding Devices You will be able to manually add a device. - Page 24 Connect to a WiFi network The next step to connect the smart device is to connect to a WiFi network. If the proper network is not listed on this page, select the “Change Network” link to see a list of available networks. Enter the password next to the lock icon.
- Page 25 Completed bu�on at the bo�om of screen to con�nue to next step. Home Screen Updated Now that your device has been added, it will show on the home screen along with all other paired Xodo Smart Products. Now you are all set.
- Page 26 Smart Plug Home Screen The home screen will show the live plug status. 1. Press the “OFF”/”ON” bu�on to turn off/on the smart plug. 2. Press the “Countdown” bu�on to set countdown on or off. 3. Press the “Schedule” bu�on to set a schedule.
- Page 27 Countdown func�on This will keep the sock in ON posi�on for a specific dura�on of �me. 1. Click "Countdown". 2. Select the switch that needs to be set. 3. First configure the hours (le�) 4. Next configure minutes (right) 5. Click "OK" to save the se�ngs. Timer func�on This will keep the sock in ON posi�on for a specific dura�on of �me.
-
Page 28: Configure The Smart Plug Se�Ngs
8. Firmware Informa�on allows to check so�ware or install updates to device. 9. Remove device will remove the smart plug from the Xodo Smart app and remove pairing. This is necessary if pairing with a new device. 10. Restore Factory Se�ng allows to reset the Surge Protector to factory... -
Page 29: My Home Page
My Home Page Device Controls 1. Some devices can set group control. Click " " in the upper right corner 2. Click "Create Group". 3. The page displays all devices with the same model number and available to be added as a group. Select the device and click “Confirm”. - Page 30 4.Enter group name and click “Save” to finish. 5.When a group has been created successfully, the page will be automa�cally redirected to the group control panel, where grouped devices can be managed. Smart Features 1 Click “Automa�on” on the "Smart" page. 2 Click “Add Automa�on“...
- Page 31 4 Click “Add ac�ons” or "+" to select the ac�on to occur. 5 Click “Valid Time Period” to set a valid �me period for automa�on. 6 Click “Next” to go to the smart configura�on page. 7, Enter the automa�on name click “Confirm” to finish. 8.Click the switch in the lower le�...
-
Page 32: Smart Features
Smart Features - Scene To configure a scene with "Trigger automa�on", you must set up an automated scene in advance. 1 Click “Scene” on the "Smart" page. 2 Click “Add Scenario“ or "+" to go to the smart se�ngs page. 3 Click “Add ac�on“... -
Page 33: Google Home
Link Xodo Smart account to Google Home Screen 1. Open Google Play Store or Apple Store and download Google Home 2. Open the Google Home app. Click on Get Started. 3. Login with a Google Account or create a new account. - Page 34 9. The app will show se�ngs to add devices, setup rou�nes, and adjust se�ngs. 10. If the devices are already installed and setup through the Xodo app, you can select the "Works with Google" setup op�on to con�nue. 11. Configure the home se�ngs by adding address and name to a "Home"...
-
Page 35: Alexa
3. Ok Google, brighten bedroom light. 4. Ok Google, dim bedroom light. 5. Ok Google, set bedroom light to red. Link Xodo Smart account to Alexa 1. Download the free Alexa app from the Amazon Appstore, Google Play, or the Apple App Store. - Page 36 8. Click Se�ngs 9. Manage Smart Home Devices to verify Smart Life has been added. 10. You will be redirected to the account link page. Type in your Xodo Smart account and password, don't forget to select the country/region where your account belongs to.
Need help?
Do you have a question about the PK3 and is the answer not in the manual?
Questions and answers