Table of Contents
Advertisement
Quick Links
Advertisement
Table of Contents

Related Manuals for Medema Mini Crosser X1


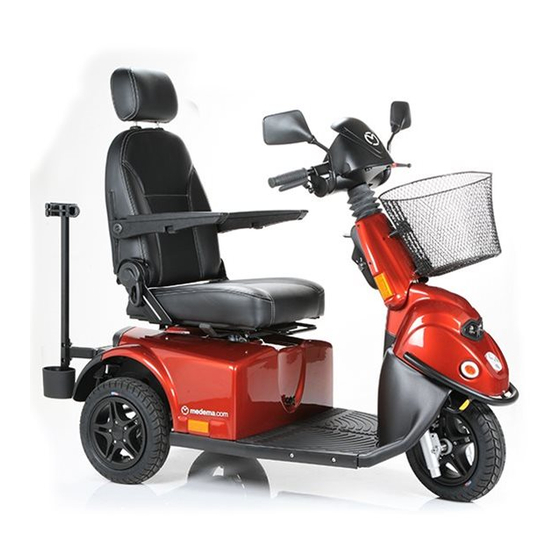
Summary of Contents for Medema Mini Crosser X1
- Page 1 medemagroup 1533-2001-S ver. 1.0.2 - January 2020...
- Page 2 Medema Production A/S Serial number: ___-______________-______-_______ Delivery date: ________________ Year 20______ This vehicle was supplied by: Date: Dealer: For this product You can expect to find the following documentation: • User manual • Service manual • Spare parts list •...
-
Page 3: Table Of Contents
Batteries ................32 Battery weight ...............32 Charging ................32 Battery disposal..............33 Storage ..................35 Cleaning ................35 Service summary for Mini Crosser X1 ........36 Troubleshooting ..............41 Programming unit ..............44 Programming via PC ............45 Information about the vehicle via PC .........47 Fuses ..................52 Summary of battery connections........53 Sockets and control panel ...........54... - Page 4 Replace the magnetic brake ..........86 Replace fuses ...............88 Replace coal................89 Replace the controller ............91 Dimensioned drawing, Mini Crosser X1 3W.......93 Dimensioned drawing, Mini Crosser X1 4W.......94 Introduction to the Ergo2 seat ..........95 Basket on seatback ..............100 Front wheel alignment, 4W ..........101 Technical data ...............102...
-
Page 5: Introduction
Class C vehicle in according to the European classifi- cation of electric wheelchairs. The Mini Crosser X1 is designed for safe travel for at least 10 years, up to a max. of 5,000 hours, providing it has service and safety inspections every third year, which is equivalent to around 1500 operating hours. -
Page 6: Intended Occupant
You can find manuals for all our products on our web page www.medema.dk. Or contact Medema A/S, and we can send the manuals in a mail for you. Find the contact information on page two in this manual. -
Page 7: Symbols
The vehicle is designed for one person only. The Mini Crosser X1 has been designed for users weighing max. 175 kg. Can be supplied in a HD version as standard for a max person weight of 250 kg. -
Page 8: Safe Servicing
Medema Production A/S Safe servicing • To avoid injuries to both the service engineer and the subsequent user of the scooter, it is important to get to know the product be- fore servicing it. • Be particularly aware of the following: •... -
Page 9: Tool List
Medema Production A/S Tool list The following tools are needed to service the scooter: • Circlip pliers • Allen keys • Box spanners, 7-17 mm • Open-ended spanners, 7-17 mm • Phillips and torx screwdrivers, 10/15/20/25 slot • Needle-nose pliers •... -
Page 10: Storage
Medema Production A/S Storage The Mini Crosser is designed for use in all types of weather. The scooter should, however, be stored and charged under cov- er at temperatures in excess of 0°C. The charger must also be kept dry. -
Page 11: Declaration Of Conformity
Medema Production A/S Declaration of conformity Medema A/S hereby declares that: Machine: Electric mobility wheelchair Use: Transport of walking-disabled people Model No: Mini Crosser X1 Complies with the Medical Device Directive 93/42/EEC The product is accredited tested according to standard DS/EN 12184 - Electrically powered wheelchairs, scooters and their chargers - Requirements and test methods. -
Page 12: Medema A/S Warranty
There is a 5-year warranty against breakage and corrosion of the undercarriage. For the warranty to cover batteries, the charger used must be sold by Medema A/S. The fabric, type and serial number must be indicated on the warranty specification, otherwise, warranty coverage may be denied. -
Page 13: Control Panel
Medema Production A/S Control panel Avoid subjecting the control panel to jarring and knocks. Take care when driving and avoid hitting obstacles. The manufacturer accepts no liability in respect of the unauthor- ized opening, adjustment or modification of the control panel. - Page 14 Medema Production A/S Designation Description Key switch To start the vehicle: Turn the key to driving position (1) When the Mini Crosser is turned on, the control system performs a safety check of the electrical system. The check lasts half a second. If the accelera- tor is operated during this time, the Mini Crosser will not be able to move until you have turned the key to 0 and back to 1.
-
Page 15: Preparations / Adjustments Prior To Use
Medema Production A/S Preparations / Adjustments prior to use Adjusting the height of the seat Lift both armrests up, and fold the seatback. Release the handle so the seat can turn. Turn a little and lift the seat off. Make sure you keep your back straight when lifting the seat, which is very heavy. - Page 16 Medema Production A/S Hight adjustment seat post standard Loosen the counter nut. Use spanner, 17 mm. Adjust the seat post to the desired position. The seat post is marked with a ring at each centimeter. Be aware that the black line is holding its position after movement, so the seat is straight in front of the steering.
-
Page 17: Electric Seat Adjustment
Medema Production A/S Seat tube Release Seat tube in top position. There are five holes for adjusting the seat tube. The release must be in a hole for the seat to be stable. Electric seat adjustment The Mini Crosser can be fitted with electric seat adjustment as an optional extra. -
Page 18: Seat Rotation
Medema Production A/S IMPORTANT! The Mini Crosser is most stable when the seat is in its lowest position. Always drive carefully when the seat is raised. Never use the seat adjustment when driving on an uneven surface or in hilly terrain. -
Page 19: Steering Column
Medema Production A/S Steering column Can be adjusted forward/back with the release lever. Pull down on the lever and pull the handlebars closer for a good driving position. Use the lever again and push the steering column for- ward to make it easier to get out. -
Page 20: Serial Number
Medema Production A/S Serial number All vehicles have a serial number plate showing the year of pro- duction and serial number. The same serial number can also be found on page two of this manual. Please quote this number when making inquiries about servic- ing, spare parts, etc. -
Page 21: Driving The Mini Crosser X1
Mini Crosser. In general the following method should be followed: • Make sure that the Mini Crosser X1 is off (switch turned to 0) when getting in and out, otherwise the Mini Crosser could start if the accelerator was touched inadvertently. - Page 22 Medema Production A/S General safety advice Make sure that the backrest is upright and the seat is as low as possible. Positioning belts are recommended if the user is unable to maintain a good driving posture independently. Adjust your driving to road conditions. Take account of light, traffic and weather.
- Page 23 Medema Production A/S Driving Even though the Mini Crosser is very stable, it can tip over. Avoid sudden changes of speed and direction when travelling at high speed, on poor surfaces and, not least, on slopes. For short distances the Mini Crosser can drive up steeper gradients than it has been tested as dynamically stable for.
-
Page 24: Lap Belt
Medema Production A/S driving in hilly districts, into a head wind, in cold weather and with low tyre pressure. Traffic regulations The traffic legislation for Mini Crossers varies from country to country. Before starting to use the vehicle outdoors, it is the user’s responsibility to familiarise him/herself with the relevant... - Page 25 Medema Production A/S Electromagnetic compatibility If the Mini Crosser starts making involuntary movements or if the brakes are released, turn the Mini Crosser off as soon as it is safe to do so. In certain circumstances a Mini Crosser can set off shop alarms.
-
Page 26: Specific Driving Situations
Medema Production A/S Specific driving situations Up kerbs • Stop at right angles to the kerbstone about 5-10 cm away from it. Keep an eye on other road users. • Lean forwards. • Accelerate moderately so that your vehicle can overcome the obstacle. - Page 27 Medema Production A/S Up a ramp/hill • There is a risk of tipping over backwards if the seat is pushed back when you start driving up a slope, e.g. a ramp. • Pull the seat forward! Check that any ramp is stable.
-
Page 28: Long Hills/Difficult Ground
Medema Production A/S Across a slope • Lean into the slope. • Avoid sudden and sharp movements. This is particularly relevant when reversing. • Always drive at low speed. Long hills/difficult ground The Mini Crosser is at risk of overheating on very long and steep hills or on very soft ground, possibly also combined with high user weight. -
Page 29: Anti-Tilt Wheels / Stabilisers
We therefore recommend fitting anti-tilt wheels in such circum- stances. (See picture below). Contact Medema for more info. Find contact information on page two in this manual. Anti-tilt wheels... -
Page 30: General Care And Maintenance
Medema Production A/S General care and maintenance A Mini Crosser X1 does not require much maintenance. It should be kept in a generally good condition, however. The following should be checked regularly. Some tasks can be done by the user, others must be preformed by an technician: •... -
Page 31: Insurance
(For further information, consult the Service Manual.) Insurance In the eyes of the law a Mini Crosser X1 with a maximum speed of 15 km/h is a cycle, so separate insurance is not required. Most contents/home insurance policies include third-party lia- bility insurance for cyclists and so also cover Mini Crosser X1 users. -
Page 32: Batteries
Medema Production A/S Batteries The Mini Crosser uses sealed, maintenance-free GEL or AGM batteries. They do not generate gas and do not have to be topped up with water. Battery weight 56 Ah = 21 kg 85 Ah = 27 kg... -
Page 33: Battery Disposal
Used batteries must be disposed of through your supplier or at a recycling centre. Take care when handling any leaky batteries, as they contain corrosive acid. INFO! New batteries can be purchased from Medema A/S. Service Manual 1533-2001-S 33 of 112 Version 1.0.2/2020... - Page 34 Medema Production A/S It is important to fit the batteries correctly. The battery terminals are marked +/-. They must be fitted as shown in the sketch be- low. Make sure that the terminals are properly tightend. For the same reason there must not be any burrs on the cable termi- nals.
-
Page 35: Storage
Medema Production A/S Note If the battery is 100% discharged, it is not possible for the charger to start charging the battery. There is no warranty on batteries that have been damaged as a result of deep discharging. If you are not using the Mini Crosser for a longer period of time, for example during winter storage, you can choose to discon- nect the one pole to the fully charged batteries. -
Page 36: Service Summary For Mini Crosser X1
Medema Production A/S Service summary for Mini Crosser X1 Area Component Check and remedy Suspension and Rear suspension Check whether the rear of the scooter wheels is drooping. The rear wheel must not rub on the mudguard with a load on the seat. - Page 37 Medema Production A/S Area Component Check and remedy Suspension and Front wheel suspen- Check that the guide rods and balls wheels (contd) sion. are in good condition and properly tightened. Check the ball bearings in the front wheels and guide spindles for play/ wear.
- Page 38 Medema Production A/S Area Component Check and remedy Motor / gear / Wear Check: That the motor runs smoothly brake and evenly. If not, the carbon brush- (Transaxle) es in the motor usually need to be replaced. The minimum length of the brushes is 1-1.5 cm.
- Page 39 Medema Production A/S Area Component Check and remedy Braking distance 10 km/h - 2,0 m (10) 13 km/h - 2,8 m (10) 15 km/h - 3,5 m (10) The figures in brackets indicate the normal braking parameter when the scooter leaves the factory. It can be changed with the programming unit (forward deceleration).
- Page 40 Medema Production A/S Area Component Check and remedy Chassis / seat / Seat Check that: covers (contd) The release lever locks the seat prop- erly. The seat is firmly secured on the seat frame/plate. The seat tube is in good condition. If necessary, lubricate the tube with a little acid-free grease.
-
Page 41: Troubleshooting
Medema Production A/S Troubleshooting The following is a list of various problems that we are frequently asked about. Possible causes and solutions are given. Problem Possible causes Solution The Mini Crosser will not The key has not been Turn the key and wait 5 turned to start. - Page 42 Medema Production A/S Problem Possible causes Solution The charging lamp on No power to the switch. Turn the switch on. the charger does not light Fault in cable. Contact supplier. up when the charger is Fault in charger. Contact supplier.
- Page 43 Medema Production A/S Electronic faults If the vehicle has an electronic fault, the battery indicator will show what sort of fault it is. It is a good idea to be able to say how many diodes/lamps light up when contacting the supplier.
-
Page 44: Programming Unit
Medema Production A/S Programming unit The Mini Crosser’s running characteristics can be partially altered using a type SP1B programming unit via PC and the PC programming package for S200. NB! SP1B cannot be used to change the speed, which can only be done using the PC program. -
Page 45: Programming Via Pc
Medema Production A/S Programming via PC There are two different versions of the PC program, an OEM version and a dealer version. The OEM version gives complete access to all settings parameters. The dealer version gives limited access. Before programming can com-... - Page 46 Medema Production A/S Note that the programming connection in the red circle is led out of the S200 controller via a short cable with a 4-pin Molex connector on the end. Connect the PC using the 4-pin Molex connector, PC ca- ble and USB for serial adapter.
-
Page 47: Information About The Vehicle Via Pc
Medema Production A/S Information about the vehicle via PC Double-clicking on the S200 program icon displays the following screen. Press Continue to continue. The red down arrow shows that the program can see that the controller is connected. Press the red arrow to load the program from the controller. - Page 48 Medema Production A/S If you do not wish to load the file from the controller but instead a program in the PC, select “Files”, “Open”. Select the desired PC P DRIVES TECHNOLOGY ROGRAMME program, and press “Open”. Having made changes to the program, use the “Program” but- Write Controller - Downloads ALL the program parameter information into the control system connected.
- Page 49 Write Controller - Downloads ALL the program parameter information into the control system connected. Medema Production A/S Read Controller - Inputs all the program parameter information from the control system connected. Preset - Restores all program parameters to factory settings.
- Page 50 Medema Production A/S The menus at the bottom of the screen enable you to: “Copy” – copy the log to another file. “Warning” – It is important to read and understand warnings before attempting to correct any errors. “Print” – print out to a printer...
- Page 51 Write Controller - Downloads ALL the program parameter information into the control system connected. Medema Production A/S Read Controller - Inputs all the program parameter information from the control system connected. Preset - Restores all program parameters to factory settings.
-
Page 52: Fuses
Medema Production A/S Fuses The Mini Crosser has the following protection systems: • Automatic overload protection, which limits the current to the motor. This protection is integral to the control system and cannot be adjusted. It prevents both the control system and the motor from being overloaded. -
Page 53: Summary Of Battery Connections
Medema Production A/S Fuse locations Fuse 1 1 x 20 A fuse Charging Item No. 1505-1228 (20 A) Fuse 2 1 x 10 A fuse Control system Item No. 1505-1225 (10 A) Main fuses, 100 A, fuse type DIN 2581 - 100 A Item No. -
Page 54: Sockets And Control Panel
Medema Production A/S Sockets and control panel MiniCrosser A/S T-127-5-002 Issue 2.0 Some of the sockets on the card are for optional extras. Some of them are connected at the factory and wired instead to the areas on the scooter where they are to be used. -
Page 55: Brakes
Medema Production A/S Brakes There are four braking systems on the Mini Crosser: • Motor brake - adjusts vehicle speed also when going downhill. • Magnetic brake - the magnetic brake is automatic and engages when the Mini Crosser stops. In an emergency, the Mini Crosser can be stopped instantaneously by turning the key switch. -
Page 56: Disengagement
Medema Production A/S Disengagement Manual The manual disengagement lever is placed underneath the back cover. Follow this procedure to use it. • Turn the key to (0) position. • Push the disengagement lever down. The motor brake is now disengaged and the vehicle can be pushed or towed, but not drive itself. -
Page 57: Transporting By Motor Vehicle
Medema Production A/S Electronic disengagement. Works only when the scooter is turned on. Disengagement button. Transporting by motor vehicle The Mini Crosser must always be restrained and the hand brake locked during transport in a motor vehicle or trailer. Avoid lifting by the seat, covers, handlebars and armrests If you just need to lift the Mini Crosser slightly, take hold of it between the rear lights and by the front bumper. -
Page 58: Securing To Vehicle Floor With Belts
Medema Production A/S Securing to vehicle floor with belts Dahl Engineering belt set for securing in motor vehicles. ALWAYS use four belts at the back and two at the front. The belts must always be attached to approved fittings in the vehicle and the four eyes welded to the Mini Crosser. - Page 59 Medema Production A/S Attachment point Attachment point Greater than the anchorage points on the Greater than Mini Crosser the anchorage Centre line points on the Mini Crosser Service Manual 1533-2001-S 59 of 112 Version 1.0.2/2020...
- Page 60 Medema Production A/S For transport in an estate car, the seat and the handlebars are fold- ed down. This reduces the maxi- mum height to 68 cm. The Mini Crosser can be used as a seat during transport in a...
-
Page 61: Transporting By Plane
Medema Production A/S Transporting by plane If the Mini Crosser is to be transported by plane, the airlines require: • the batteries to be flight-approved • the air to be let out of the tyres • the battery leads to be disconnected (not always, but frequently) The seat and cover have to be removed to disconnect the battery leads. -
Page 62: Changing The Wheels
Medema Production A/S Changing the wheels If you get a puncture in one of the pneumatic tyres or if a tyre is so badly worn that it needs to be replaced, follow the instruc- tions below. Tyres and inner tubes can be purchased from the authorised dealer who supplied the Mini Crosser. - Page 63 Medema Production A/S Remove the flange with the 5 screws (5 mm Allen key). Replace or patch the tube. Ensure that there are no foreign objects in the tyre before the tube is re- placed. Pump air into the tube so...
- Page 64 Medema Production A/S Changing the wheels on the 3W model Rear wheels: Take off in the same way as de- scribed in the section Changing the wheels on the 4W model. Front wheels: 17 mm fork spanner 6 mm Allen key 5 mm Allen key Unscrew on both sides.
- Page 65 Medema Production A/S The centre axle removed. Remove the valve cap and use a screwdriver or similar to open the valve so that the air can be released. Important! There is a risk of explosion of the wheel, if the two...
- Page 66 Medema Production A/S Replace or patch the tube. Ensure that there are no foreign objects in the tyre before the tube is re- placed. Pump air into the tube so that it is positioned cor- rectly in the tyre, but do not fill it up completely yet.
-
Page 67: Replace The Wigwag Potentiometer
Medema Production A/S Replace the wigwag potentiometer Start by removing the rubber caps or Four screws are removed. side mirrors if fitted. The panel can now be lifted. Remove the gas grip. First loosen the stop screw. Remove the potentiometer. - Page 68 Medema Production A/S The plug from the potentiometer is now New potentiometer. Mount in reverse free. order. When the throttle handle is mounted, This means that the four-finger grip hold it in position ”full speed” when you should touch the handle while tightening.
-
Page 69: Replace The Speed Potentiometer
Medema Production A/S Replace the speed potentiometer Start by removing the rubber caps or Four screws are removed. side mirrors if fitted. The panel can now be lifted. Lift the cover off with a screwdriwer. Use a 10 mm ring key to loosen the nut. - Page 70 Medema Production A/S Undo the plug. Undo the contact J10 on the circuit board. New speed potentiometer set. Mount in First the washer, then the nut, and last reverse order. the threaded rod. Turn the knob all the way to either the hare or the turtle before mounting the Mount the knob with washer and nut.
-
Page 71: Replace The Head
Medema Production A/S Replace the head Start by removing the rubber caps or Four screws are removed. side mirrors if fitted. The panel can now be lifted. Dismantle the nessecary plugs from the board. All plugs has numbers. Follow the Scheme on the inside of the head when mounting the new head. -
Page 72: Replace The Circuit Board
Medema Production A/S Replace the circuit board Start by removing the rubber caps or Four screws are removed. side mirrors if fitted. The panel can now be lifted. Dismantle the necessary plugs from the board. All plugs has numbers. Follow the Scheme on the inside of the head when mounting the new head. - Page 73 Medema Production A/S The circuit board is now free. Mount a Remember the plastic washers under the new print in reverse order. nuts when mounting. Mount the plugs in the circuit board Check that all functions are working. again. Follow the Scheme on the inside of the head.
-
Page 74: Replace Headlights
Medema Production A/S Replace headlights If the headlight stops working, replace The headlight is attached with a fitting the entire headlight. on the back of the screen. A single finger screw holds it firmly in place. Remove the screw. Remove the headlight. Detach the plug, New headlight set. - Page 75 Medema Production A/S Mount the finger screw again. The headlight can be adjusted up/down by turning this screw. Adjust the headlight so it isn’t blinding, but lights up well. Service Manual 1533-2001-S 75 of 112 Version 1.0.2/2020...
-
Page 76: Replace Gas Spring For Steering Collumn
Medema Production A/S Replace gas spring for steering collumn Remove the six screws that keep the When the cover is loosened, turn it cover in place. almost 90°, and slide it of the handle. The cover is still attached by a cable, but there is access to the gas spring. -
Page 77: Replace The Front Springs
Medema Production A/S Replace the front springs It is not necessary to remove any covers to replace the front springs. Remove the screws at the top. And on the bottom. Now the spring can Mount a new spring in reverse order. -
Page 78: Replace Rear Spring
Medema Production A/S Replace rear spring Avoid removing both springs at once. It Remove the rear cover. Remove the will cause the vehicle to collapse. stopper, and slide of the rubber. Unscrew the three screws. Unplug all electric connectors and the cover is free. -
Page 79: Replace Tail Light
Medema Production A/S Replace tail light Lift the armrests up, and fold the seat Remove the thumbscrew and remove completely. Release the seat turn - turn the battery cover. the seat a little and lift it of. Turn the nut until the tail light is loose. -
Page 80: Replace Batteries
Medema Production A/S Replace batteries Lift the armrests up, and fold the seat Remove the thumbscrew and remove completely. Release the seat turn - turn the battery cover. the seat a little and lift it of. Disconnect the poles. Remove the battery straps. -
Page 81: Replace Transaxle
Medema Production A/S Replace transaxle Lift the armrests up, and fold the seat Remove the thumbscrew and remove completely. Release the seat turn - turn the battery cover. the seat a little and lift it of. For safety reasons - disconnect one of Raise the rear end so the wheels are the poles. - Page 82 Medema Production A/S Cut the cable ties that keep the cable in The cable is free. place. Remember new cable ties when mounting again. Remove both rear wheels. Remove the cover (key 17) Remove the three screws that hold the Use a long cable tie, to keep the brake brake disc.
- Page 83 Medema Production A/S In one side the transaxle is laying on When all four screws are removed, the top of the rear suspension. In the other transaxle can be removed and replaced side it is fixed from beneath. Remove the with a new one.
-
Page 84: Replace Cable For Hand Brake
Medema Production A/S Replace cable for hand brake Raise the rear end so the wheels are Cut the brake cable. lifted of the ground. Remove the rear wheel. Press the hand brake once. The brake A new bake cable. Mostly only the inner cable will poke out. - Page 85 Medema Production A/S Mount the outer cable again. Push the cable all the way through the outer cable until it is visible by the rear wheel. Lead the cable through the adjustment And through the small hole. Adjust the screw.
-
Page 86: Replace The Magnetic Brake
Medema Production A/S Replace the magnetic brake Raise the rear end so the wheels are Remove the cover - three screws. lifted of the ground. Now there is access to the magnetic Remove the three screws to dismantle the brake. - Page 87 Medema Production A/S When the new magnetic brake is Use locktitie on the screws. Tighten the mounted, be aware to tuck the cable screws with 4 Nm. away before mounting the screws. Locktite No 2400. Mark the screws with blue paint.
-
Page 88: Replace Fuses
Medema Production A/S Replace fuses Lift the armrests up, and fold the seat Remove the thumbscrew and remove completely. Release the seat turn - turn the battery cover. the seat a little and lift it of. For safety reasons - disconnect one of Fuses 1A (hour meter), 5A (Horn), 10A the poles. -
Page 89: Replace Coal
Medema Production A/S Replace coal Lift the armrests up, and fold the seat Remove the thumbscrew and remove completely. Release the seat turn - turn the battery cover. the seat a little and lift it of. For safety reasons - disconnect one of Remove the rear cover. - Page 90 Medema Production A/S Blow the hole clean before a new coal Ready to mount the lit again. is fitted. The coal should move effortless forth and back. If needed the coal can be slightly grinded on the side until it fits perfectly.
-
Page 91: Replace The Controller
Medema Production A/S Replace the controller Lift the armrests up, and fold the seat Remove the thumbscrew and remove completely. Release the seat turn - turn the battery cover. the seat a little and lift it of. For safety reasons - disconnect one of Remove the rear cover. - Page 92 Medema Production A/S Dismantle all the plugs. The controller are to be removed now. Mount a new controller in the same place. Mount all the plugs again. When the cover is to be mounted again, Make sure to move the cables, so the avoid pinching the cables.
-
Page 93: Dimensioned Drawing, Mini Crosser X1 3W
Medema Production A/S Dimensioned drawing, Mini Crosser X1 3W X1: 305 mm X1+: 225 mm 980 mm 1340 mm Service Manual 1533-2001-S 93 of 112 Version 1.0.2/2020... -
Page 94: Dimensioned Drawing, Mini Crosser X1 4W
Medema Production A/S Dimensioned drawing, Mini Crosser X1 4W X1: 400 mm X1+: 320 mm 1030 mm 1400 mm Service Manual 1533-2001-S 94 of 112 Version 1.0.2/2020... -
Page 95: Introduction To The Ergo2 Seat
Medema Production A/S Introduction to the Ergo2 seat The Ergo2 seat is designed to stay safe to use for at least 10 years. Lever for rotating the seat The lever must be pulled back to rotate the seat. The seat can then be rotated to each side, locking at each 45°. - Page 96 Medema Production A/S Mount the seat again In order to ensure that the seat returns to the correct po- sition, the lever for rotating the seat must be released in order to place the seat. Lever for fwd/bw adjustment of the seat.
- Page 97 Medema Production A/S Width adjustment of armrest Each armrest can be adjusted 25 mm on each side. Loosen the Allen screw and the armrest can be adjusted longitudinally. Adjusting the angle of the armrests The adjustment screw makes it possible for the armrest to be adjusted 60°.
- Page 98 Medema Production A/S Backrest tilted 90° forward. This is why the seat does not necessarily need to be re- moved during transport, e.g. in a car. Backrest forward / back. Loosen the specified screws on both sides. The depth of the seat can now be adjusted by sliding the seatback forward and back.
- Page 99 Mount the basket on the brackets (Click on) and now it is ready for use. Baskets are part of a wide range of accessories. Contact your local dealer or Medema A/S. Se contact information on page two in this manual. Service Manual 1533-2001-S 99 of 112 Version 1.0.2/2020...
-
Page 100: Basket On Seatback
Medema Production A/S Basket on seatback Mounting of basket on the seat. (Optional accessory) Complete mounting kit for basket. Two brackets and four Allen screws. Unzip the zipper and position the brackets in front of the two predrilled holes. Mount the basket on the brackets and now it is ready for use. -
Page 101: Front Wheel Alignment, 4W
Medema Production A/S Front wheel alignment, 4W Front wheel alignment (toe-in), 4W Service Manual 1533-2001-S 101 of 112 Version 1.0.2/2020... -
Page 102: Technical Data
Medema Production A/S Technical data X1 3W X1 4W General information: Transport height without seat (Steer- 68 cm 68 cm ing column folded down) Total length: 134 cm 140 cm Total length incl. anti-tilt wheel: 142 cm 148 cm Total width:... - Page 103 Medema Production A/S X1 3W X1 4W 1503-1336 3,5 bar 3,5 bar 13x3.00-8” ext. Ø340 mm Wheel black - T, M and X 1503-1273 13x3.00-8” ext. Ø340 mm Wheel black puncture free - T, M and 1503-1012 2,5 bar 2,5 bar 3,50-8”...
- Page 104 Sort - metallic Sort - metallic Noise: Noice level 60db 60db The Mini Crosser X1 complies with the following standards: The Mini Crosser has been tested for the requirements EN 12184 described in: ISO 7176-15 Annex A a) requirements and test methods for static, impact an...
-
Page 105: Weight Of The Seats
Medema Production A/S Weight of the seats This is our standard Ergo2 45 cm seat, the heaviest part of the X1 to remove. The label showing the seat’s weight is located as shown above. Seat model Weight Eblo seat 45 cm... -
Page 106: Checklist For Servicing X1
Medema Production A/S Checklist for servicing X1: Mini Crosser X1 - 3W and 4W Date per- Sign. formed Area: Suspension and wheels Rear suspension No cables caught in moving parts Wheels – tightening and wheel rims Tyre pressure and tyre thread Functioning of hand brake 3W –... - Page 107 Medema Production A/S Mini Crosser X1 - 3W and 4W Date per- Sign. formed Batteries/charger Batteries – pitting and battery terminals Battery capacity Battery charger Accessories The functioning of all accessories must be tested. Replace missing screws and handles. Replace defective parts.
-
Page 108: Electrical Circuit Diagram
Medema Production A/S Electrical circuit diagram B B K K - - 2 2 H H O O U U R R M M E E T T E E R R 0 0 , , 0 0 h h... - Page 109 0 0 3 3 - - 0 0 8 8 - - 2 2 0 0 1 1 6 6 Tlf. +45 70 10 20 54 Date: Fax. +45 97 16 85 82 Description: Issue Dwg. no. 1533-1002 Circuit diagram Mini Crosser X1 Internet: http://www.medema.com Sheet 1/ Service Manual 1533-2001-S 109 of 112 Version 1.0.2/2020...
- Page 110 Medema Production A/S Service Manual 1533-2001-S 110 of 112 Version 1.0.2/2020...
- Page 111 Medema Production A/S Service Manual 1533-2001-S 111 of 112 Version 1.0.2/2020...
- Page 112 medemagroup...
Need help?
Do you have a question about the Mini Crosser X1 and is the answer not in the manual?
Questions and answers