Advertisement
Quick Links
A
®
HOIST
CART
GEN. 2
™
Assembly Instructions
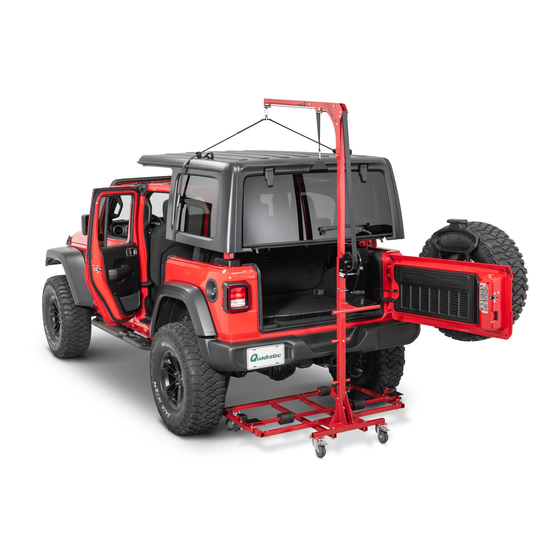
The Ultimate Top Removal and Storage System
Compact design
Quick Release
Strap
1 1/2" Wide Easy Wind
Nylon Webbing
Ratcheting Crank With
Safety Lock
Patented Smart Hook
allows window to be
closed
Paint Protection
Steering Handle
Pads Touch Points
Door Hanger
INCLUDED!
Rubber Coated
Protecting Hardtop
Locking Safety
Sliding Tray With
Caster/All four
ABEC Bearings
Casters Swivel
Pin Spring
Thick Foam Covered
Safety Lock
Hardtop Touch Points
Shorter frame base
Advertisement

Summary of Contents for Lange Originals Hoist A Cart GEN. 2
- Page 1 ® HOIST CART GEN. 2 ™ Assembly Instructions The Ultimate Top Removal and Storage System Compact design Quick Release Strap 1 1/2” Wide Easy Wind Nylon Webbing Ratcheting Crank With Safety Lock Patented Smart Hook allows window to be closed Paint Protection Steering Handle Pads Touch Points...
- Page 2 HOIST CART GEN. 2 ® ™ READ ALL INSTRUCTIONS BEFORE ASSEMBLY AND USE OF HOIST A CART READ ALL INSTRUCTIONS BEFORE ASSEMBLY AND USE OF HOIST A CART This installation guide is for the use of our Hoist A Cart system.
-
Page 3: Hardware List
HOIST CART GEN. 2 ® ™ HOIST A CART GEN 2 SHIPS IN TWO DIFFERENT BOXES Hardware List Parts List PART PART (BOX 1) NUMBER NUMBER HAC-066 Main Lifting Strap HAC-075 3/8” X 3 1/2” Hex Bolt (In box with Crank Unit) HAC-065 Steering Handle HAC-015... - Page 4 HOIST CART GEN. 2 ® ™ Hardware List Parts List PART PART (BOX 2) NUMBER NUMBER Lifting Bar HAC-050 (Rollers already assembled) HAC-052 Vertical Extension Bar HAC-053 Main Vertical Post Rear Support Bar with Welded Plate HAC-057 HAC-058 Rear Bar Support Bar HAC-059 HAC-062...
- Page 5 HOIST CART GEN. 2 ® ™ STEP 1 Locate parts: HAC-057, HAC-059 qty:2, HAC-058, HAC-055 Locate hardware: HAC-075 (3/8” X 3.5“ bolt qty:4), HAC-015 (3/8 Nyloc Nut qty:4) Special Instructions: Only tighten the nuts finger tight, and tighten everything down at once when you put the casters on in a later step (4).
- Page 6 HOIST CART GEN. 2 ® ™ STEP 2 Locate parts: HAC-067 Locate hardware: HAC-079 (3/8” X 3“ bolt qty: 2), HAC-015 (3/8” nyloc nut qty: 2) Special Instructions: Only tighten the nuts finger tight, and tighten everything down at once when you put the casters on in a later step (4).
- Page 7 HOIST CART GEN. 2 ® ™ STEP 4 Locate parts: HAC-068 (Front swivel casters without brakes), HAC-069 (Rear swivel casters with brake) Locate hardware: HAC-073 QTY: 16, HAC-015 QTY: 16 3/8” X 3/4“ bolt 3/8” nyloc nut Special Instructions: Install the casters HAC-073 HAC-073 HAC-073...
-
Page 8: Assembled View
HOIST CART GEN. 2 ® ™ STEP 5 Locate parts: HAC-053 Locate hardware: HAC-079 QTY: 2, HAC-078 QTY: 1,HAC-015 QTY: 3, 3/8” X 3“ bolt 3/8” X 2.5” HAC-053 HAC-078 HAC-053 HAC-015 HAC-015 HAC-079 HAC-015 HAC-079 HAC-079 HAC-015 HAC-079 STEP 6 Locate parts: HAC-051 X 2, HAC-050, HAC-052 Locate hardware: HAC-078 QTY: 3, HAC-015... - Page 9 HOIST CART GEN. 2 ® ™ STEP 7 Locate parts: Using assembly from step 6 Locate hardware: HAC-071 QTY: 3, HAC-072 QTY: 3 HAC-078 QTY: 3 HAC-015 QTY: 3 roller bushing roller pin 3/8” X 2.5” 3/8” nyloc nut Special Instructions: Sleave the smaller roller into the larger roller. Then sandwich the rollers into HAC-051 plates insert a bolt and tighten a nut on the end.
- Page 10 Locate parts: HAC-063, HAC-064, HAC-062, HAT-018 QTY: 2, Locate hardware: Set screws should come pre-installed. If one or more is not there check packaging or call Lange Originals Special Instructions: Unlock the position pin (set screw) by pulling it out and turning it 1/4 turn (Fig. 4). Slide the foam pieces about 1/4 way in on either side of the bar HAC-062 then slide HAC-064 on one side of the bar and HAC-063 on the other side of the bar.
- Page 11 HOIST CART GEN. 2 ® ™ LOCKED UNLOCKED Fig 3 Fig 4 STEP 10 Locate parts: HAC-054, HAC-056, HAT-018 QTY: 2 Locate hardware: HAC-079 3/8’ x 3” QTY: 2, HAC-015 QTY:2, HAC-074 3/8 x.5” QTY:3 Special Instructions: Install the crank on the upright main post by threading the three HAC-074 bolts into the threaded holes by hand and then using tools to tighten.
- Page 12 HOIST CART GEN. 2 ® ™ STEP 11 Locate parts: 30 ft strap with two snap hooks on the end crank unit strap Special Instructions: Remove snap hooks (if installed at the end of strap) and set aside. Wind one end of the strap through the underside of the bolt located in the spool (Fig 1).
- Page 13 HOIST CART GEN. 2 ® ™ STEP 12 Strap Installation Top removal strap (HAC-066) & Elevator bolts, washers, and wingnuts (BAG-047) Locate parts: Prepare hardtop for removal by removing all hardware, washer uid lines, electrical, bolts, Special Instructions: and any latches. For good resources on removing your top watch videos on you-tube, make sure to reference your specific model of Jeep as removal varies from year to year.
- Page 14 HOIST CART GEN. 2 ® ™ STEP 13 Quick Link Corresponding Rear Hook for your Jeep type Locate parts: HAT-123 or HAT-130 Special Instructions: After you have securely fastened the strap to your hardtop. Make sure your parking brake is on, and take care when using a ladder or climbing on your side steps.
- Page 15 HOIST CART GEN. 2 ® ™ STEP 14 Assembled Hoist A Cart Locate parts: Special Instructions: It’s time to check once again everything is detached holding your hardtop on the Jeep. I often forget my wiper uid tube, and wiring harness. Make sure the cradle is all the way back towards the rear of the Hoist and locked into place.
- Page 16 HOIST CART GEN. 2 ® ™ STEP 15 Storage Hoist A Cart Locate parts: Assembled Special Instructions: Undo the brakes on the rear wheels, and move the top carefully into a clear space. Lower the top down to the base of the cart, aligning the rear section to nestle in the corner of the rubber coated base of the cradle (Fig. 1, Fig.
- Page 17 HOIST CART GEN. 2 ® ™ STEP 16 Your doors, Velcro door straps 1” x 24” (HAC-070) Locate parts: Special Instructions: Roll down your windows before you undo the power harness from the doors. Remove your doors and place the hinge bolts in the slots (Fig. 1) on the Hoist A Cart CAUTION: Do not put your doors on an empty cart that does not have the top on it, or try to reinstall your top while the doors are on the cart.
- Page 18 10. Minor cosmetic issues such as paint flaws, mis-shaped foam pieces that do not affect the function of the product as determined by Lange. Lange Originals LLC reserves the right to change this document at any time and is not limited to the terms and conditions described here. For a comprehensive warranty on your specific part number/product please visit us at www.langeoriginals.com...
Need help?
Do you have a question about the Hoist A Cart GEN. 2 and is the answer not in the manual?
Questions and answers