Table of Contents
Advertisement
Quick Links
Advertisement
Table of Contents

Related Manuals for Topfloor TF100-TRS

Summary of Contents for Topfloor TF100-TRS
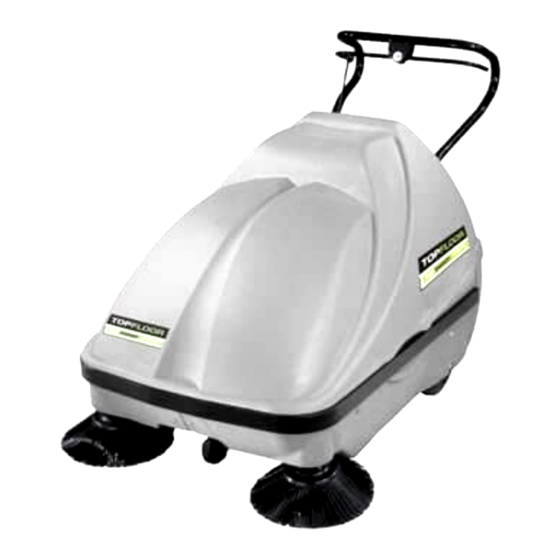
- Page 1 Operator manual TF100-TRS vacuum sweeper...
-
Page 3: Table Of Contents
Removing the filter ..................... 16 5.3.2 Fitting the filter ....................16 Replacing the Side Brush ....................17 5.4.1 Dismounting the Side Brush ................17 5.4.2 Mounting the Side Brush ................... 18 5.4.3 Adjusting the Side Brush ................... 18 Main brooms Replacement ....................19 TF100-TRS... - Page 4 Malfunctions / error messages and troubleshooting ............31 5.12 Technical Data ........................32 5.13 Product marking ........................ 33 5.14 Disposal ..........................33 5.15 Accessories and spare parts .................... 33 5.16 Service ..........................33 5.17 Transport ........................... 33 EC Declaration of conformity ......................34 TF100-TRS...
-
Page 5: Introduction
The risk is that of the user alone. Usage conformant with intended purpose also includes compliance with the operating manual and the inspection and maintenance specifica- tions. Drive the sweeper only along expressly marked routes and spac- TF100-TRS... -
Page 6: Safety Information
Caution: loose clothing can be caught and drawn in on rotat- ing parts. The operating instructions provided by the battery manufac- turer relating to his product and legal specifications for the handling of accumulator batteries should be heeded! TF100-TRS... - Page 7 Never short-circuit battery poles! Smoking, eating and drinking should be avoided in the vicin- ity of the battery charging station to avoid risks to health. Batteries should only be charged with the hood opened and secured with the holder. TF100-TRS...
-
Page 8: Device Description
Device Description An electric motor drives the suction sweeper which includes forward and reverse movement. The sweeping mechanism of the TF100-TRS fea- tures two lateral brushes which carry the refuse to two main brooms mounted parallel to the direction of motion. -
Page 9: Initial Startup
Push the handle bar and the driving linkage through the opening of the control panel. Handle bar Driving linkage Outer plastic washer Star handle Front carriage bolt Height-adjustment of the handle bar Driving linkage Turnbuckle of the driving linkage TF100-TRS... - Page 10 Should you neglect to adhere to this distance, it will result in poor sweeping or increased wear and tear of the brushes. Re-attach the main panelling. Close the main panelling. The suction sweeper is ready for operation. TF100-TRS...
-
Page 11: Operation
Insert the key into the key-operated switch. Turn the key clockwise. The machine starts. Release the key. Moving forward: Pull the right-hand part of the driving lever backwards. The suction sweeper moves forward. 1 Moving forward 3 Driving lever 2 Handle bar TF100-TRS... -
Page 12: Sweeping Operation
Unlatch the lowering lever of the sweeping roller. Push down the lowering lever. 4.2.3 Stopping Main Broom Operation Lift the main brooms and arrest the lowering lever of the main brooms Let the lever snap in arresting position. TF100-TRS... -
Page 13: Operating The Side Brushes
Make sure the dust collector has been installed Move the lever of the filter vibrating device continuously, about ten times back and forth. Afterwards open the ventilation flap. Parking the sweeper Turning off the Sweeping & Suction Machine TF100-TRS... -
Page 14: Parking The Sweeper
If the brake is relieved afterwards, the brake lever has to remain depressed position. 1 Parking brake 2 Front wheel DANGER! Incorrect handling of the Sweeping & Suction Machine may lead to severe harm to persons or objects! TF100-TRS... -
Page 15: Emptying The Hopper
Pull the hopper fully out of the suction sweeper. To empty the hopper, insert your other hand into the recessed grip. Refuse is emptied out via the lower edge of the hopper dirt collector. Empty the refuse into an appropriate container only. TF100-TRS... -
Page 16: Inserting The Hopper
Raise the front hopper guides to the height of the guide rails. Push the arrests to the side Push the hopper into the suction sweeper. Push the arrests onto the fixing knobs of the hopper. Hopper arrest Hopper guide rail TF100-TRS... -
Page 17: Maintenance
The suction sweeper may only be cleaned in the off state, when it is dry. The suction sweeper is a machine with electrical components. Moisture damages the electronics of the device. Moisture can re- WARNING sult in leakage currents and short-circuits! Do not use any high- pressure cleaners TF100-TRS... -
Page 18: Replacing The Filter
Tension closure Filter frame arrest 5.3.2 Fitting the filter Place the filter on the frame. Fold the frame upwards. Push the threaded hooks over the filter frame arrests. Press the clips of the tension closures upwards. TF100-TRS... -
Page 19: Replacing The Side Brush
Pull off the spring plug from the axle of the lateral brushes. 1 Borehole 2 Borehole 3 Flange of the lateral brush- 4 Spring plug Pull the side brush down and off. Replace the side brush. TF100-TRS... -
Page 20: Mounting The Side Brush
To raise the lateral brushes, you will have to turn the screw of the height-adjustment of the lateral brushes counter clockwise. Set the lateral brushes to their desired position. Tighten the back nuts. Put on the main panelling. TF100-TRS... -
Page 21: Main Brooms Replacement
2 fastening bolts of side trim panel The roller swing is held in place by three star handles. Loosen the star handles. Remove the roller swing. 1 open star handle 2 roller swing 3 star handle 4 turning lever TF100-TRS... -
Page 22: Installing The Main Brooms
Set the front roller swing onto the free sweeping roller ends. The roller swing is equipped with two turning levers. Each turning lever end is equipped with one pick-up pin. 1 threaded rods 2 sweeping roller keyway 3 pick-up pin TF100-TRS... -
Page 23: Setting The Main Brooms
Lift the main brooms and arrest the lowering lever of the main brooms. Let the lever snap in arresting position. Open the hood. Secure the hood position by the hood arresting device. Remove the right side trim panel facing in the direction of motion. TF100-TRS... - Page 24 Park the suction sweeper as described on page 10. Take the key out of the key-operated switch. Lift the main brooms and arrest the lowering lever of the main brooms Let the lever snap in arresting position. TF100-TRS...
-
Page 25: Drive
If the driving performance is not satisfactory in reverse, check the driv- ing belt for dirt or damage. 5.7.2 Inspecting the drive Park the suction sweeper as described. Take the key out of the key-operated switch. Remove the main panelling. TF100-TRS... - Page 26 (horizontal position) when the engine is running. Park the suction sweeper as described. Take the key out of the key-operated switch. Remove the main panelling. TF100-TRS...
-
Page 27: Adjusting The Drive
Adjustment of the drive Re-adjustment is necessary due to wearing of the frictional wheel de- pending on use. Park the suction sweeper as described. Take the key out of the key-operated switch. Remove the main panelling. TF100-TRS... - Page 28 When actuating the driving lever to move backwards the driving belt has to be tight and the frictional wheel has to be separated from the frictional roller! Should these conditions be evident? TF100-TRS...
- Page 29 If the machine "creeps" forward: Turn the screw of the free wheel adjustment clockwise to tighten the pull-back spring. If the free wheel works properly again: Tighten the back nuts. TF100-TRS...
-
Page 30: Battery
Subsequently the electronic system of the Sweep- ing& Suction Machine carries out a self-testing operation of the battery charging state. The result of this self-testing is displayed by the 5 LED`s. Information provided by LED indicators on the battery condition display: TF100-TRS... - Page 31 The manufacturer's original charger can/should remain connected after charging, as it has a trickle charge function, and thus ensures maximum battery capacity even after long standing times. Ensure that the suction sweeper is only started up if there is sufficient charge left in the batteries. TF100-TRS...
-
Page 32: Maintenance Chart
Search suction for obstacles, clean. Conduct trial run to check all operating elements. Check if roller drive chain is elongated or loosened. Check all bearings for wear. Check if seals are damaged or dislocated. TF100-TRS... -
Page 33: Charge Battery
Check side brushes and re- move obstacles Drive wheels obstructed Check ventilator wheel and remove any obstruction Frictional wheel worn out Jack up the Sweeping & Suc- tion Machine check differential operation of wheels and free running TF100-TRS... -
Page 34: Technical Data
Trim Panel Parts: impact resistant plastic Electrical Installation Power supply 2 x 12 V Batteries 60 - 80 Ah K5 Running time of battery version: ca. 2,5 - 3 Std. Maximum Airborne Sound Level 71 dB(A) dB (A): Vibration < 2m/s² TF100-TRS... -
Page 35: Product Marking
5.13 Product marking Vacuum Sweeper TF100-TRS Rated Power: Serial Number: Supplier: Crescent Industrial Berrington House, Berrington Road, Leamington Spa, CV31 1NB 5.14 Disposal Dispose of faulty parts, especially electrical components, batteries and plastic parts according to the locally applicable waste disposal specifica- tions. -
Page 36: Ec Declaration Of Conformity
Directive 2006/42/EC Directive 2000/14/EC Directive 2004/108/EC The following standards, in particular, were applied: EN 292 EN 294 DIN EN 61000-6-2 DIN EN 60335-1 DIN EN 60335-2-69 DIN EN 60335-2-72 ……………………………… Leamington Spa, 29 November 2012 Stephen Stacey (Senior Partner) TF100-TRS... - Page 37 TF100-TRS...
- Page 38 Distributed by: 0845 33 77 695 Berrington House, Berrington Road 0845 33 78 695 Leamington Spa info@c-ind.co.uk Warwickshire CV31 1NB www.crescentindustrial.co.uk TF100-TRS...
Need help?
Do you have a question about the TF100-TRS and is the answer not in the manual?
Questions and answers
what is the part number for the replacement batteries?