Advertisement
Advertisement
Table of Contents

Related Manuals for DR. Z Amplification Brake Lite SA

Summary of Contents for DR. Z Amplification Brake Lite SA
- Page 1 Brake Lite SA Manual www.drzamps.com...
- Page 2 This symbol advises the user to read all accompanying literature for safely opera�ng the unit Important Safety Instruc�ons 1) Read these instruc�ons. 2) Keep these instruc�ons. 3) Heed all warnings. 4) Follow all instruc�ons. 5) Do not use this apparatus near water. 6) Clean only with dry cloth.
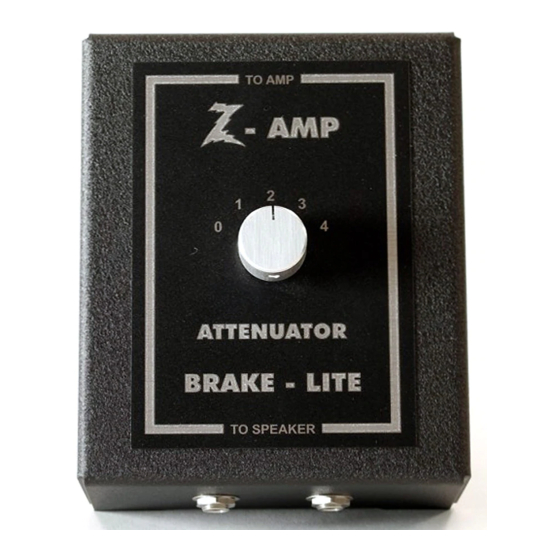
- Page 3 Alone.) Same guts as the combo mounted Brake Lite, but able to be tossed in the gig bag for use with many different amps on the fly. The Brake Lite SA works with any tube amp up to 45 wa�s and can be used with 4, 8, or 16, ohm loads*. The SA features 2 speaker outs that are wired in parallel.
- Page 4 TO AMP ATTENUATOR BRAKE - LITE TO SPEAKER Instruc�ons: - Unplug amplifier from the AC outlet. - Unplug speaker from amplifier chassis and plug into the “TO SPEAKER” jack on bo�om of Brake Lite. - Insert plug from the “TO AMP” on Brake Lite into the SPEAKER OUT jack on your amplifier chassis. - Always match the speaker out jack on your amp to your combo speaker (use 8 ohm speaker out with 8 ohm speaker).
- Page 5 A�enua�on Fine Adjustment Instruc�ons: You are able to fine tune the amount of a�entua�on between posi�ons 1 and 2, and posi�ons 2 and 3 by opening the your Brake Lite up.* A�enua�on levels between 0 and 1 and 3 and 4 are fixed se�ngs and can not be adjusted.
- Page 6 A�enua�on Fine Adjustment (Con�nued) Figure B Figure C 7. A�er adjus�ng the clamps, �ghten the screw to secure the clamp, making sure that the clamp indent is making contact with a copper winding on the resistor. If the indent is not making contact with the winding, the a�enuator will not work (Figure D).
- Page 7 8. A�er making sure the clamp indent is making contact with the resistor winding (Figure D), secure the back panel onto your Brake Lite SA with a 1/4” nut driver, plug in and enjoy. *Dr. Z Amplification is not responsible for any damage to your equipment by disassembling your Brake Lite.
Need help?
Do you have a question about the Brake Lite SA and is the answer not in the manual?
Questions and answers