
Summary of Contents for Seven Telematics Transcan Advance
- Page 1 Transcan Advance ® Install Guide Seven Telematics Ltd sales@seventelematics.com +44 (0)1636 550 320 After sales : +44 (0)1903 837 000...
- Page 2 Seven Telematics cannot accept liability for any damages or loss of information resulting from the use of information contained in this document. All rights reserved. © Copyright 2018 Seven Telematics Ltd. NG24 1RZ...
-
Page 3: Table Of Contents
Contents Transcan Advance ® Install Guide Introduction Installation Checks 1.1 Installation Overview 4.1 Power supply 1.2 Transcan Temperature Recorders 4.2 Display 1.3 Temperature Sensors 4.3 Temperature sensors 1.4 Status Monitoring 4.4 Status inputs 1.5 Transcan R & C Version 4.5 Alarm signal 1.6 Transcan T Version Recorder commissioning 1.7 Optional Junction Box... -
Page 4: Introduction
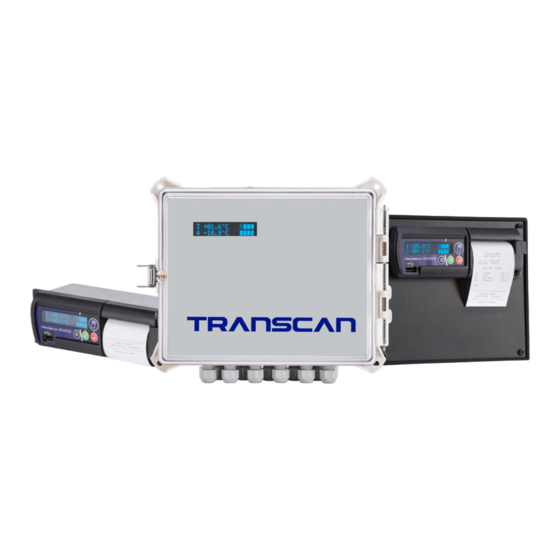
1.2 Transcan Temperature Recorders Transcan recorders are normally supplied with an installation kit The Transcan Advance is available in 3 formats: R, T and C (for in-cab which includes most of the components used for an installation. installation on a vertical bulkhead). -
Page 5: Transcan R & C Version
1.4 Status Monitoring Cont. 1.6 Transcan T Version Transcan Advance: The T version is intended for external installation and is suitable for trailers and semi-trailers. It is housed in a weatherproof enclosure and Status input 1 (labelled on the back of the unit) of the Transcan may be fitted in a wide variety of locations. -
Page 6: Installing The Sensors
2.2 Positioning The Status Switches 2.2.1 Location of Door Switches Install Guide Seven Telematics supply a switch suitable for monitoring door operations. This is a magnetic proximity switch which has a single pole 2.0 Installing The Sensors normally open contact. The activating magnet should be placed on... -
Page 7: Installing The Junction Box
2.3 Power Supply Cont. 2.4.2 Installing the Multi-Core Cable The fuse must be fitted close to the power supply point and any The multi-core cable which connects the junction box to the recorder exposed terminals protected so that they are not subject to corrosion. must be routed carefully. -
Page 8: Installing The Recorder
Transcan Advance ® 3.1.1 Mounting in a Radio Slot The recorder is retained in the mounting cage by spring locking Install Guide plates fitted to each side. Once fitted into the cage, the removal procedure is to insert the keys provided into the keyways at each side 3.0 Installing the Recorder of the front face of the recorder to release the locks. -
Page 9: Connecting The Recorder
3.3 Positioning the T Version Cont. 3.4.2 Connecting the Status Inputs Fasten the recorder enclosure to the surface of the vehicle using the The Transcan monitors status inputs as ON/OFF switches. Status fixing plugs, screws and washers supplied. Ensure that the fixing plugs inputs are connected to CON2, marked Status (On/Off) Inputs, 1 to 8 are fitted flush with the mounting surface so that vibration of the as shown in figure 3.2. -
Page 10: Installation Checks
4.3 Temperature Sensors Before testing the recorder wait 5 minutes to allow the temperature Transcan Advance Alarms are automatically disabled when the sensors to stabilize. Then check that the displayed temperatures are refrigeration unit is switched off provided that a suitable detector is as expected. -
Page 11: Recorder Commissioning
Status Input 1 is reserved for controlling the external alarm control modifications to the UPF are normally limited to the entry of the enable/disable with the Transcan Advance. To activate the External vehicle identity by setting the parameter “Set Vehicle ID”. -
Page 12: Header And Title
Transcan Advance ® 5.1.2 Status Inputs Cont. Status Input 2 is default for a door switch input. To use this input to Install Guide monitor door openings it is necessary to install a door switch and set the following parameters (Please refer to User Reference Manual, section 5.2.3): 6.0 Specification Transcan temperature recorders are designed to meet the... -
Page 13: Supply Voltage
IEC installation category II. In accordance with EN13486. Power: 6.14 Power Consumption Input Voltage: 9-36V DC Transcan Advance: 58 mA USB Output Voltage: USB Output Current: 0.5A 6.15 IEC Symbols Used Direct current 6.6 Recording Period May be set from 1 minute to 60 minutes. -
Page 14: Cleaning And Maintenance
Transcan Advance ® Install Guide 7.0 Cleaning and Maintenance For further information on the products and services offered by Seven Telematics please visit: www.seventelematics.com... - Page 15 Transcan Advance ® Install Guide Seven Telematics Ltd. +44 (0)1636 550320 UDN-1601-F This manual applies to all Firmware versions from TS2T410.013...
Need help?
Do you have a question about the Transcan Advance and is the answer not in the manual?
Questions and answers