Advertisement
Available languages
Available languages
Table of Contents
IMPORTANT SAFEGUARDS
WARNINGS
• Read all instructions before using your rotisserie.
• This rotisserie is for outdoor use only.
• Remove motor and store in a dry place when
not in use.
• Do not touch hot surfaces. Use barbecue mitts.
• This rotisserie is not for use by children.
• To protect against electrical hazards do not immerse
cord, plugs, or motor in water or other liquids.
• Unplug the motor from outlet when not in use, or before
cleaning
• Do not use rotisserie for other than intended use.
• Make sure motor is off before placing it on the
motor bracket.
• Do not operate the rotisserie motor with a damaged
cord or plug.
• Do not operate the rotisserie motor if it
should malfunction.
• The rotisserie motor is equipped with a three prong
(grounding) power cord for your protection against
shock hazard.
• The power cord should be plugged directly into a
properly grounded three prong receptacle. If use of an
extension cord is required, be sure that it is a minimum
16 AWG, 3 wire well insulated cord, marked for
OUTDOOR USE ONLY and properly grounded.
• When using an extension cord, make sure it is not in
contact with hot or sharp surface.
• Outdoor extension cords should be marked with the
letters "W-A" and a tag stating "Suitable for use with
outdoor appliances".
• Do not cut or remove the grounding prong from the
rotisserie motor power cord.
• Do not let cord hang over any sharp edge or
hot surface.
• Use only outdoors, do not expose to rain.
• To reduce the risk of electric shock, keep extension cord
connection dry and off the ground.
• A short power cord is supplied to reduce the risk of
tripping over the cord. Extension cords may be used, but
caution must be taken to prevent tripping over the cord.
SAVE THESE INSTRUCTIONS
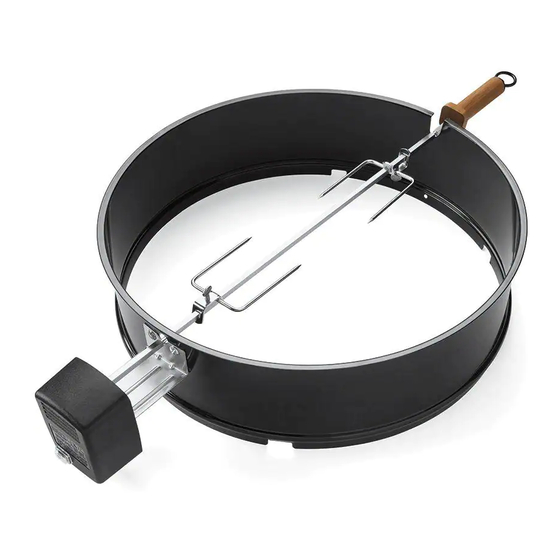
Assembly
1. Install Rotisserie Ring
Place the enameled rotisserie ring inside the kettle so
that the tabs rest on the top edge of the kettle.
2. Attach the Motor
Slide the motor onto the Stainless Steel motor bracket.
K
R
ETTLE
I
NSTRUCTIONS
3. Attach the Counterweight to the Rotisserie Shaft
Unscrew the retaining loop, put the counterweight
assembly in place, reattach the retaining loop.
Handle of shaft
Counterweight
4. Put the Spit Forks on the Rotisserie Shaft
Slide the forks onto the shaft so that the tines are facing
each other. Screw in the thumb screws to hold the forks
in place.
5. Insert the Rotisserie Shaft in the Motor
Insert the pointed end of the rotisserie shaft into
the motor.
OTISSERIE
Travel
Counterweight
assembly
Retaining loop
96811 10/98
Advertisement
Table of Contents

Related Manuals for Weber 96811


Summary of Contents for Weber 96811
-
Page 1: Important Safeguards
Slide the forks onto the shaft so that the tines are facing each other. Screw in the thumb screws to hold the forks in place. 5. Insert the Rotisserie Shaft in the Motor Insert the pointed end of the rotisserie shaft into the motor. Travel Retaining loop Counterweight assembly 96811 10/98... - Page 2 OPERATING 1. Remove rotisserie shaft from ring. Remove one spit fork. 2. Prepare the charcoal for Indirect Cooking using a drip pan. 3. Push the rotisserie shaft through the approximate center of the food. 4. Slide the spit fork onto the shaft. Insert the tines of both spit forks into the food.
-
Page 3: Montaje
ADVERTENCIAS • Lea todas las instrucciones antes de utilizar el asador giratorio. • Este asador giratorio sólo se debe usar al aire libre. • Desmonte el motor y guárdelo en un lugar seco cuando no se use. • No toque las superficies calientes. Use guantes para barbacoa. - Page 4 FUNCIONAMIENTO 1. Quite el eje del asador giratorio del anillo. Quite uno de los tenedores para asado. 2. Prepare el carbón para el Método indirecto usando una bandeja recogegotas. Introduzca el eje del asador giratorio por el centro aproximado del alimento. 4.
-
Page 5: Montage
AVERTISSEMENTS • Lisez toutes les instructions avant de vous servir de votre rôtissoire. • Cette rôtissoire doit être utilisée uniquement à l’extérieur. • Déposez le moteur et rangez-le dans un endroit sec quand vous ne vous en servez pas. • Ne touchez pas les surfaces brûlantes. Portez des gants de cuisine. - Page 6 UTILISATION 1. Retirez la broche de la rôtissoire du support annulaire, puis enlevez une fourchette. 2. Préparez le charbon de bois pour la cuisson indirecte en le disposant autour d’une barquette. 3. Enfoncez la broche de la rôtissoire jusqu’au milieu environ de la pièce de viande.
- Page 7 SICHERHEITSHINWEISE • Lesen Sie alle Anleitungen vor Gebrauch des Drehspießes. • Dieser Drehspieß ist nur für den Gebrauch im Freien vorgesehen. • Bei Nichtgebrauch den Motor herausnehmen und trocken lagern. • Berühren Sie keine heißen Flächen, und tragen Sie Grillhandschuhe. •...
-
Page 8: Betrieb
Den Drehspieß mit Grillgut in den Drehspießring setzen. 9. Den Grilldeckel schließen und den Drehspießmotor einschalten. Weber-Stephen Products Co. 200 East Daniels Road Palatine, Illinois 60067 USA (1-800-446-1071) GRILLEN • Fleisch oder Geflügel müssen vor dem Grillen auf Raumtemperatur gebracht werden. (Gewöhnlich genügen 30 bis 60 Minuten.
Need help?
Do you have a question about the 96811 and is the answer not in the manual?
Questions and answers