Advertisement
Available languages
Available languages
Quick Links
Advertisement

Subscribe to Our Youtube Channel
Related Manuals for funtec FUN Volley Set


Summary of Contents for funtec FUN Volley Set
- Page 1 V o l l e y S e t V o l l e y S e t...
- Page 2 V o l l e y S e t V o l l e y S e t Kontakt zu Funtec: 004922423231 service@funtec.de www.shop.funtec.de...
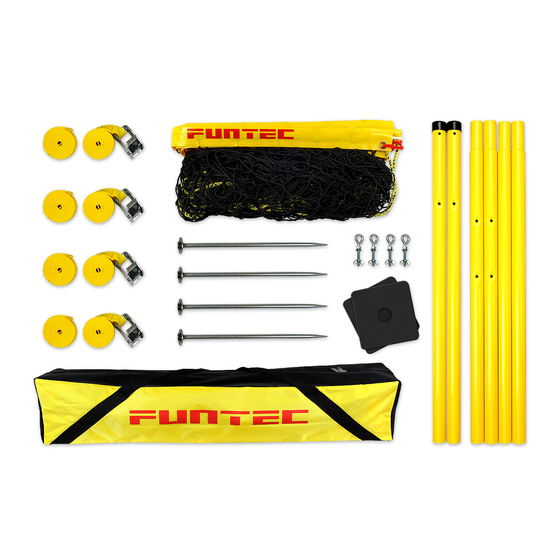
- Page 3 aufbauanleitung Beide Netzpfosten setzen sich aus je drei Rohren zusammen. Das Rohr mit der schwarzen Kunststoffkappe ist das Oberteil. Schraube die Metallösen in die dafür vorgesehenen Löcher. Du kannst zwischen zwei Netzhöhen wählen. Setze nun die gelben Spanngurte zusammen. Achte darauf, dass sich die Schlaufen am Ende der Gurte und nicht am Klemmschloss befinden.
- Page 4 Die Positionen der Erdnägel werden folgendermaßen festgelegt: Entfalte dazu vollständig das Netz 1 . Die Enden bzw. die Schlaufen des oberen Spannseils markieren die Positionen der Netzpfosten 2 . Von hier aus werden die Erdnägel jeweils in einem 45°-Winkel in einer Entfernung von ca.
- Page 5 Hänge die großen Schlaufen der Spanngurte und die Schlaufen des Netz-Spannseils an der Spitze der Netzpfosten ein und stelle diese zum Netz hin schräg auf. Spanne alle vier Spanngurte gleichmäßig ab und stelle die Netzpfosten dabei senkrecht. Die roten Leinen werden an den Schraubösen an den Pfosten befestigt.
- Page 6 Die optimale Netzposition erreichst du durch Nachjustieren der Spanngurte und der unteren Spannleinen. Das Netz sollte genau in der Flucht der Netzpfosten hängen.
- Page 7 Tipps • Bevor du dein Set wieder verpackst, befreie insbesondere die Pfosten und Steckverbindungen vom Sand. • Stecke die Erdnägel zur Aufbewahrung am besten in die Rohre. Dann können sie in der Tasche nicht herausfallen. empfehlungen Als Spielfeldmarkierung empfehlen wir dir die Fun Volley Courtline aus 5 mm starker gelber Kordel mit U-förmigen Stahlheringen.
- Page 8 LIFE starts...
- Page 9 V o l l e y S e t V o l l e y S e t Contact Funtec: 004922423231 service@funtec.de...
- Page 10 setup manual Each post is assembled from three pieces. The section with the black cap is the top piece. Insert the metal loops into the holes and secure with the threaded nut provided. You can choose between the two different holes to obtain different net heights.
- Page 11 To obtain the ideal position for the sand anchors, unfold the net completely 1 . The loops at the ends of the top cable mark the places for the posts 2 . Drive the anchors into the ground at a distance of approx.
- Page 12 Put the larger loops at the other end of the straps over the top end of the posts and put the posts up sloping inwards. Then put the cable loops attached to the top ends of the net over the top of the posts as well.
- Page 13 The net tension and net height can be altered to achieve the perfect net by adjusting the tension of the red ropes at the bottom corners of the net.
- Page 14 Tips • Wipe the sand off the posts before storing them. • For transportation store each anchor in a single pole section. Recommendation We recommend the Fun Volley courtline as suitable for this portable Beachvolleyball set. The courtline has a 5 mm rope with metal u-shaped anchors.
- Page 15 Metal pole set, 6-piece, metal loops, 2 plastic ground plates Erdnägel / Sand anchors 111408 Spanngurte, jeweils 2-teilig / 111407 Tension straps, 2-piece Freizeitnetz, 8,5 m/9,5 m / 111324/111322 Leisure sports net, 8.5 m/9.5 m 111331 Packtasche Fun Volley / Fun Volley bag www.funtec.de/shop...
Need help?
Do you have a question about the FUN Volley Set and is the answer not in the manual?
Questions and answers