Advertisement
Available languages
Available languages
Video online at sesport.com
Tip: Use a credit
card to help lift the
rear edge of the cover.
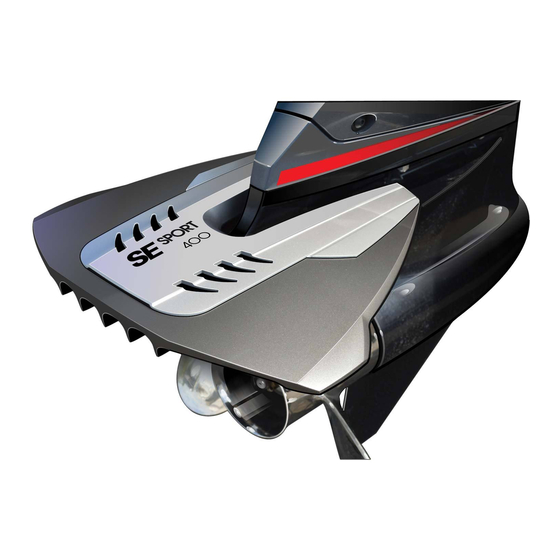
Remove Trim Cover: Gently lift rear edge
and then move the cover forward to release.
Thoroughly clean the cavitation plate. Place
the adhesive strips on the top side as shown.
Center the foil and insert bolts & D washers
in the closest holes to the cavitation plate.
Tip: Rubber presses
bottom of Cavitation Plate.
Assemble Disk-Grips with 2" rubber washers,
1" & 5/8" washers and nuts hand tightened.
Tighten lock nuts slowly with a 7/16" socket
wrench using an alternating torque pattern.
Place cover slightly forward, press down and
slide back to hold in place, & install screw.
Drill-Free
TM
Installation:
The SE Sport 400
TM
comes with all the hardware you need. (Four Disk-Grips
rubber washers, bolts, washers, adhesive strips, and lock nuts.) *Most installations
will only require a 7/16" open end or socket wrench, and a Phillips driver.
Remove the top Trim Cover by gently sliding the cover forward to release.
Clean the cavitation plate of all oily residue, top and bottom! You may need
to use rubbing alcohol to thoroughly clean the surface. Place adhesive strips
on the top surface of the cavitation plate near the outer edge, and close to
estimated assembled disk location. (Remove adhesive strip liners.)
Drill-Free
Disk assembly: Set the SE Sport 400
TM
select the hole pattern closest to the size of your cavitation plate. Place the
D-shaped washers in the foil top channels over the selected holes, and insert
carriage bolts in these four positions. (Long bolts rear and short forward.)
(Hole patterns for 5, 6, 6.5 and 7 inch wide plates with a 1/4" additional
tolerance are marked on the foil.)
Place the 2" rubber washer on the Disk-Grips
and place the 1" steel washers on the Disk-Grip
5/8" washer and lock nut. Make sure the step in the Disk-Grip
outside edge of your cavitation plate. (The rubber washers will conform to the
step when tightened.)
Tighten the lock nuts with a small socket wrench slowly to prevent thread
galling. Use an alternating torque pattern until the rubber washer on the Disk-
Grips
TM
is substantially compressed. You will feel the nut get harder to turn, and
add another half to full turn and the grip will be accomplished. You can break
the bolt with continued tightening. (Once tightened, avoid loosening the
lock nuts. Do not use a power socket.)
Install the Trim Cover: Place the Trim Cover on top, 1/2 inch forward of the
foil, and slide rearward while pressing firmly down on the center to engage
the mid interlocks. Once lined up with the center screw hole, use a Phillips
driver to hand tighten the screw until snug. (Do not over-tighten the screw.)
Final check for tightness: Tug the Sport 400
should feel very solid with no movement. In all cases, the bolts must fully
engage the nylon insert area of the lock nut to be secure.
Safety check: We recommend a check of the hydrofoil tightness before and
after your first day on the water. The engineered composite Disk-Grips
designed to withstand aggressive tightening. The lock nuts can usually be
re-tensioned an additional quarter to half turn or more at this time, without
removing the Trim Cover.
Maintenance: Check regularly for weathering of the rubber washers and
Disk-Grip
tightness. Re-tension only if needed. See your dealer or email Sport
TM
Marine for replacement parts if needed.
(Note) Installation adjustments: Cavitation plates of 8" width require SE
*
Sport 400
TM
modification for Drill-Free
Tech or www.sesport.com for written instructions and photos.
*The Mercury 40
HP
, 50
HP
the rear disk mount position. Pilot holes are provided to guide drilling the Sport
400
with a 1/4" drill bit to fit these motors. Use the standard 6" hole position
TM
for the forward Disk-Grip
have larger 7.25" wide plates. To mount to these cavitation plates, you may
need to slightly expand the outside holdes outward with a small round rasp or
1/4" drill. *Various Evinrude 200
the 6.5" pilot hole, and expanding the forward outside holes for the best fit.
Measure for the closest hole pattern before installation.
The SE Sport 400
is not recommended for Volvos with exhaust through
TM
*
the cavitation plate. The SE Sport 300
Conventional Drill Assembly: If you prefer to drill your cavitation plate, set
*
the Sport 400
in the desired position and mark the four inside holes with a
TM
center punch. Drill the four inside hole placements using a 1/4" drill bit. Install
using the same hardware without the Disk-Grips
optionally, choose to drill two holes and use two Disk-Grips
on the cavitation plate and
TM
TM
, under the cavitation plate,
TM
bottom, followed with the
firmly from side to side. It
TM
TM
installation. Contact Sport Marine
, and 60
HP
FourStrokes have a 6.5" plate width at
mounts. *The Honda 200
TM
- 300
HP
HP
range models may require drilling
is recommended.
TM
TM
TM
,
aligns with the
TM
TM
are
and Yamaha 350
HP
HP
and rubber washers. (Or,
TM
.)
Advertisement
Table of Contents

Summary of Contents for SPORT MARINE TECHNOLOGIES SE Sport 400
- Page 1 (Remove adhesive strip liners.) and then move the cover forward to release. Drill-Free Disk assembly: Set the SE Sport 400 on the cavitation plate and select the hole pattern closest to the size of your cavitation plate. Place the D-shaped washers in the foil top channels over the selected holes, and insert carriage bolts in these four positions.
- Page 2 HIGH PERFORMANCE HYDROFOIL is recommended. Video Installation also online at sesport.com Installation Adjustments: Cavitation plates of 8“ width require SE Sport 400 modification for Drill-Free installation. Contact Sport Marine Tech or www.sesport.com for written instructions and photos. *The Mercury 40...
- Page 3 Consulter le détaillant ou envoyer un courriel à Sport Marine pour obtenir des pièces de rechange au besoin. *(Remarque) Réglages de l’installation : Les plaques anticavitation de 20.32 cm (8 po) de largeur nécessitent une modification du SE Sport 400 pour TM/MC l’installation sans perceuse Drill-Free.
- Page 4 Procéder à l’installation avec la même quincaillerie, sans les Disk- Grips TM/MC et les rondelles en caoutchouc (ou, si l’on préfère, il est possible de percer deux trous et d’utiliser deux Disk-Grips TM/MC © 2014 SPORT MARINE TECHNOLOGIES, INC. Membre...
- Page 5 1.43 cm (7/16”) usando un orden de apriete alternado. necesita piezas de repuesto. *(Nota) Ajustes de instalación: Las placas de cavitación de 20.32 cm (8”) de ancho exigen modificación de la hidroala SE Sport 400 para la instalación sin taladro Drill-Free .
- Page 6 Mida para la configuración de agujeros más cercana antes de la instalación. *La hidroala SE Sport 400 no se recomienda para Volvos con escape a través de la placa de cavitación. En su lugar se...
Need help?
Do you have a question about the SE Sport 400 and is the answer not in the manual?
Questions and answers