Table of Contents
Advertisement
<KX-T7716C>
Thank you for purchasing a Proprietary Telephone.
Please read this manual carefully before using this product and save this manual for future.
For more details, please refer to the manuals of Panasonic PBX.
In this manual, the suffix of each model number is omitted unless necessary.
Accessories (included)
A Handset: 1
B Handset
cord:1
Installing the batteries
Qui c k Re f erence Guide
C Telephone line
cord: 1
1
Press down the direction of the arrow and open the
cover (A).
2
Install the batteries in the proper order as shown
(B), matching the correct polarity.
3
Close the battery cover.
R Batteries are not included with the unit.
PNQW3107ZA
P r oprieta r y T elephone
KX-T7716C
Model No.
PSNM1211NE0
Advertisement
Table of Contents

Related Manuals for Panasonic KX-T7716C


Summary of Contents for Panasonic KX-T7716C
- Page 1 Thank you for purchasing a Proprietary Telephone. Please read this manual carefully before using this product and save this manual for future. For more details, please refer to the manuals of Panasonic PBX. In this manual, the suffix of each model number is omitted unless necessary.
- Page 2 R Use only the supplied telephone line cord. Telephone line cord Handset cord To the main unit Important: This telephone is designed for use with Panasonic PBX systems only and must not be directly connected to the public telephone network.
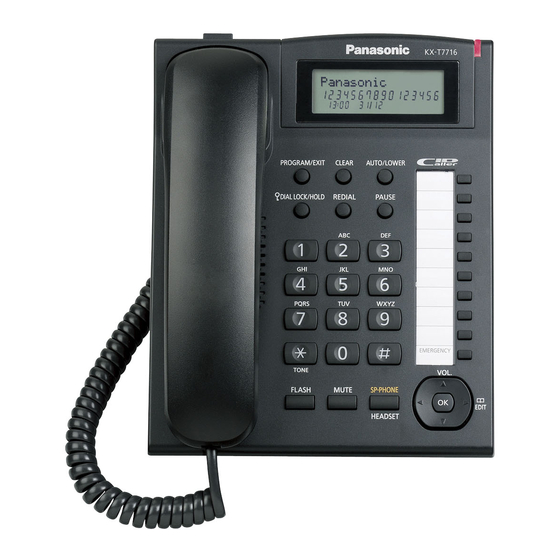
- Page 3 Controls A MHOLDN J MFLASHN B MPROGRAM/EXITN K MMUTEN C MREDIALN L MSP-PHONEN(Speakerphone) MHEADSETN D MCLEARN M Navigator key (MCN, MDN, MFN, MEN) E MAUTO/LOWERN N MOKN F MPAUSEN O One-touch dial buttons G Display P Dial key buttons/memory station numbers H Ringer/message indicator Q RINGER selector I MGN(TONE)
- Page 4 Settings Headset/speaker volume Press MDN or MCN repeatedly while talking. Ringer volume Select the ringer volume to HIGH, LOW or OFF. The default setting is HIGH. Display language MPROGRAM/EXITN ® MDN / MCN: "Change language?" ® MOKN (default: English) MDN / MCN: Select the desired setting ® MOKN ® MPROGRAM/EXITN Date and time MPROGRAM/EXITN ®...
- Page 5 Features List Making Calls One-touch Dialing Lower memory location Calling To store To an extension MPROGRAM/EXITN ® MDN / MCN: "Save Lift the handset or press MSP-PHONEN. one touch ?" ® MOKN Dial the extension number. Enter the party’s name (15 characters max.) To an outside party ®...
- Page 6 Features List During the conversation Call Hold To hold Press MHOLDN during an outside call. To release hold, – lift the handset if the handset is on the cradle. – press MHOLDN if the handset is off the cradle. – press MSP-PHONEN if using speakerphone.
- Page 7 Character Table for Entering names You can enter alphabetic characters and digits using the dialing buttons. Pressing a dialing button repeatedly displays different characters, as shown in the following table. While entering characters, you can move the cursor with the left and right navigator keys.
- Page 8 Call Display Service Using Call Display service Viewing the caller list and calling back Important: Press MDN or MCN to enter the caller list. R This unit is Call Display compatible. To use Call Press MCN to search from the most recent call, Display features, you must subscribe to Call or MDN to search from the oldest call.
- Page 9 Useful Information Desk mount setup This unit can be used in 2 positions. Low desk position (default) High desk position – You can adjust the wall mount adaptor to slope this unit. – Changing to the high desk position. 1. Press the tab in the direction of the arrow 2.
- Page 10 Useful Information Wall mount setup This unit can be mounted on a wall phone plate. Pull down the handset hook until it locks, so the tabs holds the handset. Press the tabs in the direction of the arrows (A), then remove the wall mount adaptor (B). High desk position Low desk position Tuck the telephone line cord inside the wall mount adaptor, and push it in the direction of the arrow.
- Page 11 Useful Information Drive screws (not included) into the wall using the wall template below. Connect the telephone line cord. Mount the unit, and then slide it down. Screws 8.3 cm Hooks To the main unit To temporarily set the handset down during a conversation, place it as shown in this picture.
- Page 12 R If you are having problems making calls, unplug the extension line and connect a known working telephone. If the known working telephone operates properly, have the defective telephone repaired by an authorised Panasonic factory service centre. If the known working telephone does not operate properly, check the PBX and the internal extension wiring.
- Page 13 Important Information Important Safety Instructions When using this unit, basic safety precautions, including those below, should always be followed to reduce the risk of fire, electric shock and injury to persons. Read and understand all instructions. Follow all warnings and instructions marked on this unit. Unplug this unit from the main unit before cleaning.
- Page 14 Notes...
- Page 15 Notes...
- Page 16 1-62, 4-chome, Minoshima, Hakata-ku, Fukuoka 812-8531, Japan Copyright: This material is copyrighted by Panasonic System Networks Malaysia Sdn. Bhd., and may be reproduced for internal use only. All other reproduction, in whole or in part, is prohibited without the written consent of Panasonic System Networks Malaysia Sdn. Bhd.