Table of Contents
Advertisement
Advertisement
Table of Contents

Related Manuals for LNS Super Hydrobar HS Series


Summary of Contents for LNS Super Hydrobar HS Series
- Page 1 Instruction manual LNS SA CH-2534 Orvin www.LNS-group.com 9.HS.01.ANG...
- Page 2 SUPER HYDROBAR HS...
-
Page 3: Table Of Contents
3.2. Operations............................3-8 3.2.1. End of bar position ........................3-9 CHAPTER 4: APPENDICES ..................4-1 APPENDIX A: ORDERING FORM ......................4-2 APPENDIX B: ADRESS LNS ........................4-3 APPENDIX C: PROGRAMMING EXAMPLE ................... 4-4 SUPER HYDROBAR HS... - Page 4 SUPER HYDROBAR HS...
-
Page 5: Chapter 1: Introduction
CHAPTER 1: INTRODUCTION CHAPTER 1: INTRODUCTION SUPER HYDROBAR HS... -
Page 6: Basic Introduction
LNS SA. LNS SA and its subsidiaries cannot be held responsible for damage and problems arising from the use of options and products other than LNS products, or products approved by LNS SA. -
Page 7: Chapter 2: Description
CHAPTER 2: DESCRIPTION CHAPTER 2: DESCRIPTION SUPER HYDROBAR HS... -
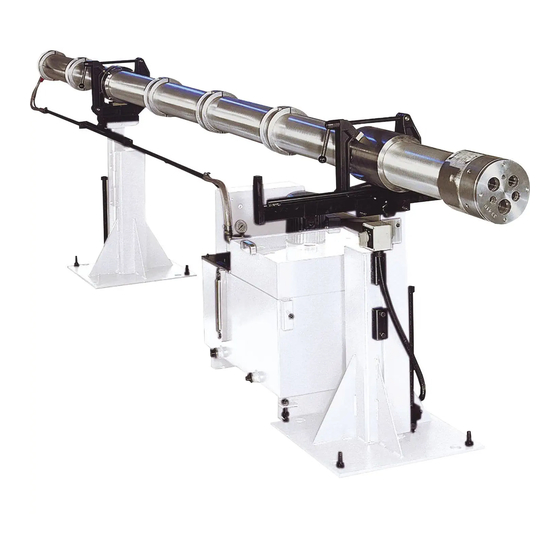
Page 8: Characteristics
CHAPTER 2: DESCRIPTION 2.1. CHARACTERISTICS NOTE : Depending on the options, these technical data may vary. Please refer to the technical data sheet. 3.26 6.42 6.65 600 Kg 650 Kg Weight 700 Kg Overall length Spindle axis height See following pages Z-axis retraction system 600 mm 600 mm... - Page 9 CHAPTER 2: DESCRIPTION 2.1.1.1. HS 3.26 Without retraction SUPER HYDROBAR HS...
- Page 10 CHAPTER 2: DESCRIPTION With retraction SUPER HYDROBAR HS...
- Page 11 CHAPTER 2: DESCRIPTION 2.1.1.2. HS 6.42 Without retraction SUPER HYDROBAR HS...
- Page 12 CHAPTER 2: DESCRIPTION With retraction SUPER HYDROBAR HS...
- Page 13 CHAPTER 2: DESCRIPTION 2.1.1.3. HS 6.65 Without retraction SUPER HYDROBAR HS...
- Page 14 CHAPTER 2: DESCRIPTION With retraction SUPER HYDROBAR HS...
-
Page 15: All View
CHAPTER 2: DESCRIPTION 2.1.2. All view SUPER HYDROBAR HS... -
Page 16: Setting Into Operation
2-10 CHAPTER 2: DESCRIPTION 2.2. SETTING INTO OPERATION 2.2.1. Transport Please read the safety precautions described at the beginning of this manual before handling the following devices. The device is delivered in two cases. One containing the hydraulic unit, the feet and the accessories, the other containing the tube. -
Page 17: Мounting
2-11 Préparation pour le montage For mounting and installing the bar feed system, it is advisable to contact LNS or one of its agents. The latter cannot be held responsible for any malfunction resulting from an incorrect installation in which they did not take part. - Page 18 2-12 CHAPTER 2: DESCRIPTION Positionning the feet Open tube case raising its lid. Remove the tube (see lifting instructions). Measure the distance (Y) between the front of the tube and the centring lugs. Place the front foot at a distance equivalent to Y+150mm from the spindle exit.
- Page 19 (front support). These lugs ensure the centring of each tube. The individual centring of the tubes was done at the LNS factory. The lugs must align with the corresponding cut-outs on the front support. Therefore, the indexing ring must not be moved otherwise the centring of the tubes can no longer be guaranteed.
- Page 20 An alignment error inevitably results in a reduction in rotational speed and can, in the worse of cases, cause damage to the guide tubes, the pistons and the pushers. If possible, this installation should be conducted using the LNS alignment checking tool (optical sight). If the assembler does not have this tool, proceed as follows : To conduct these checks, the pusher must firstly be removed (see point 3.1.2.) from the...
- Page 21 CHAPTER 2: DESCRIPTION 2-15 Anchoring to the ground After centring, the feet should be fixed to the ground by means of 8 plugs. The anchorage is effected by passing bolts through the holes in the base plate. The ground must be hard to guarantee the suppression of vibrations. If the machine is installed on unstable ground, it is recommended that the feet be secured to concrete blocks.
-
Page 22: Security Analysis For The Correct Incorporation
2-16 CHAPTER 2: DESCRIPTION 2.2.3. Security analysis for the correct incorporation Before considering assembling the machine, it is necessary to consider the following points: Consider security strategies that reduce risks to an acceptable level; Define the tasks required for applications to predict and assess the need of access and / or for the approach;... -
Page 23: Hydraulic Connections
CHAPTER 2: DESCRIPTION 2-17 Once the bar feed system has been aligned and anchored to the ground, the bar feeder must be connected to the interface of the lathe. At this stage, the hydraulic tank may be filled. 2.2.4. Hydraulic connections Procedure : ... - Page 24 2-18 CHAPTER 2: DESCRIPTION Operating pressure The operating pressure must be set according to the diameter of the guide tube. Altering the pressure (17) and changing of diameter of the working tube will cause the thrust force to vary. The operating pressure can be adjusted between 0.8 and 6 bar according to the diameters of the bar to be worked.
-
Page 25: Electric Connections
CHAPTER 2: DESCRIPTION 2-19 2.2.5. Electric connections Connections End-of-bar cable: The end-of-bar cable will be found rolled up under the electric control box. It is protected by a plastic sheath and has a female connector on its end. Unwind the cable and plug it in. Once the plug has been inserted, it is necessary to fix it by screwing its cap to the male connector. - Page 26 Transformer T1 Hydraulic pump motor The LNS bar feed systems are equipped with their own thermal protection systems (breakers, thermal relays and fuses, etc.). The power supply for the bar feed system should be connected to the output of a breaker mounted in the electrical control box of the lathe (10 A max.).
-
Page 27: Maintenance
2.3.3. Spare parts Without the written consent of LNS SA, no addition or modification of the machine or spare parts can be undertaken. LNS SA assumes no responsibility when using spare parts which were not provided by LNS SA. -
Page 28: Safety Instructions
Do not attempt to recharge the batteries of the PLC. For the use and maintenance of the bar feeder, use only parts provided by or recommended by LNS. If it is necessary to move the bar feeder once it has been originally installed, do not reinstall it before first contacting LNS or its local representative. -
Page 29: Safety Devices
By pressing the emergency stop button located on the remote control, the functions of the bar feed system and the lathe are immediately stopped. The LNS company, or its local representative, may not be held responsible for possible accidents or property damage, whether caused directly or not, by any means whatsoever, if certain safety devices have not been included. - Page 30 2-24 CHAPTER 2: DESCRIPTION SUPER HYDROBAR HS...
-
Page 31: Chapter 3: Instructions
CHAPTER 3: INSTRUCTIONS CHAPTER 3: INSTRUCTIONS SUPER HYDROBAR HS... -
Page 32: Start Up Prodution
CHAPTER 3: INSTRUCTIONS 3.1. START UP PRODUTION 3.1.1. Change of diameter Thoroughly empty the working tube by repeatedly placing the A1 selector in position R. Remove the female hydraulic connector supplying the working tube. The end-of-bar cable plug must not be removed. Unscrew the wing-screws on the collector so that it is completely free. -
Page 33: Pusher
CHAPTER 3: INSTRUCTIONS Screw down the locking bar (69/D). By means of the lever (67/A), turn the jack opening system anti-clockwise (67/C) and the tube will descend. Once the tube is resting on the centring lugs, return the jack device (67/C) to its working position by turning it clockwise until it butts up against the end-stop. - Page 34 CHAPTER 3: INSTRUCTIONS Define pusher lenght Insert a pusher into the spindle and push it until it is 10mm short of the lathe collet. Make a mark at 190mm, measuring from the lathe spindle (T). Using a punch (51/C), extract (51/1) the pin (51/G).
- Page 35 CHAPTER 3: INSTRUCTIONS Internal valve of piston The internal valve of the piston serves to calibrate the quantity of oil that passes from the compression chamber (behind the piston) to the guide tube in which the bar turns. This valve is set in the factory but if, for any reason, the setting has to be adjusted, please proceed as follows: (this setting can be checked only when the bar-feeder is operational).
- Page 36 CHAPTER 3: INSTRUCTIONS Rotating pushers (option) When extremely small diameter bars have to be guided, it is recommended that the front of the pusher (A) be fitted with a collet (B). The collet has then to be fitted to a rotating ferrule (C) so that the bar does not twist as it draws the pusher.
-
Page 37: Loading
CHAPTER 3: INSTRUCTIONS 3.1.3. Loading When the lathe stops and indicates that the bar is finished (end of bar), please proceed as follows: Place the A1 selector in position R When the pump stops, check that the pusher has been drawn back and that it is no longer between the bar-feeder and the lathe, otherwise move it back by hand (it can happen that some large-diameter... -
Page 38: Operations
CHAPTER 3: INSTRUCTIONS 3.2. Operations Please read the safety instructions provided at the beginning of this manual before handling the following devices. In case of alarm, switch the selector to R (reset function). O Position : The SUPER HYDROBAR HS is OFF. The lathe can be used without the bar-feeder device. Reloading must be done in position 0. -
Page 39: End Of Bar Position
CHAPTER 3: INSTRUCTIONS 3.2.1. End of bar position The end-of-bar signal is given when the piston (B) enters into contact with the stop ring (C). This moves up against the pusher disk (D) and releases the microswitch (F). In normal mode, the microswitch is held down by the spring (G). - Page 40 3-10 CHAPTER 3: INSTRUCTIONS SUPER HYDROBAR HS...
-
Page 41: Chapter 4: Appendices
CHAPTER 4: APPENDICES CHAPTER 4: APPENDICES APPENDIX A : ORDERING FORM APPENDIX B : ADRESS LNS APPENDIX C : PROGRAMMING EXAMPLE SUPER HYDROBAR HS... - Page 42 CHAPTER 4: APPENDICES APPENDIX A: ORDERING FORM This form should be photocopied, duly filled out, and returned to your retailer or nearest LNS agent Company name: Person in charge: Address: ZIP: City: Country: Phone: Fax: Type of device: Serial number: Qty.
- Page 43 CHAPTER 4: APPENDICES APPENDIX B: ADRESS LNS LNS AGENCIES SCHWEIZ / SUISSE LNS S.A. sales@Lns-world.com service@Lns-world.com Headquarter www.Lns-group.com Case postale 33 CH – 2534 ORVIN TEL. +41 / 32 358 02 00 FAX +41 / 32 358 02 01 FRANCE LNS France Lnsfrance@Lns.fr...
- Page 44 CHAPTER 4: APPENDICES APPENDIX C: PROGRAMMING EXAMPLE MAIN PROGRAM N... ”M” CODE “LATHE IN AUTOMATIC CYCLE” N... SPINDLE STOP N... COOLANT OFF N... TURRET TO FEED IN POSITION N... COLLET OPEN N... TURRET TO FEED OUT POSITION N... END OF BAR CHECK >...
Need help?
Do you have a question about the Super Hydrobar HS Series and is the answer not in the manual?
Questions and answers