Table of Contents
Advertisement
Quick Links
Advertisement
Table of Contents

Related Manuals for Motion Healthcare AeroLite

Summary of Contents for Motion Healthcare AeroLite
- Page 1 P R O D U C T C O D E : U s e r M a n u a l A E 0 0 1...
-
Page 2: Table Of Contents
CONTENTS 1. INTRODUCTION 2. GUIDANCE FOR USE 3. SAFETY SIGNS 4. COMPONENTS & PARTS 5. SPECIFICATIONS 6. ELECTROMAGNETIC INTERFERENCE WARNING 7. SAFETY 8. INSTALLATION GUIDE 9. OPERATION GUIDE 10. TROLLY WHEEL USAGE METHOD 11. BATTERY 12. UNFOLDING 13. FOLDING 14. LIFTING THE ARMREST 15. -
Page 3: Introduction
1. INTRODUCTION Dear customer, Thank you for choosing you Aerolite Powerchair, which has excellent qualities of safety, comfort and portability in design and manufacture. Your Aerolite Powerchair will help you regain your mobility, and it will be your most trustworthy and dependable friend. -
Page 4: Guidance For Use
2. GUIDANCE FOR USE This product is driven by DC motor and can be used both indoors and outdoors. (It is recommended not to use it outside for a long time, and the ambient temperature ranges from -5° to 45°). Used by the elderly and the disabled as a travel tool, the power wheelchair is ultra-compact, light-weight, portable, safe and comfortable. -
Page 5: Safety Signs
3. SAFETY SIGNS The following signs are used to identify warnings, mandatory actions and prohibited actions. It is essential that you shall fully understand and completely familiarize yourself with these signs before use. Read and follow the instructions provided in this manual. Safety warning sign or an indication of a dangerous operation that may endanger others or yourself. -
Page 6: Components & Parts
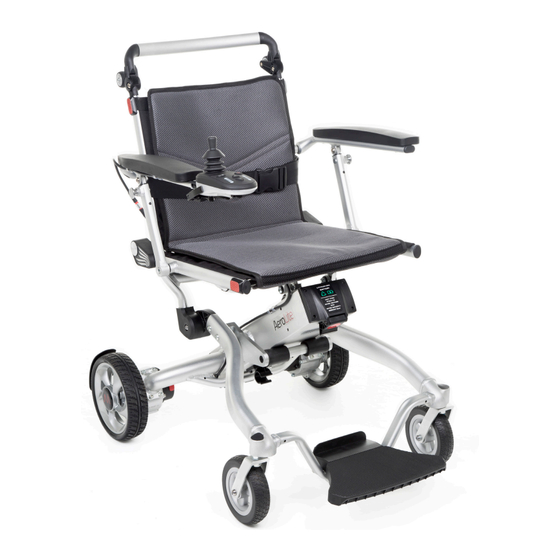
4. COMPONENTS & PARTS Backrest 4. Armrest Unlock Button 7. Joystick 2. Seat Cushion 5. Battery 8. Motor 3. Front Wheel 6. Foldable Footrest... - Page 7 4. COMPONENTS & PARTS 9. Front fork 12. Unlock Drawstring 14. Anti Tipping Wheel 10. Anti-tipping wheel 13. Electromagnetic 15. Splash Guard unlock button Unlock Valve 11. Trolly wheel...
-
Page 8: Specifications
5. SPECIFICATIONS P R O D U C T C O D E : A E 0 0 1 87cm / 34” LENGTH WIDTH 62cm / 24” 90cm / 35” HEIGHT 80cm / 31” FOLDED LENGTH 60cm / 23.5” FOLDED WIDTH FOLDED HEIGHT 32cm / 12.5”... -
Page 9: Electromagnetic Interference Warning
6. ELECTROMAGNETIC INTERFERENCE WARNING The power wheelchair may be affected by electromagnetic interference (EMI). Therefore, it’s quite essential for users to familiarize the instructions. This section aims to describe the problems caused by the electromagnetic interference, which can help users understand and take protective measures against the risks. The Interference of Electromagnetic Waves The power wheelchair is susceptible to electromagnetic waves, the sources of which come from broadcasting stations, TV stations, radio transmitters, and... -
Page 10: Safety
7. SAFETY USERS Keep tools and other metal objects away from both ends of the battery. If contacted, short-circuit or electric shock may occur and cause injury. 2. Health care personnel shall receive professional training and guidance in safe use of the power wheelchair. - Page 11 7. SAFETY CONTROL PANEL Please be noted that you may need to adjust the settings of control panel (Fig. A1) to avoid the risk of collision, descent or fall. Check and adjust the settings of control panel every six months. 2.
- Page 12 7. SAFETY • Ensure that all electrical connections are safe and non-loose. • You must not wash the wheelchair with water. If the electric wheelchair is wet, please remove the battery as soon as possible and make the wheelchair dry. Make sure the wheelchair is dry before loading the battery to use it.
- Page 13 7. SAFETY MOTOR VEHICLES Please do not use the wheelchair when taking any forms of transportation such as bus, metro, train, plane and ship. 2. If you take such forms of transportation while remaining in the wheelchair, it is extremely important to fasten your seat belt, and find a place where the wheels or the wheelchair can be fixed to avoid injury in the event of a sudden stop or a traffic accident.
- Page 14 7. SAFETY Getting On/Off It is dangerous to move your body by yourself because it requires good balance and flexibility. Whenever moving your body, it is recommended to have a supporting point that is higher than the seat cushion to avoid falling. Before getting on the wheelchair, ensure that the power is off.
- Page 15 7. SAFETY BODY INCLINATION AND EXTENSION Reaching out your hands or tilting your body will affect the weight balance of the electric wheelchair. If you do not position your body correctly, you may fall off or tip over from the wheelchair.
- Page 16 7. SAFETY CROSSING OVER OBSTACLES You may need to overcome some obstacles in your daily use, including door sill, elevators, slopes, pot holes and rough roads. Improper use may result in damage to the wheelchair or causing bodily harm. Extreme caution is needed when crossing the door sill. Even a slight height change may make the front wheels stuck in, tipping over your wheelchair.
- Page 17 7. SAFETY DRIVING ON INCLINED SLOPES When you drive on a slope, the balance of the wheelchair will change. The slopes include hillsides and ramps. When you are not sure about the safe use on slopes, please use it with the help of others and do not use it alone. Following issues are needed to be extremely cautioned: It is prohibited to drive on slopes over 6°.
-
Page 18: Installation Guide
8. INSTALLATION GUIDE SEAT BELT INSTALLATION Seat belt is designed to fix the user’s body and prevent the user from sliding down. It cannot protect the users in accidents. The seat belt can be adjusted according to the user’s comfort. The use of the seat belt: You must fasten the seat belt to ensure personal safety. - Page 19 8. INSTALLATION GUIDE CONTROL PANEL INSTALLATION Based on the users’ needs, the control panel can be mounted on the right or left armrest. (The control panel is initially mounted on the right armrest, please contact the supplier if you want to change it to the left side).
-
Page 20: Operation Guide
9. OPERATION GUIDE CONTROL PANEL The operation of the electric wheelchair is controlled by buttons and joystick on the control panel. The buttons are described below Power Button: Press this button to turn it 5. Control Joystick: Control the direction and on, and press it again to turn it off. - Page 21 9. OPERATION GUIDE POWER-ON/OFF BUTTON Press this power button to turn it on. 2. Press it again to turn it off. ELECTROMAGNETIC UNLOCK VALVE As shown in Fig. F1, electromagnetic unlock valve is in “Lock” position with the pristine condition. When the wheelchair is out of power, the electromagnetic unlock valve works and the wheelchair brakes urgently, which avoids the risk that the wheelchair slips off the slope without being controlled.
- Page 22 9. OPERATION GUIDE CONTROL JOYSTICK When learning to operate the electric wheelchair for the first time, you should choose a slower speed and gently tilt the joystick forward. This practice will help you learn how to control the electric wheelchair, let you slowly understand and familiarize with how to control the strength, and smoothly grasp the method of starting and stopping the electric wheelchair.
-
Page 23: Trolly Wheel Usage Method
10. TROLLY WHEEL USAGE METHOD Stand on the ground after the chair 2. Hold the end of the seat tube and tilt is locked. the wheel chair then push & pull it. 12. BATTERY Keep conductive objects such as metal away from both ends of the battery. If contacted, short-circuit or electric shock may occur and cause injury. - Page 24 11. BATTERY WARNING Do not attempt to directly using pliers or metal cables to charge the battery. 2. Do not use the wheelchair when the battery is being charged. 3. Do not use non-standard power supplies (eg. generator or inverter), even if their voltages and frequencies appear to meet the requirements.
-
Page 25: Battery
11. BATTERY MOUNT/REMOVE BATTER Ensure the wheelchair is powered off before mounting or removing the battery. Take out the battery: Pull the battery out of the main frame tube by gripping the cover (Fig. G1) Mount the battery: Grasp the battery, place the battery handle downward, obliquely insert the battery into the main rack tube until the main rack tube is buckled (Fig. - Page 26 11. BATTERY CHARGE THE BATTERY The battery can be charged with normal AC power (AC 110-220 V, 50-60 Hz). The charging port is located under the front part of the control panel. 2. Before charging, ensure the wheelchair is powered off. 3.
- Page 27 11. BATTERY OVER-CURRENT PROTECTOR The power wheelchair is also equipped with an over-current protector. If the current supplied to the motor is too high, the over-current protector will cut off the current supply. If the climbing gradient is greater than 6 degrees, the load exceeds 120kg, or the motor is blocked, the over current protector will be activated and the wheelchair controller will cut off the circuit to prevent over current and overheating of the motor.
-
Page 28: Unfolding
12. UNFOLDING UNFOLDING STEPS If you need to unfold the wheelchair after the first unpacking or folding, follow these steps: Step 1: Hold point A in the picture with one hand, Lightly push the chair back to lift the front wheels off the ground and pull the handle along the arrow with the other hand to release the lock hook, then complete the first step of... -
Page 29: Folding
13. FOLDING Folding Steps For storing and transporting the wheelchair, please follow these steps to fold it after using: Step 1: Pull the lock pin to fold the anti-tipping wheel And turn the footrest up. Step 2: Pull the locking rope to release the spring pins from the locking holes on both sides while push the... -
Page 30: Lifting The Armrest
14. LIFTING THE ARMREST Step 1: Step 2: Step 3: Press the unlock button Press the unlock button while Pull the armrest to the pulling the armrest up. extreme position. 16. CONTROLLER Controller There are three external interfaces for controllers in all, which are described as follows: Interface 1 is for the right-side motor. -
Page 31: Troubleshooting
15. TROUBLESHOOTING Problem Cause Solution 1. Faulty connection of the control Re-plug the 5-pin plug into the socket on the panel and the connector. side of the seat. 2. Low power supply or the power If the power is off automatically, the batteries cut off automatically. - Page 32 15. TROUBLESHOOTING Problem Cause Solution 1. Incorrect connection between Reconnect the 3-pin plug into the battery control panel and plug connector on the side of the seat. 2. Controller is damaged. Contact customer service to replace the controller. Charging Fault 3.
-
Page 33: Warranty
16. WARRANTY Warranty includes: Main Frame - 3 years Incorrect use, damaged or modified by the user will void the warranty and the repair costs will be charged. Motor - 1 year Damaged due to overload or privately disassembled by the user will void the warranty. Lithium Battery - 1 year Incorrect charging or disassembled and damaged by the user will void the warranty. - Page 34 NOTES...
- Page 35 NOTES...
Need help?
Do you have a question about the AeroLite and is the answer not in the manual?
Questions and answers