
Related Manuals for Hill-Rom Volara PVL1


Summary of Contents for Hill-Rom Volara PVL1
- Page 1 196654__C_2019-Apr-29_Cleaned Volara™ System Model PVL1 User Manual Product No. PVL1 Rx only: Federal USA law restricts this device to sale by or on the order of a physician. 196654 REV C...
- Page 2 196654__C_2019-Apr-29_Cleaned...
- Page 3 The Volara™ System, Model PVL1 may be covered by one or more patents. See the Internet address above. The Hill-Rom companies are the proprietors of European, US, and other patents and pending patent applications. Authorized European Union Manufactured by:...
- Page 4 First Printing, 2019 Bluetooth® is a registered trademark of Bluetooth Sig, Inc. Hill-Rom® is a registered trademark of Hill-Rom Services, Inc. Volara™ is a trademark of Hill-Rom Services PTE Ltd. Replace this manual (196654) if it is damaged and/or can not be read.
-
Page 5: Table Of Contents
196654__C_2019-Apr-29_Cleaned Table of Contents Revision ............i Intended Use . - Page 6 196654__C_2019-Apr-29_Cleaned Table of Contents Start a Therapy in Automatic Mode ..... . 31 Adjust Cough Pause Settings ......33 Access the Advanced View .
- Page 7 196654__C_2019-Apr-29_Cleaned Table of Contents Charge the Battery ........69 Pulse Oximeter .
- Page 8 196654__C_2019-Apr-29_Cleaned Table of Contents Power Requirements ........97 Replaceable Battery (Optional) .
-
Page 9: Intended Use
196654__C_2019-Apr-29_Cleaned Intended Use INTENDED USE The Volara™ System, Model PVL1 is intended for the mobilization of secretions, lung expansion therapy, the treatment and prevention of pulmonary atelectasis, and has the ability to provide supplemental oxygen when used with oxygen supply. NTENDED ATIENT OPULATION... -
Page 10: Theory Of Operation
196654__C_2019-Apr-29_Cleaned Important Information HEORY OF PERATION The Volara™ System provides a therapy that enhances secretion removal and helps prevent or resolve patchy atelectasis. The system delivers therapy in two modes: • CHFO (Continuous High Frequency Oscillation)—a pneumatic form of chest physiotherapy that delivers medicated aerosol while oscillating the airways with continuous pulses of positive pressure. -
Page 11: Relative Contraindications
196654__C_2019-Apr-29_Cleaned Important Information ELATIVE ONTRAINDICATIONS When you use the Volara™ System, patients with these conditions should be carefully evaluated before a decision is made to use the therapy: • History of pneumothorax • Pulmonary air leak • Recent pneumonectomy • Pulmonary hemorrhage •... -
Page 12: Symbols And Acronyms
196654__C_2019-Apr-29_Cleaned Symbols and Acronyms SYMBOLS AND ACRONYMS OCUMENT YMBOLS This manual contains different typefaces and symbols to make the content easier to read and understand: • Standard text—used for regular data. • Boldface text—emphasizes a word or phrase. • NOTE:—sets apart special data or important instruction clarification. •... - Page 13 196654__C_2019-Apr-29_Cleaned Symbols and Acronyms Symbol Definition Rating for ingress protection in accordance with IEC 60259 Unique Device Identification information Type B equipment with an F-type applied part, according to EN 60601-1 Class II equipment (double insulated), according to EN60601-1 Manufacturer or distributor complies with the Waste Electric and Electronic Equipment Directive 2002/96/EC Manufacture date...
- Page 14 196654__C_2019-Apr-29_Cleaned Symbols and Acronyms Symbol Definition Single patient use Physician prescription required (for US only) Safe Working Load—this includes weight of control unit and accessories such as patient circuits Mass of the medical equipment Mass of the medical equipment including the mass of the control unit, accessories, patient circuits, and the pole clamp assembly Warning—Read the User Manual for safety...
-
Page 15: Common Screen Symbols
196654__C_2019-Apr-29_Cleaned Symbols and Acronyms OMMON CREEN YMBOLS The following symbols may or may not be shown on the touchscreen. Symbol Description The system is connected to the AC power and not powered by the battery. The system is powered by the battery. The system is connected to a WiFi network. -
Page 16: Acronyms
196654__C_2019-Apr-29_Cleaned Symbols and Acronyms Symbol Description Blood oxygen saturation level of the patient. Strength of the cough flow. Tidal volume delivered to the patient during the therapy. CRONYMS Acronym Meaning CHFO Continuous High Frequency Oscillation CPEP Continuous Positive Expiratory Pressure Highest Programed Pressure Pressure Ceiling Peak Cough Flow... -
Page 17: Safety Instructions
READ ALL INSTRUCTIONS BEFORE USING Training shall be provided by a Hill-Rom qualified trainer or respiratory therapist before the user uses the system for therapy delivery. WARNING: Obey all warnings throughout the manual and also those below to help prevent injury and/or equipment damage: •... - Page 18 • Warning—Do not connect any equipment or accessories to the USB port on the system, except for Hill-Rom approved accessories (See “Accessories” on page 65). The USB port on the back of the system is only for retrieving information as described in this user manual.
- Page 19 196654__C_2019-Apr-29_Cleaned Safety Instructions WARNING: (Warnings continued) Obey all warnings throughout the manual and also those below to help prevent injury and/or equipment damage: • Warning—Do not allow any metallic conductive objects to contact the battery terminals. Do not short circuit a battery or throw it into the fire;...
- Page 20 Volara™ System, Model PVL1, contact Hill-Rom: • In the USA, call Hill-Rom at 800-426-4224. • Outside of the USA, contact your distributor or local Hill-Rom representative, or go to www.respiratorycare.hill-rom.com. SAVE THESE INSTRUCTIONS Volara™ System, Model PVL1 User Manual (196286 REV C)
-
Page 21: Features
196654__C_2019-Apr-29_Cleaned Features FEATURES ONTROL Front Item Description Item Description Control unit Therapy port Touchscreen Nebulizer port Power On/Off button Therapy port cap Volara™ System, Model PVL1 User Manual (196286 REV C) -
Page 22: Back
196654__C_2019-Apr-29_Cleaned Features Back Item Description Item Description Patient circuit hook USB port Handle Foot switch port (Not applicable on Volara™ Systems) Replaceable battery Fuse holder (optional) Ventilation fan Air inlet filter Power inlet Nebulizer filter Volara™ System, Model PVL1 User Manual (196286 REV C) -
Page 23: Volara™ Single Patient Use Circuit
196654__C_2019-Apr-29_Cleaned Features ™ S OLARA IRCUIT ATIENT Item Description Item Description Bio-filter Face mask (optional) Breathing hose Mouthpiece Handset Clear spontaneous breathing adapter (optional) Adapter, 22 mm x 22 mm K Oxygen bleed-in adapter (optional) Nebulizer kit Blue ventilator adapter (optional) Nebulizer tubing Handset plug (optional) -
Page 24: Assemble And Connect The Patient Circuit
• In the USA, call Hill-Rom at 800-426-4224. • Outside the USA, contact your distributor or local Hill-Rom representative, or go to www.respiratorycare.hill-rom.com. Connect the correct patient circuit. See page 17. Volara™ System, Model PVL1 User Manual (196286 REV C) -
Page 25: Connect The Volara™ Patient Circuit
196654__C_2019-Apr-29_Cleaned Assemble and Connect the Patient Circuit ™ P ONNECT THE OLARA ATIENT IRCUIT WARNING: Warning—The patient circuit is for single patient use only. Always use a new patient circuit when using the system on a new patient. Failure to do so could cause cross contamination. - Page 26 196654__C_2019-Apr-29_Cleaned Assemble and Connect the Patient Circuit WARNING: Warning—During the therapy, make sure the expiratory ports on the clear spontaneous breathing adapter (G) are not blocked. This prevents carbon dioxide from accumulating in the system. Connect and twist the parts until they lock into position.
- Page 27 196654__C_2019-Apr-29_Cleaned Assemble and Connect the Patient Circuit NOTE: If the nebulizer kit is not used, make sure the handset plug is installed tightly to cover the nebulizer port on the handset. Volara™ System, Model PVL1 User Manual (196286 REV C)
-
Page 28: Therapy
196654__C_2019-Apr-29_Cleaned Assemble and Connect the Patient Circuit Connect the Volara™ Patient Circuit for In-line Ventilation Therapy WARNING: To help prevent injury and/or equipment damage, obey these warnings: • Warning—The patient circuit is for single patient use only. Always use a new circuit when using the system on a new patient. - Page 29 196654__C_2019-Apr-29_Cleaned Assemble and Connect the Patient Circuit Connect a spring-valve “tee” adapter into the inspiratory limb of the patient circuit (I). See Step 6. NOTE: If required, attach the oxygen bleed-in adapter to the output port of the blue ventilator adapter (G). Assemble the nebulizer kit and add the prescribed medication.
-
Page 30: Assemble The Nebulizer Kit And Add Medication
196654__C_2019-Apr-29_Cleaned Assemble and Connect the Patient Circuit Assemble the Nebulizer Kit and Add Medication CAUTION: Caution—The fill volume of the nebulizer cup is 2 - 10 ml. Do not fill the medication out of the limits stated above. NOTE: A fill volume of 2.5 ml of medication is expected to last 10 minutes of nebulization. - Page 31 196654__C_2019-Apr-29_Cleaned Assemble and Connect the Patient Circuit Connect the adapter (22 mm x 22 mm) to the nebulizer port of the clear spontaneous breathing adapter or blue ventilator adapter. Connect the nebulizer kit to the adapter attached to the nebulizer port. The nebulizer kit is now connected to the patient circuit and control unit.
-
Page 32: Set Up And Power On The Control Unit
196654__C_2019-Apr-29_Cleaned Set up and Power on the Control Unit SET UP AND POWER ON THE CONTROL UNIT Warning—Never block the air openings of the system or set it on a soft surface, such as a bed or couch, where the air openings may be blocked. Keep the air openings free of lint, hair, and the like. -
Page 33: Power Off The Control Unit And Store The System
196654__C_2019-Apr-29_Cleaned Power off the Control Unit and Store the System The Hill-Rom screen shows. To start a therapy, see “Volara™ Therapy” on page 26. POWER OFF THE CONTROL UNIT AND STORE THE SYSTEM When the therapy is complete, do these steps: Press and hold the Power button for 5 seconds. -
Page 34: Volara™ Therapy
196654__C_2019-Apr-29_Cleaned Volara™ Therapy VOLARA™ THERAPY BOUT THE Item Description Item Description Automatic Therapy mode B Manual Therapy mode Volara™ System, Model PVL1 User Manual (196286 REV C) -
Page 35: About The Options Menu
196654__C_2019-Apr-29_Cleaned Volara™ Therapy BOUT THE PTIONS Item Option Description Home—Go to the Home menu. Advanced View—See an advanced view of a therapy summary. Care Plan—Access the preset therapy settings. Device Settings—Access the device control settings, enable clinical access, retrieve logs, and configure connections to accessories (available only if enabled). -
Page 36: Start A Therapy
196654__C_2019-Apr-29_Cleaned Volara™ Therapy TART A HERAPY NOTES: • Always use the settings prescribed by the physician. • Avoid operating the touchscreen with wet fingers as this will reduce the screen response. Volara™ Therapy as a is available in both automatic and manual mode. Select the preferred therapy mode—... - Page 37 196654__C_2019-Apr-29_Cleaned Volara™ Therapy Follow the steps that apply to the prescribed therapy mode: • Automatic mode—see “Volara™ Therapy in Automatic Mode” on page 30. • Manual mode—see “Volara™ Therapy in Manual Mode” on page Volara™ System, Model PVL1 User Manual (196286 REV C)
-
Page 38: Volara™ Therapy In Automatic Mode
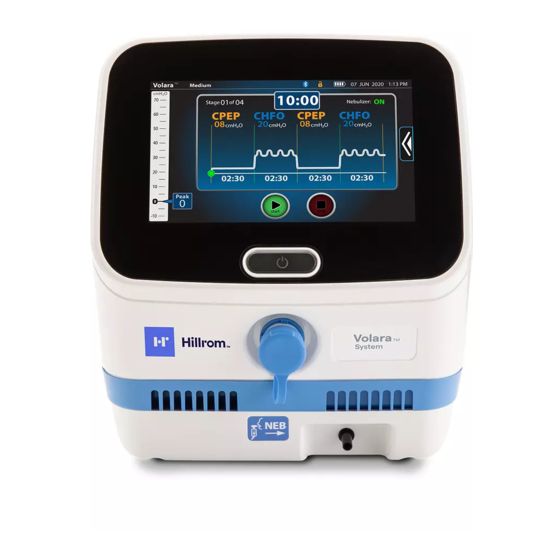
196654__C_2019-Apr-29_Cleaned Volara™ Therapy ™ T OLARA HERAPY IN UTOMATIC Basic View in Automatic Mode Item Description Item Description Name of the preset Heart rate and pulse therapy selected oximeter readings (available only if a pulse oximeter is connected) Digital manometer Start/stop control Therapy status Volara™... -
Page 39: Start A Therapy In Automatic Mode
196654__C_2019-Apr-29_Cleaned Volara™ Therapy Start a Therapy in Automatic Mode NOTES: • Before you start a therapy, make sure you have connected the appropriate patient circuit to the system. “Connect the Volara™ Patient Circuit” on page 17. • Make sure the patient circuit is put into position on the patient. See Step 7 on page 18. - Page 40 196654__C_2019-Apr-29_Cleaned Volara™ Therapy • During the therapy, you can pause or stop a therapy. Or, press Resume to continue a paused therapy session. NOTE: If a therapy is paused for more than 3 minutes, the therapy will stop and a warning message will show.
-
Page 41: Adjust Cough Pause Settings
196654__C_2019-Apr-29_Cleaned Volara™ Therapy Adjust Cough Pause Settings NOTE: Applicable only to preset therapy plans. Press Automatic. • If prompted, scan the patient’s ID barcode with the paired barcode reader. For pairing instructions, see page 51. Before you start the therapy, swipe the Options tab left, and select the Care Plan menu control. -
Page 42: Access The Advanced View
196654__C_2019-Apr-29_Cleaned Volara™ Therapy Access the Advanced View Before you start the therapy, swipe the Options tab left, and select the Advanced View control. The Advanced View shows. Press Start to begin the therapy. ™ T OLARA HERAPY IN ANUAL Basic View in Manual Mode Item Description Item... -
Page 43: Start A Therapy In Manual Mode
196654__C_2019-Apr-29_Cleaned Volara™ Therapy Start a Therapy in Manual Mode NOTES: • Before you start a therapy, make sure you have connected the appropriate patient circuit to the system. “Connect the Volara™ Patient Circuit” on page 17. • Make sure the patient circuit is put into position on the patient. See Step 7 on page 18. - Page 44 196654__C_2019-Apr-29_Cleaned Volara™ Therapy Press Start. NOTE: This does not start the therapy, but starts the air pump in the control unit. When the system is ready, the CPEP and/or CHFO controls are lighted. To start the therapy, press CPEP or CHFO. NOTE: During the therapy, follow these guidelines: Encourage the patient to exhale slowly (3-4 seconds).
- Page 45 196654__C_2019-Apr-29_Cleaned Volara™ Therapy Press Back to go back to the manual therapy screen. To go to the Home menu, swipe the Options tab left, and press the Home menu control. NOTES: • The system does not allow a CPEP or CHFO stage to last for more than 30 minutes.
-
Page 46: Advanced Volara™ Therapy Settings
196654__C_2019-Apr-29_Cleaned Volara™ Therapy ™ T DVANCED OLARA HERAPY ETTINGS These settings allow you to create, modify, rename, and delete a preset therapy. Create a New Preset Therapy Plan NOTE: Available only if Clinical Access is enabled. See page 48. Press Automatic. Swipe the Options tab left, and select the Care Plan menu control. - Page 47 196654__C_2019-Apr-29_Cleaned Volara™ Therapy Press the down arrow and select the preferred option: • CPEP—Set the therapy pressure, therapy duration, and enable or disable the use of a nebulizer. • CHFO—Set the therapy pressure, therapy duration, frequency of continuous high frequency pressure, and enable or disable the use of a nebulizer.
-
Page 48: Modify A Preset Therapy Plan
196654__C_2019-Apr-29_Cleaned Volara™ Therapy Press the keypad control and enter the required setting, or use the + or – control to adjust the setting. d. Press Save to save the changes. Or, press Cancel. When you have completed the changes, press Done. The initial therapy screen shows. - Page 49 196654__C_2019-Apr-29_Cleaned Volara™ Therapy Select a preset therapy plan and review the therapy settings. Press Edit. When prompted, press Modify. Swipe right or left to select the stage to modify. Press the down arrow and select the option to modify: • CPEP—Modify the therapy pressure, therapy duration, and enable or disable the use of a nebulizer.
- Page 50 196654__C_2019-Apr-29_Cleaned Volara™ Therapy Press the setting to adjust the pressure setting. GUI Map Rev 6 Page Use the + or – control to select the 46 TP1.13 pressure settings. Or, use the keypad control to enter the required setting. NOTE: The maximum pressure that can be set depends on the pressure ceiling limit defined in the Clinical Access settings.
-
Page 51: Rename A Preset Therapy Plan
196654__C_2019-Apr-29_Cleaned Volara™ Therapy Rename a Preset Therapy Plan NOTE: Available only if Clinical Access is enabled. See page 48. Select the preset therapy plan to rename. Press and hold the therapy plan until the on-screen keyboard shows. Use the on-screen keyboard to enter any 5 alphanumeric characters for the new name. -
Page 52: Delete A Preset Therapy Plan
196654__C_2019-Apr-29_Cleaned Volara™ Therapy Delete a Preset Therapy Plan NOTE: Available only if Clinical Access is enabled. See page 48. Press Automatic. Swipe the Options tab left, and press the Care Plan menu control. Select a preset therapy plan and review the therapy settings. -
Page 53: Volara™ Therapy With An In-Line Ventilator
196654__C_2019-Apr-29_Cleaned Volara™ Therapy ™ T OLARA HERAPY WITH AN LINE ENTILATOR WARNING: Warning—Only persons trained to use the Volara™ System and ventilators should provide therapy to ventilated patients. Failure to obey this warning could cause patient injury or equipment damage. When you use the Volara™... -
Page 54: Device Settings
196654__C_2019-Apr-29_Cleaned Device Settings DEVICE SETTINGS Swipe the Options tab left, and press the Device Settings menu control. The Device Settings screen shows. You can view or adjust these settings: • Screen brightness • Date and time • 12 hour or 24 hour clock format •... -
Page 55: Adjust Date And Time Settings
196654__C_2019-Apr-29_Cleaned Device Settings DJUST ATE AND IME SETTINGS Press Device to access the Date-Time settings. At the Device screen, move the slider to select the preferred setting for each item. To change the time zone, press Modify. b. Scroll up or down to select the correct time zone, and press Save. -
Page 56: Enable Or Disable Clinical Access
196654__C_2019-Apr-29_Cleaned Device Settings NABLE OR ISABLE LINICAL CCESS Clinical Access allows facility-authorized persons to access and configure these advanced features: • Adjustment of the maximum pressure ceiling setting available to the user. • Modification of the preset therapy settings. • Import of the device settings •... -
Page 57: Set The Pressure Ceiling Limit
196654__C_2019-Apr-29_Cleaned Device Settings NOTE: To prevent unauthorized persons from adjusting the settings made, disable Clinical Access after you have made the settings. Press Control, then slide Clinical Access to OFF. Press the Home menu control to exit. ET THE RESSURE EILING IMIT The Pressure Management feature allows facility-authorized persons to... - Page 58 196654__C_2019-Apr-29_Cleaned Device Settings NOTE: The pressure management settings show: • Pressure Ceiling (PC)—the maximum therapy pressure that can be selected by the user in manual mode or when modifying a preset plan. • Highest Programed Pressure (HPP)—the highest therapy pressure that has been programed in both automatic and manual modes in this system.
-
Page 59: Connect A Barcode Reader Or Pulse Oximeter
196654__C_2019-Apr-29_Cleaned Device Settings ONNECT A ARCODE EADER OR ULSE XIMETER NOTES: • Available only if Clinical Access is enabled. See page 48. • For Bluetooth® detection, have the barcode reader or pulse oximeter within one meter (3') of the system. Power on the control unit and the device for pairing. -
Page 60: Connect To Awifi Network
196654__C_2019-Apr-29_Cleaned Device Settings NOTE: To prevent unauthorized persons from adjusting the settings made, disable Clinical Access after you have made the settings. Press Device, then press Control. Slide Clinical Access to OFF. When complete, press the Home menu control to exit. WIFI N ONNECT TO A ETWORK... - Page 61 196654__C_2019-Apr-29_Cleaned Device Settings Depending on the networks available, the scan will take a few minutes. When complete, a list of wireless networks shows. Select the network to join. Use the on-screen keyboard to enter the Password. To confirm the entries, press Proceed. To cancel, press Cancel.
-
Page 62: Connect To A Public Network
196654__C_2019-Apr-29_Cleaned Device Settings Connect to a Public Network NOTES: • After initial connection, the WiFi will automatically connect when the Volara™ System is turned on and within WiFi range. • Data will transmit automatically at the end of the therapy session, or when the Volara™... -
Page 63: Connect To An Enterprise Network
196654__C_2019-Apr-29_Cleaned Device Settings • If the connection is unsuccessful, an error message shows. Press Return to go to the previous screens and make your entries again. To view the status of the connection, press Status. Press the Home menu control to exit. Connect to an Enterprise Network Swipe the Options tab left, then press the Options menu control. -
Page 64: Configure Network Settings
196654__C_2019-Apr-29_Cleaned Device Settings Select the network to join. When prompted, use the on-screen keyboard to enter the UserID and Password. To confirm, press Proceed. To cancel, press Cancel. 10. When the connection is successful, a green check mark shows next to the access point name. - Page 65 • If the test is unsuccessful, try again later. • If the test continues to fail, contact Hill-Rom. Press Return to exit the test connection screen. To connect to the server, slide WiFi to OFF, then ON again. The network settings entered are submitted to the server.
-
Page 66: Test The Connection To Visiview™ Health Portal
If the test is complete, a confirmation screen shows. • If the test is unsuccessful, try again later. • If the test continues to fail, contact Hill-Rom. Press the Home menu control to exit. Volara™ System, Model PVL1 User Manual (196286 REV C) -
Page 67: Test The Connection To Electronic Medical Records (Emr)
If the test is complete, a confirmation screen shows. Press Return to exit. • If the test is unsuccessful, try again later. • If the test continues to fail, contact Hill-Rom. Volara™ System, Model PVL1 User Manual (196286 REV C) -
Page 68: Retrieve Logs
196654__C_2019-Apr-29_Cleaned Device Settings To confirm the settings entered, slide WiFi to OFF, then ON again. Press the Home menu control to exit. ETRIEVE You can retrieve both the therapy log and the error log from this system. NOTES: • Before you start, format the USB drive to FAT16 or FAT32 format on your computer. -
Page 69: Retrieve The Error Log
196654__C_2019-Apr-29_Cleaned Device Settings To export all the therapy logs, connect a USB drive to the port on the back of the control unit. At Therapy Log, press Export. Exporting begins. When the export is complete, a confirmation screen shows. Press Return to go to the Data screen. NOTE: To prevent unauthorized persons from adjusting the settings made, disable... - Page 70 196654__C_2019-Apr-29_Cleaned Device Settings Select the date and time of the session on the left hand panel. Errors that occurred at that time show on the right panel. Press Back to go to the Data screen. To export the Error Log, connect the USB drive to the port on the back of the control unit.
-
Page 71: Import And Export Device Settings
196654__C_2019-Apr-29_Cleaned Device Settings MPORT AND XPORT EVICE ETTINGS You can export the settings from one system and import the settings into another system. NOTES: • Before you start, format the USB drive to FAT16 or FAT32 format on your computer. This action deletes all information currently stored on the USB drive. -
Page 72: View The Firmware Version And System Information
196654__C_2019-Apr-29_Cleaned Device Settings NOTE: To prevent unauthorized persons from adjusting the settings made, disable Clinical Access after you have made the settings. Press Device, then press Control. Slide Clinical Access to OFF. IEW THE IRMWARE ERSION AND YSTEM NFORMATION Swipe the Options tab left, and press the Device Settings menu control. -
Page 73: Accessories
196654__C_2019-Apr-29_Cleaned Accessories ACCESSORIES Item Part Number Replaceable Battery 194566S See page 66. Pulse Oximeter, Bluetooth® 196694 See page 70. WiFi Module, USB 198658 Pole Clamp Assembly M08235 See page 71. Stand and Cart Assembly M08177 (with Pole Clamp) See page 71. Power Cord, 3 m (10') 181995 Volara™... -
Page 74: Replaceable Battery
Caution—Do not open, crush, puncture, incinerate, immerse in water, or heat over 140°F (60°C) the battery. • Caution—Use only the Hill-Rom approved battery (194566S). • Caution—Fully charge the battery to 100% before the first time use. Allow for up to 8 hours to fully charge the battery. -
Page 75: Install The Battery
196654__C_2019-Apr-29_Cleaned Accessories NOTE: If the replaceable battery is unable to support at least 2 therapy sessions, replace with a new and freshly charged battery. See “Replacement Parts/Kits” on page 78. For disposal of the battery, consult your local regulations to safely discard or recycle the battery. - Page 76 196654__C_2019-Apr-29_Cleaned Accessories When the replaceable battery is installed in the control unit, the battery symbol shows on the touchscreen. Symbol Battery status The battery charge is low. The battery is charging. The battery is 25% charged. The battery is 50% charged. The battery is 75% charged.
-
Page 77: Charge The Battery
196654__C_2019-Apr-29_Cleaned Accessories To check the battery charge, press the button beside the LED indicator on the battery. LED indicator Battery status Four green bars The battery is fully charged. Blinking bars The battery charge is low. Blinking bars when the control The battery is charging. -
Page 78: Pulse Oximeter
196654__C_2019-Apr-29_Cleaned Accessories ULSE XIMETER NOTE: Use only the Hill-Rom approved pulse oximeter (196694). The pulse oximeter is connected to the Volara™ System by Bluetooth®. The pulse oximeter monitors the patient’s blood oxygen level and heart rate (pulse). When the pulse oximeter is connected, you can view the readings collected from the patient on the control unit touchscreen. -
Page 79: Mobile Stand And Pole Clamp Assembly
196654__C_2019-Apr-29_Cleaned Accessories OBILE TAND AND LAMP SSEMBLY Install the Stand Lock the casters. to prevent the stand base from moving. Install the pole with cart into the stand base. Lay the stand base on its side. Install the screw and washer to secure the stand base to the pole. Turn the hex wrench clockwise to tighten the screw. - Page 80 196654__C_2019-Apr-29_Cleaned Accessories Install the top pole into the stand base. Make sure the groove is aligned with its opening in the bottom pole. Use the hex wrench to tighten the pole connection. Volara™ System, Model PVL1 User Manual (196286 REV C)
-
Page 81: Install The Tray And Pole Clamp
196654__C_2019-Apr-29_Cleaned Accessories Install the Tray and Pole Clamp Note the guide on the back of the tray. Turn the tray over, and attach the pole clamp to the tray with the supplied parts from the kit. Volara™ System, Model PVL1 User Manual (196286 REV C) -
Page 82: Install The Control Unit On The Cart And Stand Assembly
196654__C_2019-Apr-29_Cleaned Accessories Install the Control Unit on the Cart and Stand Assembly Find the preferred position to install the tray. Turn the knob on the pole clamp clockwise to hold the tray in position on the cart. Put the control unit on the tray. Make sure the screw holes on the bottom of the control unit are aligned with the screw holes on the tray. -
Page 83: Move The Stand
196654__C_2019-Apr-29_Cleaned Accessories Move the Stand CAUTION: Obey these cautions to help prevent equipment damage: • Caution—Do not apply force or pull the control unit when it is connected to the oxygen source. • Caution—Do not pull the control unit using the breathing hose or circuit tubing. -
Page 84: Install The Control Unit On A Medical Rail Or Iv Pole
196654__C_2019-Apr-29_Cleaned Accessories Install the Control Unit on a Medical Rail or IV pole CAUTION: To help prevent equipment damage, obey these cautions and make sure the mounting structure complies with these recommendations: • Caution—Make sure the diameter of the pole for mounting the pole clamp assembly is between 16 to 35 mm. - Page 85 196654__C_2019-Apr-29_Cleaned Accessories Volara™ System, Model PVL1 User Manual (196286 REV C)
-
Page 86: Replacement Parts/Kits
196654__C_2019-Apr-29_Cleaned Replacement Parts/Kits REPLACEMENT PARTS/KITS Description Part number Adapter, in-line 22 mm x 22 mm C10038 Adapter, in-line 22 mm/15F-15F 198096 Bio-filter 206680 Battery cover 194779 Breathing hose: 120 cm (47") long, 22 mm ID 206681 Face mask: 15 mm OD—infant 188339 Face mask: 22 mm ID—adult large 188343... -
Page 87: Cleaning And Disinfecting
196654__C_2019-Apr-29_Cleaned Cleaning and Disinfecting CLEANING AND DISINFECTING WARNING: When you clean and disinfect the system, obey these warnings to help prevent injury and/or equipment damage: • Warning—The potential for electrical shock exists with electrical equipment. Failure to follow facility protocols may cause death or serious injury. -
Page 88: Clean The Control Unit And Stand With Cart
196654__C_2019-Apr-29_Cleaned Cleaning and Disinfecting CAUTION: To help prevent equipment damage, obey these cautions: • Caution—Do not use harsh cleansers/detergents, heavy duty grease removers, solvents such as toluene, xylene, or acetone, and do not use scouring pads (you may use a soft-bristle brush). •... -
Page 89: Clean The Pulse Oximeter
196654__C_2019-Apr-29_Cleaned Cleaning and Disinfecting Clean the control unitand mobile stand with cart as follows: Power off the control unit. Disconnect the control unit from the power source. Disconnect the patient circuit from the control unit. Put the therapy port cap over the therapy port. Disconnect/detach any accessories attached to the control unit. - Page 90 196654__C_2019-Apr-29_Cleaned Cleaning and Disinfecting • Warning—Clean the patient circuit between each therapy session for the same patient. • Warning—If the circuit and/or bio-filter are damaged or visibly soiled, replace them. See “Replacement Parts/Kits” on page 78. NOTE: Each patient circuit is for use by a single patient and intended for 30 days of treatment or a maximum of 90 treatment sessions.
- Page 91 196654__C_2019-Apr-29_Cleaned Cleaning and Disinfecting NOTE: Before the next use of the system, follow these instructions: • Examine the components of the circuit for cracks or other damage. If there is damage, replace the circuit. See “Replacement Parts/Kits” on page 78. •...
-
Page 92: Disinfect
196654__C_2019-Apr-29_Cleaned Cleaning and Disinfecting Examples of Typical Damage of the Bio-filter Each of the following three pictures show examples of possible damage. These pictures do not show all possible types of damage. Soiled Filter: Mucus or liquid is attached to the membrane. -
Page 93: Maintenance
196654__C_2019-Apr-29_Cleaned Maintenance MAINTENANCE WARNING: Warning—To prevent injury and/or equipment damage, do not do maintenance when the system is in use. NLET ILTER Examine the inlet filter every month, and clean it as necessary. Replace the inlet filter every twelve (12) months. To clean the filter, do as follows: Power off the control unit. -
Page 94: Nebulizer Filter
196654__C_2019-Apr-29_Cleaned Maintenance EBULIZER ILTER Examine the nebulizer filter every month, and clean it as necessary. Replace the inlet filter every twelve (12) months. To clean the filter, do as follows: Power off the control unit. Remove the inlet filter from the back of the control unit. NOTE: If the filter is damaged, replace it. -
Page 95: Expected Life
If service is necessary, use this contact information: • In the USA, call a Hill-Rom representative at: 800-426-4224. • Outside the USA, contact your distributor or a local Hill-Rom representative or go to www.respiratorycare.hill-rom.com. NOTE: When contacting a Hill-Rom representative regarding the Volara™ System, be prepared to provide the serial number from the product identification label. -
Page 96: Troubleshooting
Make sure the power cord is fully plugged into an AC power. • Examine the fuse. If necessary, replace the fuse (see page 86). • If the problem continues, contact a Hill-Rom representative. • If the control unit is powered by a battery: •... -
Page 97: Information Indicators
196654__C_2019-Apr-29_Cleaned Troubleshooting NFORMATION NDICATORS Information indicators provide the caregiver with audible indicators and visual indicators. Audio Alerts Beeps provide audible indications of the status of the system. Alert Pattern Status One beep Indicates that an activity is successful. Three beeps Indicates that attention is needed, and you should look at the touchscreen. -
Page 98: Warning Messages
001, 002, 003, 004, Power off the control unit, then power it on 005, 006, 008, 032 again. Make sure only the Hill-Rom approved battery (194566S) is used. Press return after reading the on-screen message. Make sure the battery is correctly installed in the control unit. -
Page 99: Caution Messages
196654__C_2019-Apr-29_Cleaned Troubleshooting Caution Messages Caution messages show on-screen to let you know that an issue has occurred. Follow the on-screen instructions to troubleshoot the issue. If an error code shows, see “Solutions for Cautious Messages” on page 91. Solutions for Cautious Messages Error Code Do this: 007, 013, 020... - Page 100 See “Replacement Parts/Kits” on page 4. Press return after you read the on-screen message. 1. Make sure only the Hill-Rom approved bio- filter (206680) is used. For instructions on how to connect the filter correctly, see page 2. Press return after you read the on-screen message.
- Page 101 196654__C_2019-Apr-29_Cleaned Troubleshooting Error Code Do this: 1. Make sure a tight seal is maintained on the face mask or mouthpiece. 2. Examine the connections between the patient circuit components, tubings, and the control unit for any source of leakage. If necessary, disassemble the patient circuit and assemble it again.
-
Page 102: Storage And Handling
Hill-Rom: • In the USA, call Hill-Rom at 800-426-4224. • Outside of the USA, contact your distributor or local Hill-Rom representative, or go to www.respiratorycare.hill-rom.com. STORAGE AND HANDLING To store or transport the Volara™ System, do the following: Put the therapy port cap over the therapy port. -
Page 103: Shipping And Packaging
• Request and get a return material authorization (RMA) number from Hill-Rom. You will get a return kit in the mail. Clean and disinfect the unit. Make sure it is dry before you pack it. See “Clean the Control Unit and Stand with Cart” on page 80. -
Page 104: Specifications
196654__C_2019-Apr-29_Cleaned Specifications SPECIFICATIONS RODUCT DENTIFICATION Product Number Description PVL1 Volara™ System, Model PVL1 PECIFICATIONS RODUCT Feature Description CPEP 5 to 25 cmH2O CHFO 5 to 70 cmH2O Nebulizer 5 cmH2O Per Stage Duration 1 sec to 5 minutes CHFO Frequencies Low, medium and, high Pressure Accuracy ±... -
Page 105: Power Requirements
196654__C_2019-Apr-29_Cleaned Specifications OWER EQUIREMENTS Condition Range Line voltage 100 - 240 V AC Supply frequency 50 - 60 Hz Supply current 2.0 - 1.0 A Mode of operation Non-continuous: 5 minutes ON/ 20 minutes OFF at CHFO pressure setting of 65 cmH2O and above. Fuse rating Fuse, 4 A H 250 V Replaceable Battery (Optional) -
Page 106: System Cool Down
196654__C_2019-Apr-29_Cleaned Specifications YSTEM CAUTION: Caution—Failure to follow the system cool down guidelines below could cause equipment damage. Condition Cool Down Period System operates continuously for At least 20 minutes 5 minutes, at CHFO pressure setting of 65 cmH2O and above. IRELESS OMMUNICATION The Volara™... -
Page 107: Classification And Standards
196654__C_2019-Apr-29_Cleaned Specifications Feature Dimension Security Authentication/ WPA/WPA2-Personal, WEP 64/128 bits Encryption LASSIFICATION AND TANDARDS Classification Standards Safety Standards ANSI/AAMI ES60601-1: 2005 + C1: 09 + A2: 10 + A1: 12 ANSI/AAMI HA60601-1-11:2015 CAN/CSA-C22.2 No. 60601-1: 14 CAN/CSA-C22.2 No. 60601-1-11:15 IEC 60601-1: 2005 + A1: 2012 EN 60601-1: 2006 + A12:2014 IEC 60601-1:1988 + A1:1991 + A2:1995 IEC 60601-1-11: 2015-01... -
Page 108: Federal Communications Commission (Fcc) Compliance
196654__C_2019-Apr-29_Cleaned Specifications (FCC) C EDERAL OMMUNICATIONS OMMISSION OMPLIANCE TATEMENT <This section is pending further updates from C&S. To be updated in Phase 3 after certification submission.> NOTES: • This system may not cause harmful interference, • This system must accept any interference received, including interference that may cause undesired operation. - Page 109 196654__C_2019-Apr-29_Cleaned Specifications To see the FCC ID of this system— Swipe the Options tab left, and press the Device Settings menu control. The device information screen shows. Find the FCC ID in the system information. Volara™ System, Model PVL1 User Manual (196286 REV C)
-
Page 110: Electromagnetic Compatibility Guidance
196654__C_2019-Apr-29_Cleaned Specifications LECTROMAGNETIC OMPATIBILITY UIDANCE The Volara™ System, Model PVL1 is suitable for the electromagnetic environment settings specified in the tables that follow. WARNING: Warning—The Volara™ System, Model PVL1 should not be used adjacent to or stacked with other equipment. If adjacent or stacked use is necessary, the Volara™... - Page 111 196654__C_2019-Apr-29_Cleaned Specifications Guidance and Manufacturer's Declaration—Electromagnetic Immunity The Volara™ System, Model PVL1 is intended for use in the electromagnetic environment specified below. The customer or user of the Volara™ System, Model PVL1 should make sure it is used in such an environment. IEC 60601 Compliance Electromagnetic...
- Page 112 196654__C_2019-Apr-29_Cleaned Specifications Guidance and Manufacturer's Declaration—Electromagnetic Immunity The Volara™ System, Model PVL1 is intended for use in the electromagnetic environment specified below. The customer or user of the Volara™ System, Model PVL1 should make sure it is used in such an environment. IEC 60601 Compliance Electromagnetic...
- Page 113 196654__C_2019-Apr-29_Cleaned Specifications a. Field strengths from fixed transmitters, such as base stations for radio (cellular/cordless) telephones and land mobile radios, amateur radio, AM and FM radio broadcast, and TV broadcast can not be predicted theoretically with accuracy. To assess the electromagnetic environment due to fixed RF transmitters, the electromagnetic site used should be considered.
-
Page 114: Electromagnetic Immunity To Wireless Communications
196654__C_2019-Apr-29_Cleaned Specifications LECTROMAGNETIC MMUNITY TO IRELESS OMMUNICATIONS The Volara™ System, Model PVL1 is intended for use in the electromagnetic environ- ment specified below. The customer or user of the Volara™ System, Model PVL1 should make sure it is used in such an environment. Sides Tested Frequency Test Severity Level... - Page 115 196654__C_2019-Apr-29_Cleaned...
- Page 116 196654__C_2019-Apr-29_Cleaned...
Need help?
Do you have a question about the Volara PVL1 and is the answer not in the manual?
Questions and answers
Have a pt. He has been intubated for 2 weeks , then finely trach, he had MS. Did volará prior to trach, When can restart therapy. Us RTS are apprehensive when a new trach