Table of Contents
Advertisement
Flashforge
Flashforge
Flashforge
Flashforge
InventorⅡ (3D Printer
Inventor
Inventor
User Guide
User Guide
User Guide
User Guide
Inventor Ⅱ User Guide |
Inventor Ⅱ
User Guide | www.flashforge.com
lashforge.com
Flashforge Corporation
Flashforge Corporation
Flashforge Corporation
Flashforge Corporation
3D Printer
3D Printer)
3D Printer
0086-
- 0579-82273989
82273989
Advertisement
Table of Contents

Related Manuals for Flashforge Inventor II


Summary of Contents for Flashforge Inventor II
- Page 1 Flashforge Corporation Flashforge Flashforge Flashforge Flashforge Inventor Inventor InventorⅡ (3D Printer 3D Printer 3D Printer 3D Printer) User Guide User Guide User Guide User Guide Inventor Ⅱ Inventor Ⅱ User Guide | User Guide | www.flashforge.com lashforge.com 0086- - 0579-82273989 82273989...
-
Page 2: Table Of Contents
6.1 Generate a Gcode ......................53 6.2 Print Methods ......................56 Chapter 7 : Advanced Printing ....................59 7.1 Skills on Supports ......................67 7.2 Control over Printing Quality ..................73 Chapter 8: Supports and Service ....................78 Inventor Ⅱ User Guide | www.flashforge.com 0086-0579-82273989... -
Page 3: Preface
On the completion of this User Guide, thanks all Flashforge engineers and the Flashforge 3D printer users for their unremitting efforts and sincere assistance. -
Page 4: Introduction
Introduction Notes: ·Please read Flashforge Inventor Ⅱ 3D Printer User Guide carefully before use. ·The User Guide is written based on Windows 7 OS. ·The version of the Flashprint is latest. The Flashforge Inventor Ⅱ 3D Printer User Guide contains the information needed for you to set up and use this device. -
Page 5: Notice
Safety Notice ! Notices: Read all the instructions in the manual and familiarize yourself with the Flashforge InventorⅡ User Guide before setting-up and using. Failure to comply with the warning and instructions may result in individual injury, fire, equipment damage or property damage. - Page 6 Temperature: RT 15-30℃ Moisture: 20%-70% · Filament Requirements Do not abuse the filament. Please make sure you use the Flashforge filament or the filament from the brands accepted by Flashforge. · Filament Storage All polymers degrade with time. Do not unpack until filament is needed. Filament Inventor Ⅱ...
- Page 7 IMPLIED WARRATIES OF MERCHANTA- BILITY AND FITNESS FOR A PARTICULAR PURPOSE. Flashforge shall not be liable for errors contained herein for incidental consequential damages in connection with furnishing, performance or use of this material This document contains proprietary information protected by copyright.
-
Page 8: Chapter 1: 3D Printing Technology
3D scanners work by digitizing a physical object, collecting its geometric data, and saving it to a file on your PC. There are also apps that can turn a mobile device into a 3D scanner. Inventor Ⅱ User Guide | www.flashforge.com 0086-0579-82273989... - Page 9 1.1.3 Build the 3D Model: Once the output file has been transferred to your InventorⅡ, it will start to turn the 3D model into a physical object by laying down layers of filament. Inventor Ⅱ User Guide | www.flashforge.com 0086-0579-82273989...
-
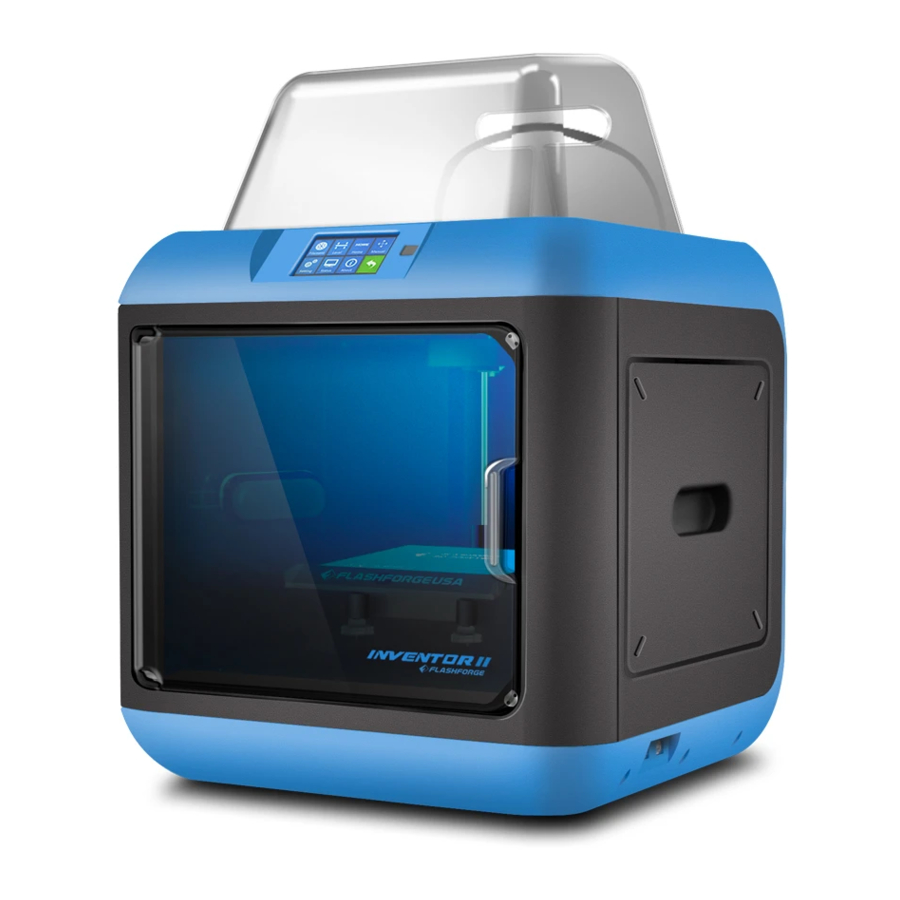
Page 10: Chapter 2: About Inventorⅱ
9. Filament intake 4. Z-axis guide rod axis guide rod axis guide rod 10. X 10. X-axis guide rod axis guide rod 5. Build plate Build plate Inventor Ⅱ Inventor Ⅱ User Guide | User Guide | www.flashforge.com lashforge.com 0086-0579 0579-82273989... - Page 11 A black plastic piece that guides the filament from the filament box to the filament intake Filament Cartridge A specific box for placing Flashforge filament PVP Glue Stick A solid adhesive used for making the model stick to the build plate firmly...
- Page 12 Nozzle Diameter 0.4mm Build Speed 30~150 mm/s Software FlashPrint Support Formats Input:3MF/ STL/OBJ/FPP/BMP/PNG/JPG/JPEG Output:GX/G Win xp/Vista/7/8/10、Mac OS、Linux Prodcut Dimensions 420*420*420mm Net Weight 11Kg AC Input Input:100V-240VAC, 47-63Hz Power65W Connectivity USB cable, USB stick, WIFI Inventor Ⅱ User Guide | www.flashforge.com 0086-0579-82273989...
- Page 13 Ÿ Delete: To delete the print file Print interface Ÿ Abort: To abort the print job. Ÿ Pause/Resume: To suspend or resume the print job. Ÿ More: To change filament and set up auto shutdown during printing. Inventor Ⅱ User Guide | www.flashforge.com 0086-0579-82273989...
- Page 14 Tap [Yes] to save the setting while tap [No] Tap [Yes] to save the setting while tap [No] to cancel the setting. to cancel the setting. to cancel the setting. Inventor Ⅱ Inventor Ⅱ User Guide | User Guide | www.flashforge.com lashforge.com 0086-0579 0579-82273989...
- Page 15 ŸX-: The extruder moves to the direction opposite to the X+. Ÿ Z+: The build plate elevates. Ÿ Z-: The build plate descends. Ÿ Return arrow Inventor Ⅱ User Guide | www.flashforge.com 0086-0579-82273989...
- Page 16 To tap the “+” on the touch screen to To tap the “+” on the touch screen to adjust the touch adjust the touch adjust the touch screen. Inventor Ⅱ Inventor Ⅱ User Guide | User Guide | www.flashforge.com lashforge.com 0086-0579 0579-82273989...
- Page 17 Actually, the present servo status is on. And the servo’s swing arm withdraws. Tap ‘+’ or ‘-’ to adjust the status of swing arm. Tap ‘+’, the arm swings down while tap ‘-’ , the arm swings up. Inventor Ⅱ User Guide | www.flashforge.com 0086-0579-82273989...
- Page 18 Status: It displays the real-time status of the extruder temperature, fan and filament. About: It displays the basic information about the device. Inventor Ⅱ User Guide | www.flashforge.com 0086-0579-82273989...
-
Page 19: Chapter 3: Hardware Assembly
(3-2) Take out the filament and thread it through the filament detecting equipment. (Note: The filament should feeds from the bottom of the spool towards the top ) After installing the filament, put the cartridge back to the printer. 3.2 Printer Start-up Inventor Ⅱ User Guide | www.flashforge.com 0086-0579-82273989 pwoer Power in... -
Page 20: Loading Filament
(3-5) Take out the filament guide tube, thread the filament from the filament cartridge through the tube. (3-6) Insert the filament from the filament guide tube into the filament intake. Inventor Ⅱ User Guide | www.flashforge.com 0086-0579-82273989... - Page 21 Next, we will load the Flashforge filament.(Note: Please lower the build plate to increase the distance between the nozzle and build plate to 50mm at least for avoiding nozzle jam.) (3-7) Tap [Tool]. (3-8) Tap [Filament]--[Load] (3-9) After the extruder’s temperature reaches 220 , the printer will sound a beep to ℃...
- Page 22 (3-10) Insert the filament into the extruder at an upright angle. Then the filament will be drawn through the extruder. Do not tap [Cancel] until the filament load the extruder steadily. 3.4 Unloading Filament 3-11 (3-11) Tap [Tool]-[Unload] and the extruder starts heating up. Inventor Ⅱ User Guide | www.flashforge.com 0086-0579-82273989...
- Page 23 Note: Do not pull out the filament with force as it will damage the gears. If the melted filament has cooled down in the extruder, please repeat the steps above. Inventor Ⅱ User Guide | www.flashforge.com 0086-0579-82273989...
-
Page 24: Chapter 4: Build Plate Leveling
(4-2) After tapping [Yes], the extruder starts to move towards the first point and the plate moves up and down to verify the distance between nozzle and plate. Inventor Ⅱ User Guide | www.flashforge.com 0086-0579-82273989... - Page 25 (4-4) If the distance is appropriate, tap [OK] to second point leveling. If still not, please follow the prompts to adjust again till you see [OK] button. (4-5) Repeat steps 2 through 4 above to complete second and third points leveling and then Tap [Finish] to exit. Inventor Ⅱ User Guide | www.flashforge.com 0086-0579-82273989...
- Page 26 (7)Then move to the center of the build plate for a check. Confirm that the paper slides between the nozzle and build with a moderate amount friction. Inventor Ⅱ User Guide | www.flashforge.com 0086-0579-82273989...
- Page 27 (8)Tap the Abort button and finish leveling. Inventor Ⅱ User Guide | www.flashforge.com 0086-0579-82273989...
-
Page 28: Chapter 5: About Software
2. Start the software with the start menu shortcut or by clicking the software icon.(See 5-1) 5.2 Exploring FlashPrint 5. 2.1 Machine Type Selection ! After starting FlashPrint, you need to select the target machine type first. Inventor Ⅱ User Guide | www.flashforge.com 0086-0579-82273989... - Page 29 When you start FlashPrint, a dialog box will pop up. Just select Flashforge InventorⅡ in the machine type list and click [OK]. You can also change the machine type via clicking [Print]--[Machine type]. See graphic 5-2: 5.2.2 Software Introduction Inventor Ⅱ User Guide | www.flashforge.com...
- Page 30 Method 4: Click [File]--[Examples] to load the example files Method 5: Click [File]--[Recent Files] to load the files opened recently. Method 6: Select and drag the target file to the icon of Flashprint. Inventor Ⅱ User Guide | www.flashforge.com 0086-0579-82273989...
- Page 31 Bottom thickness: For tube, canister and lamp to set up bottom thickness Top diameter: For tube, canister lamp and steal to set up the top diameter Bottom diameter: For tube, canister, lamp and steal to set up the bottom diameter Inventor Ⅱ User Guide | www.flashforge.com 0086-0579-82273989...
- Page 32 Plane(5-5) Tube(5-6) Cansiter(5-7) Inventor Ⅱ User Guide | www.flashforge.com 0086-0579-82273989...
- Page 33 Method 1: Hold down the left mouse button and drag. Method 2: Hold down the middle mouse button and drag. Inventor Ⅱ User Guide | www.flashforge.com 0086-0579-82273989...
- Page 34 [Reset]. ④Show Model Outline Click [View]--[Show Model Outline], it will highlight the yellow border of the object Inventor Ⅱ User Guide | www.flashforge.com 0086-0579-82273989...
- Page 35 In this way, you could make the model rotate on X/Y/Z axis. Method 2: Click the [Rotate] icon on the left, and then enter into rotating angel values in X/Y/Z axes positioning. Click [Reset] to reset rotating angel values. Inventor Ⅱ User Guide | www.flashforge.com 0086-0579-82273989...
- Page 36 Left-click on the model to select it and double-click on the Cut icon to set the cut plane. The direction and position are available for setting. ① Draw with Mouse ② X Plane Inventor Ⅱ User Guide | www.flashforge.com 0086-0579-82273989...
- Page 37 After loading the model, click [Edit]--[Supports] or click the Supports icon directly, then you will enter the support edit mode(as shown in the picture below). Click [Back] to exit when you finish editing. 5-10 ① Support Options Inventor Ⅱ User Guide | www.flashforge.com 0086-0579-82273989...
- Page 38 ). Loosen the left mouse button, if support column doesn’t meet with model, then support will be generated on origin and terminal Inventor Ⅱ User Guide | www.flashforge.com 0086-0579-82273989...
- Page 39 5.2.10 Print 5-12 ① Preview: Choose to enter preview interface or not ② Print when slice done: Print or not when slice done Inventor Ⅱ User Guide | www.flashforge.com 0086-0579-82273989...
- Page 40 ● Primeter Shells: Maximize is 10 a. Top Solid Layer: Maximize is 10, minimum is 1. b. Bottom Solid Layer: Maximize is 10, minimum is 1. ● Infill Inventor Ⅱ User Guide | www.flashforge.com 0086-0579-82273989...
- Page 41 ● Others Pause At Heights: Allows users to pre-set a height in which the print will suspend automatically. The function usually applied when you want to change the Inventor Ⅱ User Guide | www.flashforge.com 0086-0579-82273989...
- Page 42 “.fpp”suffix, all models in the scene (include support) are independent . After reloading the files, extruder configuration information and model position will be the same as the configuration during saving. Inventor Ⅱ User Guide | www.flashforge.com 0086-0579-82273989...
- Page 43 5.2.12 Edit Menus ① Undo Allows users to undo the recent edits by the following two methods: Method 1: Click [Edit]--[Undo]. Inventor Ⅱ User Guide | www.flashforge.com 0086-0579-82273989...
- Page 44 Select the object and delete the object through the following two methods: Method 1: Click [Edit]--[Delete] Method 2: Press the shortcut Delete ⑦ Surface to Platform After selecting the model, you can make the model surface to platform via the Inventor Ⅱ User Guide | www.flashforge.com 0086-0579-82273989...
- Page 45 5.2.13 Print Menus ① Connect Machine You can connect the InventorⅡ with your PC via a USB cable or WIFI. Note: The machine icon on the bottom right displays the connection status: Connected Disconnected Inventor Ⅱ User Guide | www.flashforge.com 0086-0579-82273989...
- Page 46 Click[Print]-[Connect Machine] on Flashprint. Then the following dialog box pops up. You need to select “Wi-Fi” in Connect Mode. Enter into the IP Address shown on the interface and then click [Connect]. Inventor Ⅱ User Guide | www.flashforge.com 0086-0579-82273989...
- Page 47 Once your PC is connected with your InventorⅡ. Open the Internet browser and enter “10.10.100.254” and enter the default user name(admin) and password(admin). 5-20 ƒ You will enter the WIFI setting panel, it displays as follows: Inventor Ⅱ User Guide | www.flashforge.com 0086-0579-82273989...
- Page 48 You need to restart your InventorⅡ’s WIFI. And then your InventorⅡ will connect with your computer via the WIFI that you’ve set up. ② Disconnect InventorⅡ Click [Print]--[Disconnect] to disconnect your PC and InventorⅡ. Inventor Ⅱ User Guide | www.flashforge.com 0086-0579-82273989...
- Page 49 (Specified distance refers to the move distance you set in Jog Mode. c. Stop: Click the [stop] button to abort the current movement. d. XYZ coordinate frame on the right side: Show the current position of extruder/build plate. Inventor Ⅱ User Guide | www.flashforge.com 0086-0579-82273989...
- Page 50 200 , after reaching the extruder temperature, click the [Forward]/[Reverse] rotation button to control filament load and filament unload. Furthermore, if you want to stop filament load and unload, you can click [Stop]. Inventor Ⅱ User Guide | www.flashforge.com 0086-0579-82273989...
- Page 51 Step 3:Reboot you InventorⅡ and wait for 4-5 seconds, then you can see the update process bar. When the update finishes, it will go back to the main interface. Step 4:Tap[Tools]--[About] to check] to check whether the updated version is right. Inventor Ⅱ User Guide | www.flashforge.com 0086-0579-82273989...
- Page 52 [Help]--[Check for Update] to detect the available updates online. ③ :Click About FlashPrint [Help]--[About Flashprint], the software information box will pop up. The contents include the current software version and copyright information. 5-25 Inventor Ⅱ User Guide | www.flashforge.com 0086-0579-82273989...
-
Page 53: Chapter 6: Basic Printing
[Edit]--[Surface to Platform] to make your model perfectly positioned on the build area. Click [Back] and double-click the Move icon again, then click the Platform] and [Center] to ensure the model be on the platform. Inventor Ⅱ User Guide | www.flashforge.com 0086-0579-82273989... - Page 54 Preview: If you check the [Preview] box, you can preview your model after slicing is done. Print When Slice Done: If you print via USB cable, you can check the box, while if you print via USB, you should not check the box. Machine Type: Flashforge InventorⅡ Inventor Ⅱ User Guide | www.flashforge.com 0086-0579-82273989...
- Page 55 Gcode file. Note: .gx files are available for preview while the .g files are not. They are displaying as follows: g. Files gx. Files Next, we are going to print the model. Inventor Ⅱ User Guide | www.flashforge.com 0086-0579-82273989...
-
Page 56: Print Methods
② Turn on your InventorⅡ, level the build plate and load the filament. ③ Click [Print] and transfer your Gcode file to your InventorⅡ. After completing transference, the printer will heat up automatically. And when heating finishes, the printer will start to build the model. Inventor Ⅱ User Guide | www.flashforge.com 0086-0579-82273989... - Page 57 PC will transfer the Gcode file to the printer. 7-10 ● After finishing transferring, the printer will heat up automatically. And when heating finishes, the print will start to build the model. Inventor Ⅱ User Guide | www.flashforge.com 0086-0579-82273989...
- Page 58 Abort:To stop heating and printing. Once you tap [Abort], the process is irreversible. Pause:To suspend the print job, you can tap it again to resume it. You can use this function when you want to change the filament halfway. Inventor Ⅱ User Guide | www.flashforge.com 0086-0579-82273989...
-
Page 59: Chapter 7 : Advanced Printing
When printing with PLA, users will find a “hyper” option available. General: a. Layer Height Thickness of each layer. The less thickness of layers, the more time will be used and Inventor Ⅱ User Guide | www.flashforge.com 0086-0579-82273989... - Page 60 Retraction Length: Amount of retraction. Retraction can help users reduce stringing or oozing during printing. (The default value shall be suggested.) b. Speed: Speed at which the filament is retracted. The default value shall be suggested. Inventor Ⅱ User Guide | www.flashforge.com 0086-0579-82273989...
- Page 61 Mode: There are two options for Start Point mode. One is “closest to specific location”, the other is “use random start points”. b. X: The coordinate value of X c. Y: The coordinate value of Y Infill General Inventor Ⅱ User Guide | www.flashforge.com 0086-0579-82273989...
- Page 62 Maximum Combine Layers: Select the layer amount according to the layer height. The total height shall not be over 0.4mm. b. Combine Mode: Including “Sparse and Solid” and “Sparse Only”. “Sparse Only” mode only applies for the inner infill layers. Inventor Ⅱ User Guide | www.flashforge.com 0086-0579-82273989...
- Page 63 (in the X/Y directions). c. Space to Model(Z): The distance between the treelike supports and the model contact surface (in the Z direction). d. Path Space: The distance between the adjoining paths. Inventor Ⅱ User Guide | www.flashforge.com 0086-0579-82273989...
- Page 64 Shell Count: To control the printing laps for support shell. c. Space to Model: The minimum distance between the wall and model. d. Speed: Speed at which the wall is printed. Inventor Ⅱ User Guide | www.flashforge.com 0086-0579-82273989...
- Page 65 B-Axis: Voltage parameter of left-extruder stepper motor. The bigger the value is, the more heater will produce. 2)Others a.Extrusion Ratio: The filament amount extruded by the extruder. Default: 109% Inventor Ⅱ User Guide | www.flashforge.com 0086-0579-82273989...
- Page 66 Enable Adjustments: Enable software to make compensation for errors. b. External Compensation: Enable software to make compensation for the outer diameter error. 带格式的: 字体: (默认) Times New c. Internal Compensation: Enable software to make compensation for the inner Roman diameter error. Inventor Ⅱ User Guide | www.flashforge.com 0086-0579-82273989...
-
Page 67: Skills On Supports
In these cases, support structures are needed to ensure objects integrity and print quality. ① Principle of 45 Degrees Generally speaking, if the 3D model has an overhang of more than 45 degrees, you Inventor Ⅱ User Guide | www.flashforge.com 0086-0579-82273989... - Page 68 Treelike Support Structure:Suitable for models with small area overhang(s).(You are suggested printing a raft) Features:Treelike support structure is proprietary to Flashforge Corporation. And this structure can save support material and can be easily removed. However, compared with the linear support structure, it’s of less stability. So you are suggested to manually add more supports after auto-generating treelike supports.
- Page 69 Right:Treelike support structure Wrong:Linear support structure Inventor Ⅱ User Guide | www.flashforge.com 0086-0579-82273989...
- Page 70 2) Model with Small-area Overhang Right:Treelike support structure Inventor Ⅱ User Guide | www.flashforge.com 0086-0579-82273989...
- Page 71 Wrong:Linear support structure Manual Modification For the experienced 3D printer users, the [Add] and [Delete] buttons are suggested using for manually adding or deleting supports. Inventor Ⅱ User Guide | www.flashforge.com 0086-0579-82273989...
- Page 72 7-10 You can add the support structure manually to according to the actual shape of the model. Left click [Add] on the left, and then click on the position when support structure is Inventor Ⅱ User Guide | www.flashforge.com 0086-0579-82273989...
-
Page 73: Control Over Printing Quality
● High (Slow) (Print Speed 50mm/s Travel Speed 70mm/s) ● Hyper (Print Speed 50mm/s Travel Speed 70mm/s) 7.3 Skills of Model Placement Not all the models are in the right positions after being loaded. Therefore, you need to Inventor Ⅱ User Guide | www.flashforge.com 0086-0579-82273989... - Page 74 Such as the models below, ⑦ you need to put one of the surfaces onto the platform.(Please refer to 5.1.12- Surface to Platform) ① ② Improper Proper 7-13 ③ Improper Proper 7-14 Further Reading:Cut Function Inventor Ⅱ User Guide | www.flashforge.com 0086-0579-82273989...
- Page 75 Picture 8-15 is the preview of the model’s original placement and Picture 8-16 is the preview of the model with support structure. 7-15 (7-16) Model with support structure 7-16 (7-17) Looking at the Picture 8-16, we will definitely find that the complex supports Inventor Ⅱ User Guide | www.flashforge.com 0086-0579-82273989...
- Page 76 By analyzing the model’s feature, cutting from the Y plane will be suitable. 7-17 (7-18) The model preview after cutting. 7-18 (7-19) Click [Edit]--[Surface to Platform] to put the flat surfaces onto the platform. Inventor Ⅱ User Guide | www.flashforge.com 0086-0579-82273989...
- Page 77 7-10 Comparison Inventor Ⅱ User Guide | www.flashforge.com 0086-0579-82273989...
-
Page 78: Chapter 8: Supports And Service
Chapter 8: Supports and Service Flashforge team is on standby and ready to help you with any challenges you may have with your InventorⅡ. If the issues or questions are not covered in this User Guide, you can seek for solutions on our official website or contact us via telephone. - Page 79 -Consult the dealer or an experienced radio/TV technician for help. *When contacting support, please have your serial number ready. The serial number is a bar code on the back of your InventorⅡ.” Inventor Ⅱ User Guide | www.flashforge.com 0086-0579-82273989...
Need help?
Do you have a question about the Inventor II and is the answer not in the manual?
Questions and answers