
Subscribe to Our Youtube Channel
Related Manuals for HPC Blitz 1200CMB


Summary of Contents for HPC Blitz 1200CMB
- Page 1 Blitz ™ Code Milling Key Machine No. 1200CMB ©2013 HPC, Inc., Schiller Park, Illinois • 60176 • U.S.A. • www.hpcworld.com 040913 36CMB_000_PR...
- Page 2 NTRODUCTION Congratulations on your purchase of the "Standard of the Industry" HPC Blitz ™ Machine. From its introduction in the 1970's, it revolutionized the locksmith industry. The Blitz ™ simplified the code cutting process, and its innovative design earned it 3 U.S. patents. It is the best selling code machine and has become an integral part of virtually every locksmith business.
- Page 3 CMB-CK Calibration Kit (DECK-150)* (KBPS-1) Cutter Nut Wrench (WRENCH-3) *NOT included with 1200B series machines OPTIONAL ACCESSORIES: Carrying Case Storage Panel HPC Software Tip Gauges Key Decoder (1200 CASE) (CARD-BP) (HT-125, HT-625, HT-SD, RT-SD) (HKD-75) Medeco ® Jaw Medeco ® 3...
- Page 4 ndex ectIon ectIon umber Code Cards........1.0....5 Cutters .
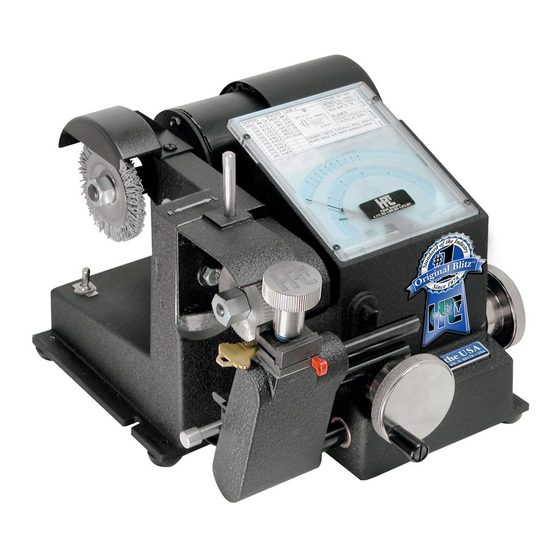
- Page 5 PARTS DESIGNATION CHART fOR THE 1200CMB CODE MACHINE CM-1043 (pivot pin) CM-1080MA (motor) CM-1053X (cutter head assembly) CM-1014B (belt guard) CM-1012 (HPC lens) CM-1042 (angle index pin) EGN-1 (Easy Grip Wing Nut) CM-1096B (brush guard) TYX-3 (Softie ™ brush) CM-1056MA (key vise)
- Page 6 ards Blitz ™ No. 1200CMB...
- Page 7 1.1 C ARDS Jaw to use Cutter to use Applicable Code Series Applicable Key Blanks Depth and Space Dimensions Important Notes in Inches and Millimeters Key Placement Depth Increments Gauge Point Space Increments The Code Cards include all key cutting information. Blitz ™...
- Page 8 “stand up” notebook and stored away from direct sunlight or extreme heat. The cards are inserted sideways with the notch to the right, so that the card number and manufacturer’s name shows. Additional storage panels may be ordered through your HPC Distributor. Blitz ™...
- Page 9 Visit us at www.hpcworld.com Blitz ™ No. 1200CMB...
- Page 10 utters Blitz ™ No. 1200CMB...
- Page 11 ™ tandard utters for the lItz achIne No. CW-1011 (Tool Steel) No. CW-14MC (Tool Steel) No. CW-14MCC (Carbide)-Optional No. CW-1011CC (Carbide)-Optional 90° angle, small cylinder cutter for 100° angle, standard large cylinder cutter automotive, furniture and padlock keys. for Schlage, KwikSet, Yale, etc.) The CW-14MC and CW-1011 are included with the Original Blitz ™...
- Page 12 ™ ddItIonal utters for the lItz achIne contInued No. CW-1014 (Tool Steel) No. CW-20FM (Tool Steel) This specially designed cutter has .080 flat for 76°, double angle, flat mill tooth for Sargent and Welch keys. one step cutting of keys for Kwikset, Weslock, and Weiser locks using original pins.
- Page 13 ™ ddItIonal utters for the lItz achIne contInued No. CW-90MC (Tool Steel) No. CW-105 (Tool Steel) 105°, double angle cutter for ASSA. 90° angle, large cylinder cutter for shallow & deep cuts in adjacent positions. For Best, Falcon, Eagle, Arrow, Kaba, and IC core. ™...
- Page 14 ™ lotter utters for the lItz achIne No. CW-DC*-(Carbide) No. CW-EC* -(Carbide) .064 carbide slotter cutter for S&G. .069 carbide slotter cutter for Diebold. *(requires spacer SPR-5) *(requires spacer SPR-5) No. CW-FC* -(Carbide) No. CW-45SMS* -(Tool Steel) .088 carbide slotter cutter for Mosler. .045 M2 tool steel combination standard/flat *(requires spacer SPR-5) steel cutter for safety deposit boxes.
- Page 15 hangIng utters The following procedure is recommended when changing from one cutter to another. Turn off the machine. Hold the cutter shaft fast with a 1/2” open end wrench. (No. WRENCH-1 supplied) Blitz ™ No. 1200CMB...
- Page 16 HOLD HOLD Loosen the cutter shaft nut, with a 3/4” open end wrench (No. WRENCH-3 supplied) by turning it clockwise (left hand thread). Remove the cutter. Blitz ™ No. 1200CMB...
- Page 17 HOLD • Slide the replacement cutter wheel onto the shaft. IMPORTANT: Be sure cutter is installed for a clockwise rotation! • Hold the shaft with the 1/2” wrench. • Install the nut, turning it counter-clockwise onto the shaft with the 3/4” wrench. Do not overtighten the nut. Blitz ™...
- Page 18 augIng and oldIng Blitz ™ No. 1200CMB...
- Page 19 auges Red (Plastic) Tip Gauge No. CM-1054MA Black (Horseshoe) Tip Gauge No. CM-1054R Shoulder Gauge No. CMB-fG Blitz ™ No. 1200CMB...
- Page 20 SHOULDER GAUGE SAfETY SWITCH This machine is equipped with a Shoulder Gauge Safety Switch to protect the shoulder gauge from being accidentally damaged by the cutter. This type of accident occurs if the shoulder gauge is left up at the key after gauging rather than being lowered to its rest position before cutting the key.
- Page 21 ectIon No. CMB-FG Shoulder Gauge tandard ylInder wIth houlder augIng usIng (Example: Schlage, Card No. C45) Place key blank in the jaw with the shoulder touching the left hand edge of shoulder gauge. Flip the shoulder gauge down before turning on the motor. The space dimension can be significantly affected by any damage incurred to the shoulder gauge.
- Page 22 No. CM-1054MA Key Vise Tip Gauge Key vise tip gauge pulled to rear and into Position No. 1. Wing nut and top jaw of vise removed to show a top view of the bottom jaw only, for key positioning. Make sure the key is laying flat against ledge before tightening wing nut.
- Page 23 ectIon No. CMB-FG Shoulder Gauge tandard ylInder wIth houlder augIng usIng (Example: Master, Card No. C34) Key shoulder touches left hand edge of shoulder gauge. Flip gauge down before turning on motor. Blitz ™ No. 1200CMB...
- Page 24 Key lays in front of lip. Key vise tip gauge pulled to rear. (Position No. 1) No. CM-1054MA Tip Stop Make sure the key is laying flat against ledge, before tightening the wing nut. Blitz ™ No. 1200CMB...
- Page 25 ectIon No. CM-1054MA Tip Gauge hort augIng usIng (Example: Ford, Card No. C24) Key is gauged from tip. Blitz ™ No. 1200CMB...
- Page 26 Key vise tip gauge, pushed inward to the third groove position. Tip gauge is pulled to rear while cutting. No. CM-1054MA Gauge in 3rd groove. Wing nut and top jaw of vise removed to show a top view of the bottom jaw only, for key positioning and stop bar settings.
- Page 27 ectIon No. CM-1054MA Tip Gauge Iddle hort augIng sIng (Example: KABA-PEAKS 6-Pin, Card No. CPKS1) Key is gauged from bottom stop, not tip. Blitz ™ No. 1200CMB...
- Page 28 Key vise tip gauge, pushed inward to the second groove position. Tip gauge is pulled to rear while cutting. No. CM-1054MA Key Vise in 2nd Position. Top jaw of vise removed to show a top view of the lower jaw only, for key positioning and stop bar settings.
- Page 29 ectIon lacK orseshoe hort augIng sIng (Example: Best Card No. C3) Key is gauged from bottom stop, not tip. (Note: Use black tip gauge, NOT red.) Blitz ™ No. 1200CMB...
- Page 30 Gauge pushed inward to first groove position. Note special holding on key milling using jaw “B” side. (Key must lay flat against back ledge of bottom jaw as shown.) Blitz ™ No. 1200CMB...
- Page 31 ectIon medeco ® - s tandard ommercIal c. (o sIng PtIonal quIPment (Example: Medeco ® Card No. C36) *Medeco ® is a registered trademark of Medeco Security Locks, Inc. Key shoulder touches left hand edge of shoulder gauge. Flip gauge down before turning on motor. Blitz ™...
- Page 32 “Nested” Jaw and grooves “nest” into each other. Key vise tip gauge is pulled back to rear. Open jaw “C” only enough to slide key into position. Be sure key groove and jaw milling mate before tightening wing nut. Blitz ™...
- Page 33 ectIon lacK orseshoe augIng usIng (Example: GM Modular 94+, Card No. CF215) Key is gauged from tip as shown. (Note: Black tip gauge NOT Red.) Blitz ™ No. 1200CMB...
- Page 34 Detent in second groove position. Gauge against tip stop. Be sure key lays flat against ledge before tightening wing nut. Blitz ™ No. 1200CMB...
- Page 35 Visit us at www.hpcworld.com Blitz ™ No. 1200CMB...
- Page 36 ePth and Pace ranK ontrols Blitz ™ No. 1200CMB...
- Page 37 Depth Window Space Window LATERAL CRANK Counter-clockwise rotation, cuts farther from shoulder. DEPTH CRANK Clockwise rotation, cuts deeper. DEPTH CRANK THE DEPTH OF A CUT is controlled by rotating the No. CM-1026X Depth Crank, located at the front of the machine.
- Page 38 Rotating the lateral crank clockwise moves the pivot arm to the right, and rotating counter-clockwise moves it to the left. Blitz ™ No. 1200CMB...
- Page 39 Rotating the depth crank clockwise, the pivot arm will move inward towards the cutter, rotating counter-clockwise will move it outward away from the cutter. The depth indicator needle sweeps across the face of the arc, from left to right as the knob is advanced.
- Page 40 uttIng the Blitz ™ No. 1200CMB...
- Page 41 Select the correct Code Card and insert it beneath the lens as shown above. Blitz ™ No. 1200CMB...
- Page 42 Change the cutter and jaw (if necessary) to those indicated on the Code Card. Blitz ™ No. 1200CMB...
- Page 43 For maximum clearance, and easy accessibility when inserting the key blank, rotate both of the crank knobs counter-clockwise. Blitz ™ No. 1200CMB...
- Page 44 Gauge the key... Blitz ™ No. 1200CMB...
- Page 45 ...and tighten the wing nut when the key is level. Then flip gauge down before starting to cut. Blitz ™ No. 1200CMB...
- Page 46 Turn machine “ON.” Blitz ™ No. 1200CMB...
- Page 47 Rotate the lateral crank clockwise until the indicator lines up with the No. 1 space mark in the space window as indicated above. Blitz ™ No. 1200CMB...
- Page 48 Slowly rotate the depth crank clockwise until the depth indicator is centered over the depth mark you wish to cut as shown in the upper depth window. Do NOT pass the mark! Blitz ™ No. 1200CMB...
- Page 49 Now rotate the depth crank counter-clockwise (outward) until the spinning cutter is clear of the key blank. Blitz ™ No. 1200CMB...
- Page 50 Rotate the lateral crank to the second space indicator. Blitz ™ No. 1200CMB...
- Page 51 Slowly rotate the depth crank clockwise until the depth indicator is centered once more over the depth you wish to cut in this space position. Blitz ™ No. 1200CMB...
- Page 52 Continue the correct space and depth movements until all cuts are made from the head to the tip of the key. Blitz ™ No. 1200CMB...
- Page 53 Upon completion of the last cut rotate both of the cranks counter-clockwise for maximum clearance and easy accessibility to the cut key. Then turn off machine and remove key. Blitz ™ No. 1200CMB...
- Page 54 Turn motor back on to deburr key. Blitz ™ No. 1200CMB...
- Page 55 The following is only for keys that require widening as indicated on the code card. When widening, start at the first small mark for each space and, while holding the depth crank, turn the lateral crank counter-clockwise from the first small widening mark through the center mark and stopping at the second small widening mark.
- Page 56 ngle Blitz ™ No. 1200CMB...
- Page 57 An optional cutter and Jaw “C” are required to cut keys for commercial level Medeco ® . This cutter Part No. CW-1012 and No. MJ-1 “Jaw C” may be added at a later date. Both parts are readily available from your HPC distributor. Biaxial keys only require the CW-1012 cutter, not the MJ-1 “Jaw C”.
- Page 58 The depths and angles must be decoded prior to cutting the key. Depths can be measured with a knife-edge caliper, a key micrometer or with one of the special decoders commercially available. The HPC Pocket Sized Decoder, No. HKD-75 (pictured above), in addition to decoding depths and angles for Medeco ® also contains an assortment of cards for other locks.
- Page 59 Gauge the key from the shoulder, making sure the key grooving and special jaw milling are nested together. Blitz ™ No. 1200CMB...
- Page 60 Insert Code Card No. C36 for Medeco ® . *Medeco ® is a registered trademark of Medeco Security Locks, Inc. Blitz ™ No. 1200CMB...
- Page 61 Turn the lateral crank as required to move key into the correct space positions for cuts with center angles. Cutter head is not swiveled for center cuts. Make all center angle cuts first. Blitz ™ No. 1200CMB...
- Page 62 Cut first center cut. Blitz ™ No. 1200CMB...
- Page 63 Back off. Blitz ™ No. 1200CMB...
- Page 64 Move to next center angle cut and plunge. Blitz ™ No. 1200CMB...
- Page 65 Back off. Blitz ™ No. 1200CMB...
- Page 66 Move away from cutter. Blitz ™ No. 1200CMB...
- Page 67 Turn off the machine. Blitz ™ No. 1200CMB...
- Page 68 Pull outward on angle index pin. Blitz ™ No. 1200CMB...
- Page 69 Swivel cutter head by the angle pivot pin, as indicated by the arrows. Blitz ™ No. 1200CMB...
- Page 70 Be sure the index pin is relocked into the cutter head before operating. Make all right angle cuts at this time. Blitz ™ No. 1200CMB...
- Page 71 Then turn off the machine. Blitz ™ No. 1200CMB...
- Page 72 Repeat the same procedure for left angle cuts. Blitz ™ No. 1200CMB...
- Page 73 Be sure to brush Medeco ® keys exceptionally clean and free of all burrs. Hold the cut key so that the rotation of the deburring brush sweeps the burrs out and away from the cut. *Medeco ® is a registered trademark of Medeco Security Locks, Inc. Blitz ™...
- Page 74 calIbratIon ePth Blitz ™ No. 1200CMB...
- Page 75 ttentIon lease read before ProceedIng calIbratIon of dePth NO RE-ADJUSTMENT of depth is required when changing from one code card to another. The depth indicator marks on each code card are positioned for correct alignment when using the factory cutter wheels. No special washers are required on either side of the cutter.
- Page 76 Cut a key by code and compare carefully measured depths against a code card. Blitz ™ No. 1200CMB...
- Page 77 The two flats on the end of the eccentric shaft allow a 3/8” open end wrench (such as No. WRENCH-1) to rotate the eccentric shaft either towards you, making the depths deeper, or away, making the depths shallower. There should be no need to loosen the two set screws.
- Page 78 calIbratIon Pace Blitz ™ No. 1200CMB...
- Page 79 ttentIon lease read before ProceedIng calIbratIon of sPace NO RE-ADJUSTMENT of space is required when changing from one code card to another. The space indicator marks on each code card are positioned for correct lateral alignment when using the factory cutter wheels. No special spacing washers are required on either side of the cutter.
- Page 80 CUTTING TOO CLOSE OR TOO fAR fROM THE TIP ON KEYS GAUGED fROM THE TIP. Select an original large cylinder type tip-gauged cut key such as Best or Falcon. Blitz ™ No. 1200CMB...
- Page 81 Put on the correct cutter and insert the correct card. Then, gauge and clamp the key. Blitz ™ No. 1200CMB...
- Page 82 Place a white piece of paper beneath the cutter for improved vision of alignment. NOTE: Unplug machine for these and the following operations. Blitz ™ No. 1200CMB...
- Page 83 Rotate lateral crank to position the key with the most easily seen cut carefully centered beneath the cutter as shown. Rotate the depth crank until the cutter is fairly deep within the cut, (Deepest cuts are usually the easiest to see.) Blitz ™...
- Page 84 If space indicator needle is centered over the corresponding space mark, the tip stop space adjustment is correct. Go no further. Blitz ™ No. 1200CMB...
- Page 85 If the space indicator needle is offset to the right, the machine is cutting too close to the tip. If the space indicator is offset to left, the machine is cutting to far from tip. (Note: Re-calibration of tip does necessitate re-calibration of shoulder space.
- Page 86 Rotate the lateral crank until the indicator needle is centered over the corresponding space mark as shown. Rotate the Depth crank until the cutter is fairly deep within the cut. Blitz ™ No. 1200CMB...
- Page 87 Loosen the four set screws that hold the pivot arm onto the pivot arm shaft. DO NOT REMOVE PIVOT ARM. Blitz ™ No. 1200CMB...
- Page 88 Re-position the space indicator needle if it has moved while loosening the set screws. Blitz ™ No. 1200CMB...
- Page 89 With a small rawhide or plastic mallet, “lightly” tap the lower left side of the pivot arm until the pin seat of the cut is directly opposite the flat of the cutter, as shown previously. (Be sure all FOUR set screws are loose.) Blitz ™...
- Page 90 With the cutter aligned opposite the cut and the space indicator needle centered over the corresponding space mark, tilt the machine up, if necessary, (without disturbing the setting) and re-tighten the set screws. Blitz ™ No. 1200CMB...
- Page 91 CUTTING TOO CLOSE OR TOO fAR fROM THE SHOULDER ON KEYS GAUGED fROM THE SHOULDER. Select an original large cylinder type shoulder-gauged cut key, such as Schlage. *Always check spacing on a tip stop key first, before adjusting for shoulder-gauged keys. Blitz ™...
- Page 92 Insert the correct Code Card. Put on the correct cutter. Blitz ™ No. 1200CMB...
- Page 93 Gauge and clamp the key. Blitz ™ No. 1200CMB...
- Page 94 Place a white piece of paper beneath the cutter for improved vision alignment. Blitz ™ No. 1200CMB...
- Page 95 Rotate lateral crank to position the key with the most easily seen cut carefully centered beneath the cutter as shown. Rotate the depth crank until the cutter is fairly deep within the cut. If space indicator needle is centered over the corresponding space mark the space adjustment is correct.
- Page 96 If the space indicator needle is offset to the right, the machine is cutting too far from the shoulder. If the space indicator needle is offset to left, the machine is cutting too close to the shoulder. (Note: Recalibration of shoulder spacing does not necessitate recalibration of tip space.) Blitz ™...
- Page 97 NOTE: Unplug the machine for these and the following operations. Rotate the lateral crank towards you until the space indicator needle is centered over the corresponding space mark as shown. Blitz ™ No. 1200CMB...
- Page 98 Loosen the key on the vise. Slide the key until the pin seat of the cut is directly opposite the flat of the cutter as shown. Tighten the key on the vise. Blitz ™ No. 1200CMB...
- Page 99 Loosen the set screw that holds the shoulder gauge turn bar onto the pivot arm (CM-1024X). Blitz ™ No. 1200CMB...
- Page 100 Blitz ™ No. 1200CMB...
- Page 101 Now that the turn bar is loose, rotate the turn bar clockwise or counter-clockwise to move the shoulder gauge toward the shoulder of the key. The left side of the gauge should end up just barely touching the shoulder of the key as shown (as in normal gauging).
- Page 102 reventIve aIntenance ubrIcatIon ePaIrs uarantee Blitz ™ No. 1200CMB...
- Page 103 visit us online at: www.hpcworld.com Blitz ™ No. 1200CMB...
- Page 104 9. CALIBRATING DEPTH FOR RE-SHARPENED CUTTERS - As cutters become worn, the alternative to purchasing a new set, would be to resharpen them. (HPC does not resharpen cutters.) In order to maintain matched cutter diameters, all cutters for this machine must be sharpened at the same time, and all diameters must be sharpened proportionately.
- Page 105 Your machine should be equipped with an HPC cutter when it is sent in for repairs. If you are sending in a Blitz ™...
- Page 106 10.0 & xPloded Iews IstIngs Blitz ™ No. 1200CMB...
- Page 107 1200CMB P arts isting Description Stock # Description Stock # Pivot Arm Complete CM-1024X Retaining Ring CM-50112 Cutter Nut CM-1039MA Screw CM-50134 Cutter Sold Separately Lateral Crank Complete CM-1044X Cutter Head Assembly CM-1053X Lateral Rack Bracket CM-1030 Spring CM-1079 Pivot Arm Shaft CM-1034 Washer CM-50100...
- Page 108 1200CMB 111704 Blitz ™ No. 1200CMB...
- Page 109 1200CMBaCDC P arts isting Description Stock # Description Stock # Pivot Arm Complete CM-1024X Pivot Arm Shaft CM-1034 Cutter Nut CM-1039MA Rubber Foot CM-50133 Cutter Sold Separately Dogging Screw CM-1016 Cutter Head Teflon Washer CM-1086 Assembly Complete CM-1053X Washer CM-50100 Spring CM-1079 Spring...
- Page 110 1200CMBaCDC 012302 Blitz ™ No. 1200CMB...
- Page 111 1200CM/1200CMB C utter sseMBLy 012302 Description Stock # Cutter Head CM-1053X (available complete only) Cutter Nut CM-1039MA Cutter Wide Selection Available Set Screw 9100-11 Cutter Head Pulley CM-1059 Washer CM-50100 Blitz ™ No. 1200CMB...
- Page 112 1200CM/1200CMB P IVOT SSEMBLY 19 20 030702 Description Stock # Easy Grip Wing Nut EGN-1 Ball Bearing Washer BBW-2 Top Jaw CM-1056MA Spring CM-1293MA Stud CM-1019MA Ball Bearing CM-50108 Set Screw CM-50110 Bottom Jaw (factory installation recommended) CM-1055MA Tip Stop CM-1054MA Spring CM-1090MA...
- Page 113 1200CMB r raCket sseMBLy 012302 Description Stock # Rack Bracket CM-1030B Lateral Rack CM-1021 Screw CM-50112 Feed Thread CM-1037B Washer CM-10150 Screw CM-50116 Lateral Feed Shaft CM-1047B Brake Pellet CM-50180 Spring CM-50181 Set Screw CM-50182 Ring CM-50183 Blitz ™ No. 1200CMB...
- Page 114 Visit us at www.hpcworld.com Blitz ™ No. 1200CMB...
Need help?
Do you have a question about the Blitz 1200CMB and is the answer not in the manual?
Questions and answers