Advertisement
Quick Links
Woodstock
Water Bell Fountain
by Woodstock Chimes
ASSEMBLY INSTRUCTIONS
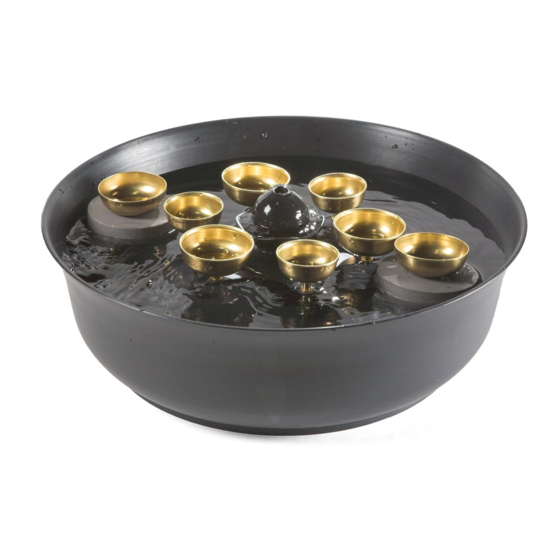
Thank you for purchasing a Woodstock Water Bell Fountain. This foun-
tain is designed to combine the relaxing sounds of flowing water with
the peaceful chiming of brass bells. This effect is created by two float-
ing bells which softly chime against a center cluster of stationary bells
as they are swept around the fountain by an underwater current creat-
ed by the pump. The force of this current, and thus the speed of the
floating bells and the frequency of the chiming, are completely
adjustable.
To personalize your fountain and enhance its visual interest, we recom-
mend adding small decorative stones or other non-metallic objects of
interest. Make sure that they are cleaned very well before adding them
to the fountain, as small amounts of dirt and grease can damage the
pump. Make sure added objects don't obstruct the movement of the
floating bells or impede the underwater current.
Parts List
First unpack your fountain by removing the box from inside the bowl.
Inside this box you should find:
• The center bell assembly (A), made up of six bells mounted on an
acrylic base with attached flow diverter (D) (only two bells shown)
• Output hose (H)
• Two individual bells with hexagonal center openings (B1 & B2)
• Two floating bells (brass bells mounted to plastic floats - not shown)
Next unpack the bowl with attached pump (C) and power cord (not
shown).
Fountain Assembly
Step 1: Feed the output hose (H) through the hole in the edge of the
acrylic base and attach it to the side of the flow diverter (D) as shown.
`
Step 2: Make sure that the pump's flow control is set on "MAX."Then,
attach the pump to the flow diverter by inserting the round end of the
diverter (D1) through the center of the bell assembly and into the hole
at the top of the pump (C1).
™
®
Step 3: Place bell assembly in the bowl so that each leg is resting in one
of the raised circles at the bottom of the bowl. The pump should be
resting on its rubber feet in the center of the bowl. The end of the out-
put hose should be oriented so that the water will flow in a clockwise
direction around the bowl.
Step 4: Press the two individual bells onto the six-sided flow diverter
stem at the center of the bell assembly, the larger bell first (B1). You
should feel the bells gently "snap" into place.
Step 5: Make sure the fountain is resting on a level surface. Using dis-
tilled water (highly recommended), fill the bowl approximately 2/3 full
or so that the water level is about one inch below the rim of the bowl.
Add the two floating bells, taking care that they are level when placed
in the water (otherwise they may tip over). If the floats are clover shaped,
add water until the rims of the floating bells are ⁄" below the rims of the
six fixed bells.
Advertisement

Related Manuals for Woodstock Chimes Water Bell Fountain


Summary of Contents for Woodstock Chimes Water Bell Fountain
- Page 1 Woodstock Chimes ® ASSEMBLY INSTRUCTIONS Thank you for purchasing a Woodstock Water Bell Fountain. This foun- tain is designed to combine the relaxing sounds of flowing water with the peaceful chiming of brass bells. This effect is created by two float-...
- Page 2 Step 6: Now you are ready to plug in your fountain. Be sure that the power cord loops below the electrical outlet to form a “drip loop.” This will prevent water from running down the cord into the electrical out- by Woodstock Chimes ® let.
Need help?
Do you have a question about the Water Bell Fountain and is the answer not in the manual?
Questions and answers