
Related Manuals for TVS electronics MINI THERMAL RP-3180


Summary of Contents for TVS electronics MINI THERMAL RP-3180
- Page 1 RP-3180 MINI Thermal Printer USER'S MANUAL TVS Electronics Limited MANUAL REVISION V8.1...
- Page 2 NOTICE You must use the supplied adapter only. It is dangerous to use other adapters. Make sure the printer power is off before plug or unplug the cable. Please don t place the printer in humidity or dusty space, excessive humidity and dust may damage it.
-
Page 3: Table Of Contents
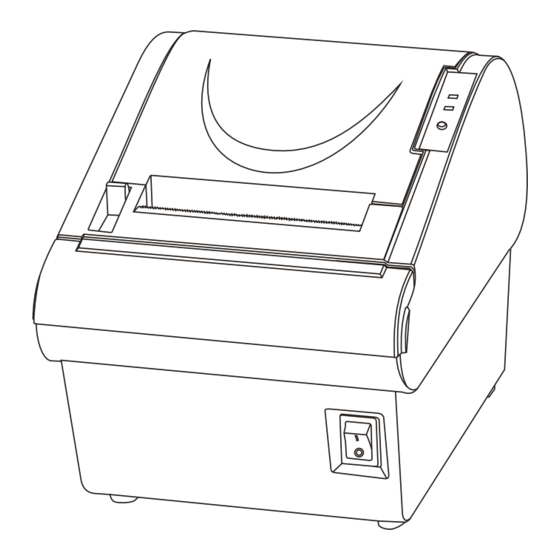
INTRODUCTION The RP-3180 Thermal Printer is designed for use with electronic instruments such as system ECR, POS, banking equipment, computer peripheral equipment, etc. The main features of the printer are as follows: 1. High speed printing: 180mm per second max. 2. -
Page 4: Chapter 1. Setting Up The Printer
Chapter 1. Setting up the Printer 1-1. Unpacking Your printer box should include these items. If any items are damaged or missing, please contact your dealer for assistance. RP-3180 Roll paper Operator s M anual Power cord 1-2. Installing the printer Avoid locations in direct sunlight or subject to excessive heat. -
Page 5: Chapter 2. Connecting The Cables
Chapter 2. Connecting the cables 2-1. Connecting the AC Cable NOTE:To remove the DC cable connector, make sure that the power supply s power cord is unplugged; then grasp the connector at the arrow and pull it straight out. 2-2. Connecting the AC adapter to the printer You can connect up the three cables to the printer. -
Page 6: Chapter 3. Installing The Roll Paper
Chapter 3. Installing the roll paper 3-1. Installing or Replacing the Paper Roll 1. Make sure that the printer is not receiving data; otherwise, data may be lost. 2. Open the paper roll cover by pressing the cover-open button. 3. Remove the used paper roll core if there is one. 4. -
Page 7: Chapter 4. The Self Test
Chapter 4. The self test The self-test checks whether the printer has any problems. If the printer does not function properly, contact your dealer. 1. Make sure paper roll has been installed properly. 2. Turn on the power while holding down the FEED button. The self-test begins. 3. -
Page 8: Chapter 7.Interface
Chapter 7.Interface RS-232C Cable Connection PRINTER HOST SIDE(25P) SIDE(9P) (F.G) (F.G) (TXD) (TXD) (RXD) (RXD) (RTS) (CTS) (DSR) (DSR) (DTR) (DTR) (S.G) (S.G) Interface Connector Serial Interface (RS-232) Pin No Signal name Direction Function Frame Ground Output Transmit Data Input Receive Data Output Ready To Send... -
Page 9: Chapter 8. Specification
Chapter 7.Specification Printing method Thermal line printing Dot density 203 dpi 203 dpi ( 8 8 dots/mm) Printing width 72 mm {2.83"}, 576 dot positions Characters per line 48 (default) or 72 Character size 1.25 3.00 mm Number of characters Alphanumeric characters: 95 Print speed Approx. -
Page 10: Descriptions Of Each Item
8-2 Descriptions of Each Item [Name] The name of the command. [Format] The code sequence. [Range] Gives the allowable ranges for the arguments. [Description] Describes the command's function. [Details] Describes the usage of the command in detail. [Default] Gives the default values, if any, for the command parameters. [Example] Gives examples of how to use the command. - Page 11 [Details] If the values of m is out of the specified range, n1 and data following are processed as normal data. The n1 and n2 indicate the number of dots of the bit image in the horizontal direction. The number of dots is calculated by n1 + n2 x 256. If the bit-image data input exceeds the number of dots to be printed on a line, the excess data is ignored.
- Page 12 ESC H n [Name] Select character Double-height mode [Format] ASCII Decimal [Range] [Description] Select character Double-height mode. ESC I [Name] Select character Double-height mode [Format] ASCII Decimal [Description] Select character Double-height mode. ESC J n [Name] Print and feed paper [Format] ASCII ESC J n Hex 1B 4A n...
- Page 13 If the horizontal length or vertical length is 0, this command is canceled and the next data is handled as normal data. If the horizontal start point + horizontal length is greater than the horizontal printable area, the horizontal printable area - horizontal start point is taken as the horizontal length.
- Page 14 ESC m [Name] Partial cut [Format] ASCII Decimal [Description] Cut the paper partially. [Details] During cutting, printing and paper feeding is stopped. This command is valid only when an auto-cutter is connected. ESC p m n 1 n2 [Name] Generating the specified pulses [Format] ASCII Decimal...
- Page 15 n1 n2 d1...d(n1 x n2 x 8) [Name] Define downloaded bit image [Format] ASCII d1...d(n1 x n2 x 8) d1...d(n1 x n2 x 8) Decimal d1...d(n1 x n2 x 8) [Range] 255, 1 48, n1 x n2 [Description] Defines a downloaded bit image using the number of dots specified by n1 and n2 n1 specifies the number of dots in the horizontal direction.
- Page 16 GS v 0 m xL xH yL yH d1...dk [Name] Printing of raster bit image [Format] ASC II m xL xH yL yH d1...dk 76 30 xL xH yL yH d1...dk Decimal 118 48 xL xH yL yH d1...dk [Range] 3, 48 51, 0 255, 0...
- Page 17 For (2): n indicates the number of bar code data, and the printer processes n bytes from the next character data as bar code data. If n is outside of the specified range, the printer stops command processing and processes the following data as normal data. In standard mode: If d is outside of the specified range, the printer only feeds paper and processes the following data as normal data.
-
Page 18: Chapter 10. Printer Driver
Chapter 10. Printer Driver 10-1.How to use Logo Download Tool RP-3180 receipt printer supports Store Logo printing. You can download max four images into printer and select which one to print on receipt. 1) Install the driver for Logo Download Tool on Computer. 2) Run [Logo Download Tool]. -
Page 19: Setting Printer Properties
10-2.Setting Printer Properties The printer driver software can be found from CD disk packaged with printer. 1) Install the printer driver software. The printer driver should be installed according to following steps: Go to [Printers and Faxes] folder, click [Add a printer]; Click [next] according to the direction of installation;...
Need help?
Do you have a question about the MINI THERMAL RP-3180 and is the answer not in the manual?
Questions and answers