Table of Contents
Advertisement
Quick Links
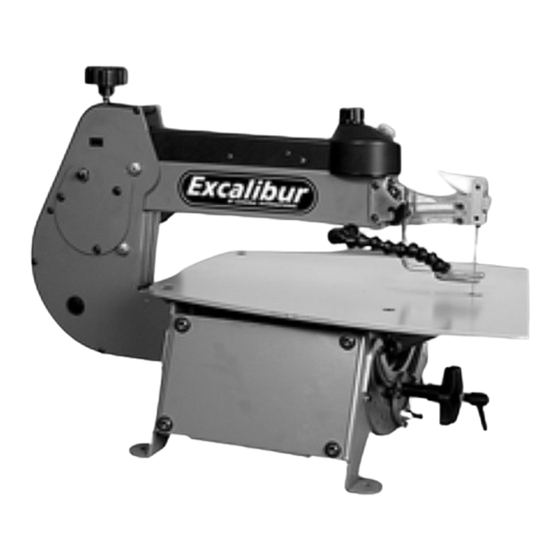
Head tilts 45° left and right, tilting the
blade, not the table keeping the work-
piece level for better control & more
accurate cuts.
16" throat capacity.
2" cutting thickness capacity.
Large 12" x 18 1/2" (305 x 470 mm) table
surface.
Quick blade changes with finger operat-
ed blade clamps, no tools required.
Easy access speed and tension controls.
Onboard dust blower.
LENGTH
27" (686 mm)
WIDTH
15" (380 mm)
HEIGHT
17" (432 mm)
BLADE TILT RANGE
0° TO 45° (TO RIGHT OR LEFT)
THROAT
16"(406 mm)
MAXIMUM CUTTING DEPTH
2" (53 mm)
SPEED (VARIABLE)
400 TO 1400 STROKES/MIN
TABLE SURFACE
12" x 18 1/2" (305 x 470 mm)
MOTOR
120 V, 1.3 A
WEIGHT
68 LBS (31 kg)
REVISION 1 - JUNE 28/10
© COPYRIGHT GENERAL INTERNATIONAL 06/2010
Advertisement
Table of Contents

Related Manuals for Excalibur EX-16

Summary of Contents for Excalibur EX-16
- Page 1 Head tilts 45° left and right, tilting the blade, not the table keeping the work- piece level for better control & more accurate cuts. 16" throat capacity. 2" cutting thickness capacity. Large 12” x 18 1/2” (305 x 470 mm) table surface.
- Page 2 ® International model EX-16, 16" Scroll Saw. This scroll saw has been carefully tested and inspected before shipment and if properly used and maintained, will provide you with years of reliable service. For your safety, as well as to ensure optimum performance and trouble-free operation, and to get the...
- Page 3 GENERAL & GENERAL INTERNATIONAL WARRANTY All component parts of General®, General® International and Excalibur by General International ® products are carefully inspected during all stages of production and each unit is thoroughly inspected upon completion of assembly. Limited Lifetime Warranty Because of our commitment to quality and customer satisfaction, General®...
-
Page 4: Table Of Contents
TABLE OF CONTENTS Rules for safe operation Maintenance, Adjustments & Servicing .....5 Handling ........16 Additional Safety Instructions for Scroll Saw Blade clamping thumbscrews/set screws . -
Page 5: Rules For Safe Operation
Rules for Safe Operation To help ensure safe operation, please take a moment to learn the machine’s applications and limita- tions, as well as potential hazards. General® International disclaims any real or implied warranty and hold itself harmless for any injury that may result from the improper use of its equipment. 12. - Page 6 Additional Safety Instructions Specific to this Scroll Saw Because each shop situation is unique, no list of safety guidelines can ever be complete. The most important safety feature in any shop is the knowledge and good judgement of the user. Use com- mon sense and always keep safety considerations, as they apply to your individual shop situation first and foremost in mind.
-
Page 7: Electrical Requirements
ELECTRICAL REQUIREMENTS Before connecting the machine to the power source, verify that the voltage of your power supply corresponds with the voltage specified on the motor I.D. nameplate. A power source with greater voltage than needed can result in serious injury to the user as well as damage to the machine. If in doubt, contact a qualified electrician before con- necting to the power source. -
Page 8: Identification Of Main Parts And Components
16” SCROLL SAW EX-16 IDENTIFICATION OF MAIN PARTS AND COMPONENTS OPPOSITE SIDE VIEW A- UPPER ARM TENSIONER BLADE TILT LOCKING LEVER B- VARIABLE BLADE SPEED CONTROL KNOB J- TILT HANDLE C- ON/OFF SWITCH K- ANGLE INDICATOR D- BLADE TENSION LEVER... -
Page 9: Unpacking
UNPACKING Carefully unpack and remove the scroll saw and its components from the box and check for damaged or missing items as per the list of contents below. NOTE: Please report any damaged or missing items to your General International distributor immediately. LIST OF CONTENTS A - SCROLL SAW..............1 B - POWER CORD ............1... -
Page 10: Attaching The Leveling Feet
ATTACHING THE LEVELING FEET INSTALLING THE OPTIONAL STAND Install the leveling feet as shown. Loosen the upper A If you prefer, an optional stand (item EX-21BS) is avail- and lower B nuts as needed to adjust the height of the able from your local General International dealer. -
Page 11: Installing Or Changing Blades
SKIP TOOTH Regular evenly spaced tooth pattern. Considered the most common of scroll saw blades, they are available in the widest range of sizes and provide a good combination of fast cutting action with good chip clearance and a relatively smooth finish. BLADE WIDTH THICKNESS... -
Page 12: Operating Instructions
ADJUSTING THE BLADE SPEED The Ex-16 Scroll Saw is equipped with a variable blade speed control which allows you to select or fine-tune to the exact blade speed required (from 400-1400 strokes per minute) for best results based on the type and thickness of material and type of blade being used. -
Page 13: Adjusting The Blower
Note: The EX-16 has a 16” throat that allow for a workpiece of up to 16” of clearance to swing completely around without hitting the back of the saw. If necessary, rough-cut the workpiece down to a workable size before starting intricate work on the scroll saw. -
Page 14: Fret Cutting
A. The EX-16 is a great tool for fret cutting because unlike most scroll saws it allows you to raise the upper arm with the blade attached, line up the guide hole in your workpiece with the... -
Page 15: Angle Or Bevel Cutting
A COMPLETE STOP BEFORE REACHING IN TO REMOVE WASTE MATERIAL FROM A FRET CUT. ANGLE OR BEVEL CUTTING One of the unique features of the EX-16 Scroll Saw is the ability to tilt the head of the saw in order to make angle or bevel cuts. -
Page 16: Maintenance, Adjustments & Servicing
MAINTENANCE, ADJUSTMENTS AND SERVICING HANDLING Never lift the saw by the upper arm assembly as this will Rather lift the saw by the front of the table and by the result in damage to the drivetrain. motor. BLADE CLAMPING THUMBSCREWS - SET SCREWS Over time with normal use and wear, especially when doing a lot of internal cutting where one end of the blade is frequently disconnected then reconnected to... -
Page 17: Squaring The Bade To The Table
SQUARING THE BLADE TO THE TABLE Depending on frequency of use and how much the tilting mech- anism is used, normal wear will over time cause the blade to come slightly out of alignment with the table. Periodically check the blade for square with the table. When needed, adjust as described in the following steps to re-align the blade square to the table. - Page 19 PARTS LIST - EX-16 (A) PART N0. DESCRIPTION SPECIFICATION EX21-A04 ALLEN SCREW #10-32X1/4 EX21-A05 SWITCH COVER EX21-A06 SWITCH EX21-A12 AIR NOZZLE EX21-A18 BOLT 1/4-20X1/2 EX21-A19 UPPER & LOWER TENSION PLATE EX21-A20 HOLD DOWN MOUNT PLATE EX21-A21 ALLEN SCREW #10-32X3/8 EX21-A22...
- Page 21 PARTS LIST - EX-16 (B) PART N0. DESCRIPTION SPECIFICATION EX21-B01 TRUNNION EX21-B03 REAR TRUNNION PLATE EX21-B04 FRONT TRUNNION PLATE EX21-B06 GROUND JUMPER EX21-B07 POWER CORD EX21-B08 SPONG BLOCK EX21-B09 POLYFOAM EX21-B10 SCREW 1/4-20UNCX1/2 EX21-B11 LOCK WASHER 1/4. EX21-B12 WASHER 1/4.
- Page 23 PARTS LIST - EX-16 (C) PART N0. DESCRIPTION SPECIFICATION EX21-C02 BALANCE BLOCK EX21-C03 SET SCREW M6X6 EX21-C04 ALLEN SCREW 1/4-20X1/2 EX21-C05 LOCK WASHER 1/4. EX21-C06 FLAT WASHER 1/4X16X1.8 EX21-C07 MOTOR COVER PLATE EX21-C08 SCREW M6X16 EX21-C09 BEARING 608ZZ EX21-C10 MOTOR CAM EX21-C11 M8XP1.25 LH...
- Page 24 MODEL EX-16 8360 Champ-d’Eau, Montreal (Quebec) Canada H1P 1Y3 Tel.: (514) 326-1161 Fax: (514) 326-5565 - Fax: (514) 326-5555 - Parts & Service / Order Desk orderdesk@general.ca www.general.ca IMPORTANT When ordering replacement parts, always give the model number, serial number of the machine and...
Need help?
Do you have a question about the EX-16 and is the answer not in the manual?
Questions and answers