Advertisement
Quick Links
π
H-5598
IGLOO PARTY BAR
TOOLS NEEDED
Wrench
Lid x 1
Rigid
Locking
Caster x 2
Caster x 2
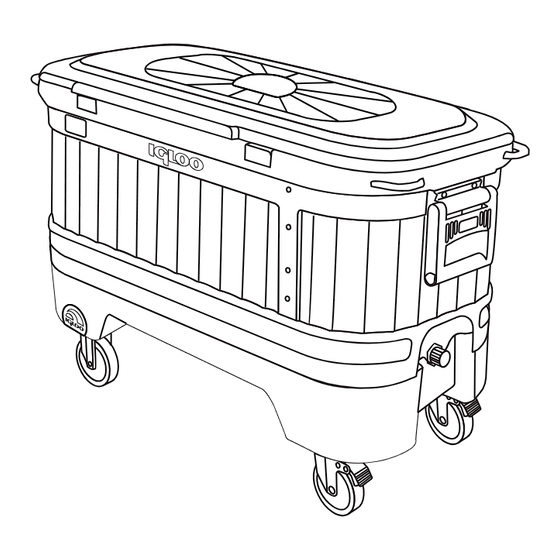
Figure 1
Short
Screws
Long Screws
PAGE 1 OF 3
1-800-295-5510
uline.com
Phillips
Screwdriver
Caster Mounting
Hardware x 16
INSTALLATION
Mounting
Bracket
Cooler
PARTS
Cooler x 1
Bottle
Short
Opener x 1
Screw x 2
1.
Remove two short screws and bottle opener from
bag. Line up the bottle opener with the two most
upper holes. Using the Phillips screwdriver, tighten
the short screws into the cooler. (See Figure 1)
NOTE: The holes are not pre-cut, but are
marked with indentations in the cooler wall.
2. Attach mounting bracket to cooler wall using the two
long screws. Make sure mounting bracket is upright
(See Figure 1)
NOTE: the holes are not pre-cut, but are
marked with indentations in the cooler wall.
Base x 1
Mounting
Long
Bracket x 1
Screw x 2
Cap Catch
Bin x 1
0316 IH-5598
Advertisement

Related Manuals for U-Line Igloo Party Bar


Summary of Contents for U-Line Igloo Party Bar
- Page 1 π H-5598 1-800-295-5510 uline.com IGLOO PARTY BAR TOOLS NEEDED Wrench Phillips Screwdriver PARTS Base x 1 Lid x 1 Cooler x 1 Rigid Locking Caster Mounting Bottle Short Mounting Long Cap Catch Caster x 2 Caster x 2 Hardware x 16...
- Page 2 INSTALLATION CONTINUED 3. Slide the cap catch bin onto the mounting bracket. Figure 2 (See Figure 2) 4. Connect the lid by pushing the three pins into the Figure 3 clips located on the cooler. (See Figure 3) 5. Flip the base upside down to install the rigid casters Locking using the caster mounting hardware.
- Page 3 INSTALLATION CONTINUED 10. Unscrew battery cover using the Phillips screwdriver Figure 6 and install four AA batteries (not included). Secure battery cover using the Phillips screwdriver. (See Figure 6) SAFETY • Do not sit on lid or stack heavy objects on lid. Doing •...
Need help?
Do you have a question about the Igloo Party Bar and is the answer not in the manual?
Questions and answers