Table of Contents
Advertisement
Advertisement
Table of Contents

Related Manuals for SainSmart GENMITSU 3018-PROVer

Summary of Contents for SainSmart GENMITSU 3018-PROVer
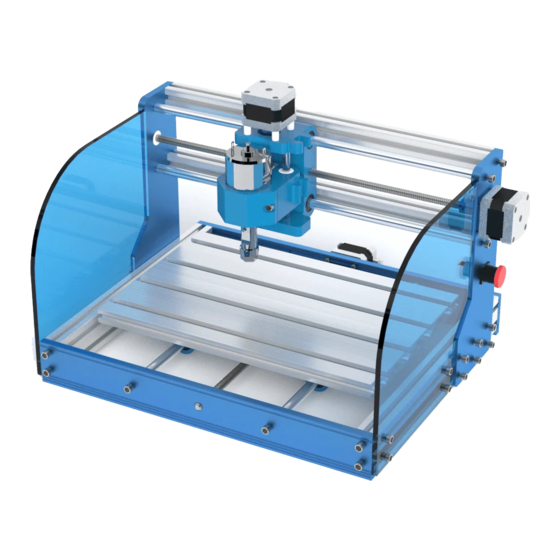
- Page 1 GENMITSU CNC ROUTER 3018-PROVer USER MANUAL...
- Page 2 Contents ............................Welcome ............................Warnings ............................Parts List ........................ Finishing the Assembly ............................Wiring it up ........................... Final Checks ..........................A Brief Glossary ........................ Setting up the Software ............................. Testing ......................Using the Offline Controller...
- Page 3 • Sample files • Offline Controller control files These files can also be downloaded from the SainSmart Wiki Page http://wiki.sainsmart.com/index.php/101-60-3018PROVER which also contains some extra files such as wiring diagrams and Laser connections. Before attempting to assembly the 3018 PROVer, please watch the assembly video on the SD card that came with your machine.
- Page 4 • Use this CNC router under adult supervision if you are underage Any modification of the Router or the use of accessories provided by a third party will void any warranty. SainSmart does not accept any responsibility or liability for any use or misuse of the Router including any accessories.
- Page 5 Parts List NAME DETAILS PICTURE QTY. CODE Gantry assembly X and Z axes VER-1 Base assembly Y Axis VER-2 775 with ER11 Spindle Motor VER-3 Tool Holder ER11 Collet 3.175mm (1/8”) VER-4 Side Plates 5mm Acrylic VER-5...
- Page 6 Parts List NAME DETAILS PICTURE QTY. CODE SainSmart GRBL 1.8” screen VER-6 Offline Controller GRBL Motherboard With open case fitted VER-7 GC3D3 USB cable USB-A to USB-B VER-8 24V power supply 24V 5A VER-9 Power cable (US) 1.2M VER-10 Power cable (EU) 1.2M...
- Page 7 Parts List NAME DETAILS PICTURE QTY. CODE Offline Controller 50cm VER-13 Cable X LIM+ 15cm VER-14 X LIM- 53cm VER-15 Y LIM+ 30cm VER-16 Limit Switch Cables Y LIM- 60cm VER-17 Z LIM+ 34cm VER-18 Z LIM- 40cm VER-19 X Axis 17cm VER-20 Stepper motor Y Axis 52cm...
- Page 8 Parts List NAME DETAILS PICTURE QTY. CODE Work Clamp set VER-25 Z-Probe kit VER-26 20˚ V Bit, 3.175mm (1/8”) Engraving Bits VER-27 Shank. 2.0mm, 2.5mm, 3.0mm, Allen Keys VER-28 4.0mm, 5.0mm ER11 Spanners VER-29 Screwdriver VER-30 Gantry Alignment VER-31 tool VER-32 Cable Ties Cable holder...
- Page 9 Parts List NAME DETAILS PICTURE QTY. CODE Sealing strip 270mm VER-34 (Y Axis) Sealing strip VER-35 340mm (X Axis) 340mm Cable Protector VER-36 Contains: Manuals, Offline Controller Videos, Sample files and VER-37 Micro SD Card Offline Controller files. USB Micro SD VER-38 card reader User Manual...
- Page 10 Parts List NAME DETAILS PICTURE QTY. CODE Base Assembly 12*8*7 VER-40 Rubber Feet M5*10mm VER-41 M5 bolt M5*14mm VER-42 M6 bolt M6*16mm VER-43 M3*20mm VER-44 M3 screw M3*5mm VER-45 M3*8mm VER-46 T Nut 20M3 VER-47 T Nut 20M5 VER-48 ABS spacer 7mm*M3.2*14mm VER-49...
- Page 11 Finishing the Assembly Secure the Bed to the base assembly NAME CODE QTY. BEFORE VER-2 VER-43 x2Pcs Base assembly VER-2 Cutting here Parts Used M6 Bolts M6*16mm VER-43 Tools Allen Key (5mm) AFTER Slide the Aluminum Bed to align the holes on the threaded screw carrier over the pre-installed nuts in the center slot of the Bed.
- Page 12 Finishing the Assembly Install Y axis Limit switches and Cable Holders on the Base assembly NAME CODE QTY. BEFORE VER-2 Base assembly VER-2 VER-45 x10Pcs VER-12 x2Pcs Limit switch VER-12 Parts Used Cable holder VER-33 VER-33 x6Pcs Screw M3*5mm VER-45 Tools Screwdriver AFTER...
- Page 13 Finishing the Assembly Install the Anti Vibration feet on the Base Assembly NAME CODE QTY. BEFORE VER-2 Base assembly VER-2 VER-40 x4Pcs Parts Used Rubber Feet VER-40 Tools Allen Key (3mm) AFTER Screw them in firmly, do not over tighten them as the Steps rubber can deform。...
- Page 14 Finishing the Assembly Install X axis Limit switches and Cable Holders on the Gantry Assembly NAME CODE QTY. BEFORE Gantry assembly VER-1 VER-1 VER-44 x2Pcs VER-12 x 2Pcs Limit switch VER-12 Cable holder VER-33 Parts Used ABS spacer VER-49 VER-49 x2Pcs VER-45 x 6Pcs Screw M3*5mm VER-45...
- Page 15 Finishing the Assembly Position the Gantry attachment Slider nuts NAME CODE QTY. BEFORE VER-49 x12Pcs Base assembly VER-2 Parts Used Slider nut 20*M5 VER-49 Tools Gantry Alignment Tool (VER-31) & Allen key AFTER Use an Allen key to insert into the holes of slider nuts and move each of them for certain distance.
- Page 16 Finishing the Assembly Install the Gantry assembly onto the Base Assembly NAME CODE QTY. BEFORE Base assembly VER-2 Parts Gantry assembly VER-1 Used Bolt M5*14 VER-42 VER-42 x12Pcs Tools Gantry Alignment Tool & Allen Key (4mm) AFTER This is a critical part of the assembly, at the end of this the gantry assembly should be vertical to the bed on the base assembly and in line with it horizontally.
- Page 17 Finishing the Assembly Install the Spindle Motor NAME CODE QTY. BEFORE Tighten VER-3 the screw Parts Spindle Motor VER-3 Used M4 bolt Tools Allen wrench (3mm) AFTER Loosen the M4 Clamping bolt on the spindle mount. Slide the spindle motor into the mount from the top. NOTE: This can be a very tight fit especially at first.
- Page 18 Finishing the Assembly Install the Motherboard NAME CODE QTY. BEFORE GRBL Motherboard GC3D3 VER-7 Parts Bolt M3*8mm VER-46 Used VER-7 VER-47 VER-46 T Nut 20*M3 VER-47 x4Pcs x4Pcs Tools Allen Key (2.5mm) AFTER Place the bolts into the holes on the motherboard back plate and screw the T Nuts on to the end of the bolt 30mm with the flat/stepped edge towards the motherboard.
- Page 19 Finishing the Assembly Install Side Plates NAME CODE QTY. BEFORE VER-5 x2Pcs VER-41 x8Pcs Side Plates VER-5 Parts Bolt M5*10mm VER-41 Used T Nut 20*M5 VER-48 VER-48 x8Pcs Tools Allen Key (4mm) AFTER Check the alignment of the plates to the bed and gantry assembly and peel off the protective Paper.
- Page 20 Finishing the Assembly Install Side Plates NAME CODE QTY. BEFORE Bed Clamp Set Includes: Clamping plates x 4 Parts Washers x 4 VER-25 Used Wing nuts x 4 T Nut 5mm x 4 M5 Screws 35mm x 8 Tools Optional, Thread lock (Not Included) AFTER Screw the wing nut onto a screw, add the washer and place the screw through the slot of the clamping plate...
- Page 21 Wiring it up General Wiring Notes Labeling Each cable is labeled at one end with its purpose and this corresponds to the markings of where it fits into the motherboard. The label end goes into the motherboard. Cable routing Most of the cables are static; they will not move as the router working, these must be routed so that in operation they are out of the way of the bed including anything which may be mounted on it and the spindle.
- Page 22 Wiring it up Motherboard Connections X Axis Y Axis Z Axis Spindle motor motor motor 0-5V spindle controller Power speed control signal supply 24V 5A PWM signal output USB connection Laser module Offline controller ESTOP PROBE X Y Z axis limit/home switch...
- Page 23 24V Power ON GND 0-5V 0-5V spindle controller speed control signal 24V Power OFF Spindle Spindle motor X Axis stepper motor Offline SainSmart Offline controller controller Y Axis stepper motor ESTOP Emergency stop button Z Axis stepper motor PROBE Z-Probe kit USB.PWR...
- Page 24 Wiring it up Connecting the X Axis Limit Switches NAME CODE QTY. VIEW 1 Limit Switch Cable X LIM+ 15cm VER-14 VER-15 Parts VER-14 Limit Switch Cable X LIM- 53cm VER-15 Used Sealing strip 340mm VER-35 Tools VIEW 2 Plug the short cable into the limit switch on the gantry by the stepper motor and the labeled end into the XLIM+ socket on the motherboard.
- Page 25 Wiring it up Connecting the Y Axis Limit Switches NAME CODE QTY. VIEW 1 Limit Switch Cable Y LIM+ 30cm VER-16 Limit Switch Cable Y LIM- 60cm VER-17 Parts Used Cable Ties VER-32 VER-17 VER-16 VER-34 Sealing strip 270mm VER-34 Tools VIEW 2 Plug the end of the long cable into the switch on the...
- Page 26 Wiring it up Connecting the Z Axis Limit Switches NAME CODE QTY. VIEW 1 Limit Switch Cable Z LIM+ 34cm VER-18 VER-18 Limit Switch Cable Z LIM- 40cm VER-19 VER-19 Parts Used Cable Protector VER-36 30cm Cable Tie VER-32 Tools VIEW 2 Cut a piece of the Cable Protector (~30cm) and slide both cables through it.
- Page 27 Wiring it up Connecting the Stepper motors NAME CODE QTY. VIEW 1 Stepper motor Cable X Axis 17cm VER-20 VER-22 Stepper motor Cable Y Axis 52cm VER-21 VER-20 Parts Stepper motor Cable Z Axis 28cm VER-22 Used Cable Ties VER-32 VER-21 Cable Protector VER-36...
- Page 28 Wiring it up Connecting the Spindle motor NAME CODE QTY. VIEW 1 Spindle motor Cable 35cm VER-23 VER-23 Parts Cable Ties VER-32 Used Cable Protector VER-36 25cm Tools VIEW 2 Cut a piece of the Cable protector ~25cm long and Slide the Spindle motor cable through it.
- Page 29 Wiring it up Connecting the X Axis Limit Switches NAME CODE QTY. VIEW 1 Parts Emergency Stop Button VER-24 Used VER-24 Tools VIEW 2 Remove the holding collar and square plate from the button then thread the wires through the hole in the gantry from the outside.
- Page 30 Final Checks Final Checks Lubricate the Threaded rods on all the axes, It is suggested to use a ‘Dry’ PTFE based lubricant or similar (Not included) to help stop any dust sticking to the rods. Lubricate the axes Note: Part of the normal maintenance is to periodically clean the threaded rods and re-lubricate as needed.
- Page 31 A Brief Glossary Glossary The aluminum base with slots to allow stock to be clamped to it. Moved by the Y axis. Stock Whatever material you secure to the bed and cut or engrave. Geometric Code, the language of the commands that the router understands, ca be used for G-Code specific commands or combined into a file (normally .nc) of instructions to make something.
- Page 32 All files referenced should be on your SD card or mini CD, if there are any problems with accessing these you can download them from http://wiki.sainsmart.com/index.php/101-60-3018PROVER Install the Windows Serial port driver Locate the Driver_CH340SER.EXE file and run it (you will need administrator privileges on your PC), follow the prompts provided.
- Page 33 Setting up the Software Connect your 3018-PROVer via the USB cable and start Candle. Ideally you should see something like the screenshot on the left, if not then the one on the right. The red Alarm state in the status box is actually good! The 3018-PROVer is fitted with limit switches and by default has ‘Homing’...
- Page 34 Setting up the Software Now check some other settings before we proceed: In the Machine Information section set/check the following: Rapid Speed 2000 Spindle Speed Min 10000 Spindle Speed Max Laser Power Min 10000 Laser Power Max And hit OK. Candle can be customized quite extensively using the settings panel, these are just the basic ones for the 3018-PROVer.
- Page 35 Testing In order to run a few quick tests click on the padlock icon in the Control section of Candle to unlock the machine, do not run a homing cycle at this point. The Alarm state should now be replaced with an Idle State Test 1 - All axes move in the right direction Note: X and Z axes are straightforward but the Y axis can be confusing as the bed moves, not the spindle.
- Page 36 Testing Test 4 - Homing Cycle Hit the Home icon in the Candle Control icons. The router will first move the Z axis to the top until it hits the limit switch, then it will move the spindle to the Front right of the bed. Each time it hits a limit switch it will back off slightly to disengage the switch. At the end the router status will be set to Idle.
- Page 37 Testing There are 2 variations of the G-Code required, one for use in Candle and the other in the probe.txt file used by the Offline Controller, this is just in the way they are formatted, not the content. In the examples shown below the default value for the Base Height is14.19mm, substitute this value with the one you measured. Candle In Candle select the Service/Settings menu and copy and paste the line below into the Control, Probe commands box replacing whatever was in there.
- Page 38 Testing To test the Z-probe operation: 1) Mount a bit into the spindle tool holder. 2) Jog the bit so it is over the center of one of the slots in the bed. NOTE: this is partly verifying the thickness measurement of the Z-Probe base, so if for any reason this is incorrect placing the bit over a slot will allow it to descend as needed minimizing any chance of damage to the bed or the bit.
- Page 39 Testing TROUBLESHOOTING Hopefully everything works as expected, but if not: Symptom Check The USB cable is inserted correctly. Candle shows a Serial port error The USB Driver has been installed correctly. message in the Console window The correct COM Port and a baud rate of 115200 are set in Candle. The Offline Controller is not connected.
- Page 40 Run a test engraving Start Candle and connect to the PROVer by the USB cable, make sure the 24V power supply is connected and the router is turned on. Load the sample G-Code file sainsmart.nc (File/Open). Run a homing cycle.
- Page 41 Testing Using jog commands position the bit on the XY axes to where you want the job to start and using the Origin Control button zero the XY axes. Place the Z-Probe base underneath the bit, connect the alligator clip to the bit and hit the Z-Probe origin control button. Remove the Z-Probe base and the alligator clamp and set them aside.
- Page 42 Testing TROUBLESHOOTING Hopefully everything works as expected, but if not: Symptom Check The depth of cut is uneven, only parts are cut. That the stock used is flat and level. The measurement of the Z-Probe base and that Candle and the probe.txt file for Nothing at all is cut or the cut is too deep.
- Page 43 Depending on the package you purchased with the 3018-PROVer an Offline Controller may be provided. If not this can be purchased separately from SainSmart The Offline Controller connects directly to the PROVer and is used to control the router, setting homing, origin position etc. and to send the contents of the files directly to the router without needing a PC connected to it via a USB cable.
- Page 44 Using the Offline Controller Setting up the Z-Probe Measure the thickness of the Z Probe base as accurately as you can, this can vary slightly due to manufacturing and assembly tolerances. This thickness needs to be in mm and preferably accurate to .01mm.
- Page 45 Using the Offline Controller Navigating The offline controller is powered from the Router Motherboard, no batteries or other power supply is needed. Plug the cable into the offline controller and the Router motherboard. Connect the router to the 24V external power supply and turn it on. The Main menu will be shown as below.
- Page 46 Using the Offline Controller Menus Highlight the File or Control menu by using Select and then press Enter. Control Menu Function Description Spindle/ Turn on the spindle or laser, to turn off select Reset and enter. Laser Send Z-Probe commands to automatically zero the Z Axis at the bottom of the Z-Probe Base.
- Page 47 Using the Offline Controller File Menu Presents a series of pages displaying the files on the SD card, scroll down (or back up) the list until the file you want is highlighted. The Step and Jog functions are active in this menu. Function Description STEP...
- Page 48 Using the Offline Controller Run a File When a file is selected from the File menu the following menu will be shown with the state shown as Stop. Jog and step buttons are disabled on this menu and while running a file. Press the Enter button to run the file: The Percent: value shows the percentage of the commands in the file that have been sent to the Router, not the time taken to complete the Job.
- Page 49 Using the Offline Controller Summary of running a file using the Offline Controller 1) Go to the Control Menu 2) Using the Step button to control the distance moved and the Jog buttons position the bit to the work origin in the X and Y axes and select the Zero XY command and hit enter.
- Page 50 2711 Centerville Road, Wilmington, DE, 19808, United States...
Need help?
Do you have a question about the GENMITSU 3018-PROVer and is the answer not in the manual?
Questions and answers