Vernier LabQuest 2 User Manual
Hide thumbs
Also See for LabQuest 2:
- Quick start manual (2 pages) ,
- Reference manual (49 pages) ,
- Quick start manual (15 pages)
Table of Contents
Advertisement
Quick Links
Advertisement
Table of Contents

Related Manuals for Vernier LabQuest 2


Summary of Contents for Vernier LabQuest 2
- Page 1 LabQuest 2 – User Manual ® Version 2.8.5 May 2019...
- Page 2 ABOUT THIS GUIDE LabQuest 2, released in March 2012, ships with a Quick-Start Guide to get you started with basic data collection and analysis. The LabQuest 2 User Manual is an extended guide detailing the features, hardware, and software of LabQuest 2.
- Page 3 ® LabQuest 2 User Manual SAFETY INFORMATION Federal Communication Commission Interference Statement This equipment has been tested and found to comply with the limits for a Class B digital device, pursuant to Part 15 of the FCC rules. These limits are designed to provide reasonable protection against harmful interference in a residential installation.
- Page 4 ® LabQuest 2 – User Manual IC Statement This device complies with Industry Canada license-exempt RSS standard(s). Operation is subject to the following two conditions: (1) this device may not cause interference, and (2) this device must accept any interference, including interference that may cause undesired operation of the device.
-
Page 5: Table Of Contents
Setting Up Data Sharing on LabQuest ................32 Connecting to LabQuest 2 from Your Device ..............37 USING LABQUEST 2 WITH A COMPUTER OR CHROMEBOOK™ VIA USB ....... 39 Collecting Data with Logger Lite, Logger Pro 3, or Graphical Analysis™ 4 ....39 ... - Page 6 ® LabQuest 2 – User Manual APPENDICES ............................. 49 Appendix A – LabQuest 2 Technical Specifications ............49 Appendix B – LabQuest Maintenance ................50 Appendix C – LabQuest Keyboard ..................52 Appendix D – License Information ..................53 ...
-
Page 7: Getting Started With Labquest 2
® GETTING STARTED WITH LABQUEST What’s Included LabQuest 2 interface Rechargeable battery (in unit) AC power adapter Computer connection (USB) cable Quick-Start guide Stylus (in unit) Stylus tether Using LabQuest for the First Time Install the Battery LabQuest ships with the battery in place;... - Page 8 ® Getting Started with LabQuest 2. Connect an analog sensor to the CH 1 port on LabQuest or connect a digital sensor to the DIG 1 port. LabQuest App will auto-ID the connected sensor and automatically set the default collection rate for the sensor.
- Page 9 ® LabQuest 2 – User Manual Curve Fit To fit a curve to the selected data on the Graph screen, choose Curve Fit from the Analyze menu. Select the check box to select a data column. Tap Choose Fit and choose the desired fit equation. LabQuest automatically determines and displays the fit coefficients, and displays a preview of the curve fit on the graph.
-
Page 10: Labquest 2 Hardware
® LABQUEST 2 HARDWARE Once LabQuest is connected to AC power or the battery has charged, press the power button located on the top of the unit, near the left edge. LabQuest will complete its booting procedure and automatically launch the LabQuest App by default, as shown above. If the screen momentarily shows a charge battery icon or does not light after a moment when used on battery power, connect the power adapter to LabQuest and to an AC power source, then try the power button again. -
Page 11: Touch Screen
® LabQuest 2 – User Manual Touch Screen LabQuest has an LED backlit resistive touch screen that quickly responds to pressure exerted on the screen. LabQuest is controlled primarily by touching the screen. The software is designed to be finger-friendly. In some situations, you may desire more control for precise navigation. In such cases, we recommend using the included stylus. - Page 12 ® LabQuest 2 Hardware Audio ports are also located adjacent to the digital ports, as well as a microSD card slot for expanding disk storage. On the side opposite of the analog ports, there is a stylus storage slot, an AC power port for recharging the battery, and a mini USB port for connecting LabQuest to a computer.
-
Page 13: Internal Sensors
® LabQuest 2 – User Manual Internal Sensors LabQuest also has several built-in sensors, including GPS, microphone, three-axis accelerometer, temperature sensor, and relative light sensor. To enable internal sensors within LabQuest App, choose Sensor Setup from the Sensors menu. Within the Sensor Setup dialog box, select a check box to enable the associated sensor. - Page 14 ® LabQuest 2 Hardware – The internal temperature sensor Temperature monitors ambient temperature. The sensor is located between CH2 and CH3, in front of the BTA connectors. – The internal light sensor is located on the front of LabQuest, to the left of the Light Sensor screen.
-
Page 15: Labquest App
® III. LABQUEST The data-collection and analysis software, LabQuest App, is the heart of LabQuest. When you turn on LabQuest, the LabQuest App starts automatically. If the LabQuest App is not displayed on your screen, launch LabQuest App from the Home screen. Navigating LabQuest App LabQuest App has five different screens. -
Page 16: File Menu
– Access one of over 100 Lab Instructions screen preloaded experiments for paperless instructions. For detailed instructions on accessing the preloaded experiments on LabQuest, see Viewing Vernier Lab Instructions. – Record observations about your Notes screen experiment. For more information, see Adding Notes to Your Experiment. - Page 17 ® LabQuest 2 – User Manual – Choose Open from the File menu to display a Open list of files that you have saved on LabQuest. To open a file, tap the file name, then tap Open. To open a file from an external storage source, tap the source icon ( USB, SD) to display the files available on that...
-
Page 18: Data Collection
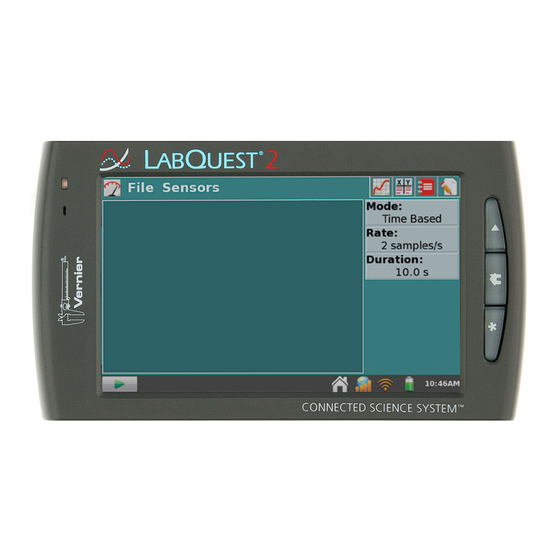
® LabQuest Number of Points for Derivative Calculations Calculated columns, curve fits, modeled functions, and even the automatic setup for sensors (e.g., Motion Detectors) may use numerical derivatives. The algorithm for such derivatives utilizes a user-defined number of points. The default value of seven points is good for many experiments, but you may want to choose a larger number for human-scale Motion Detector experiments (e.g., our Motion Match lab), or a smaller number for cart-based Motion Detector experiments (e.g., our Impulse and Momentum experiment). - Page 19 ® LabQuest 2 – User Manual Data-Collection Summary A summary of the data-collection settings (Mode, Rate, Duration) is shown in the panel to the right of the Meter screen. For most sensors, the default data- collection mode is Time Based. The default collection rate for the connected sensor is automatically set up when LabQuest identifies the sensor.
- Page 20 ® LabQuest – Choose Data Collection from the Data Collection Sensors menu to set the data-collection mode and associated parameters. The parameters listed will depend on the mode selected. Data-collection modes include Time Based, Events with Entry, Selected Events, Photogate Timing, Full Spectrum, Gas Chromatograph, Drop Counting, and Data Matrix.
- Page 21 ® LabQuest 2 – User Manual – Triggering is only available in the Triggering Time Based mode. When enabled, LabQuest waits for a trigger condition to be met before recording data collection. To set the trigger condition, choose the sensor and set the threshold condition.
- Page 22 You have two options for ending data collection in this mode: tap Stop, or end collection after a defined number of events. A block/unblock pair counts as two events. Choose the proper Photogate Mode for your experiment. For more information, see www.vernier.com/til/3329...
- Page 23 For more detailed information on the Vernier Mini Gas Chromatograph, see www.vernier.com/gc2-mini/ – This mode is used with the Vernier Drop Counter. When using Mode: Drop Counting this mode, data points are recorded every time a drop is detected by the drop counter.
- Page 24 ® LabQuest – Use Wireless Device Setup Wireless Device Setup to connect to wireless sensors and interfaces, such ® ® as our Go Direct sensors, Go Wireless Heart Rate, Go Wireless Link, or Wireless Dynamics Sensor System. – Choose Wireless Device Setup ► Go Direct…...
- Page 25 ® LabQuest 2 – User Manual – Choose Wireless Device Setup ► Go Wireless Go Wireless from the Sensors menu to scan for and select Go Wireless sensors such as Go Wireless Heart Rate, Go Wireless Temp, Go Wireless pH, or Go Wireless Link. Select the name of your sensor from the list, and tap OK.
- Page 26 Calibrate tool accessible from the Sensors menu. Follow the detailed calibration instructions provided in the sensor booklet available online at www.vernier.com/support/manuals – Choose Zero from the Sensors menu to set the current sensor reading to zero. This Zero adds an offset to the current reading.
- Page 27 ® LabQuest 2 – User Manual Graph Settings LabQuest App displays the Graph screen when data collection begins. From this screen, you can adjust graph settings. You can choose what is plotted, how the graph is scaled, and how the data are formatted. ...
-
Page 28: Data Analysis
® LabQuest Data Analysis You can analyze data from the Graph screen or the Table screen Examining Data on the Graph Screen To examine data on the Graph screen, tap on a data point of interest. The Examine cursor jumps to the data point with the nearest x-value. - Page 29 ® LabQuest 2 – User Manual Once data collection has ended, zoom options are also available. – Select a region on the graph, then tap Zoom In Zoom In to automatically adjust the axes for viewing the selected region. ...
- Page 30 ® LabQuest Analyzing Data from the Graph Screen The Analyze menu on the Graph Screen gives you access to additional tools such as tangent lines, integrals, statistics, and curve fits. To apply one of these tools, choose the desired tool from the Analyze menu.
- Page 31 ® LabQuest 2 – User Manual – The Delta tool opens a preview window Delta where you can examine x- and y-deltas. Choose Delta from the Analyze menu to open the preview window. Then, tap-and-drag to create a box overlaid on the graph.
- Page 32 – This tool calculates the integral for a selected portion of a graph. It is Peak Integration most commonly used with the Vernier Mini GC, but it can be applied to any data plot. Peak Integration differs from the Integral tool in that it does not use the x-axis as the baseline.
- Page 33 New Position Match or New Velocity Match. Remove Match removes the target graph. TIP! For additional information on using Motion Detectors, see www.vernier.com/til/5. Adjusting the Table View In addition to viewing and manipulating data from the Graph screen, you can also access data from the Table screen.
- Page 34 ® LabQuest Manipulating Data from the Table Screen From the Table menu, you can create, modify, or delete columns of data. The following tools are available from the Table menu: – New Manual Column creates New Manual Column an empty column where you can enter or generate values directly.
-
Page 35: Viewing Vernier Lab Instructions
Viewing Vernier Lab Instructions From the Lab Instructions screen, selectable by tapping the Lab Instructions tab , students can view select experiment instructions from Vernier lab books. LabQuest comes preloaded with over 100 experiments. Opening Vernier Lab Instructions From the Lab Instructions screen, choose View Lab Instructions from the View menu. -
Page 36: Adding Notes To Your Experiment
LabQuest, or to an external storage device such as a USB flash drive or microSD card. LabQuest App files can also be opened and manipulated on a computer with Vernier Logger Lite or ® Logger Pro 3 software. -
Page 37: Exporting Labquest App Files
® LabQuest 2 – User Manual Exporting LabQuest App files In some cases, you may wish to export the LabQuest App file in a text format (.txt) for further ® analysis within a program other than Logger Lite or Logger Pro To do this, choose Export from the File menu. -
Page 38: Data Sharing: Using Labquest 2
Android™ tablets and phones. How Data Sharing Works Students in a lab group set up an experiment with Vernier sensors and LabQuest 2. Students use Graphical Analysis 4 app to wirelessly connect to the LabQuest 2 using Wi-Fi. - Page 39 If prompted, enter your network’s passphrase and tap Connect. TIP! If your network requires additional network authentication information or if you have an enterprise network that requires a network certificate, see our website for more instructions: www.vernier.com/til/2836...
- Page 40 If you do not have access to an existing Wi-Fi network, or are not permitted to access your school's network, you can quickly and easily set up a network with LabQuest 2. TIP! Students can connect to a LabQuest Network with their mobile devices. This network will not support access to the Internet.
- Page 41 ® LabQuest 2 – User Manual c. Verify LabQuest is attempting to create a network. The network status should indicate “Connecting.” d. Verify LabQuest has successfully created a network. The network status should change to a numeric IP address. When LabQuest has successfully created a network, tap OK to return to the Connections app.
- Page 42 ® Data Sharing: Using LabQuest Tap the Name field to edit the LabQuest name (e.g., LabQuest1). Tap Done to save the name. 3. From the Connections app, tap the Data Sharing gear to open the Data Sharing Settings dialog box. 4.
-
Page 43: Connecting To Labquest 2 From Your Device
3. From the New Experiment dialog, select Data Sharing. Discovered Data Sharing Sources will be listed automatically. 4. Tap the name of the LabQuest 2 source to connect. If your LabQuest 2 source is not listed in Data Sharing sources, you can connect by choosing Specify Source and manually entering the LabQuest Data Sharing source address, or scanning the QR Code. - Page 44 1. Launch the Connections app from the Home screen. 2. Connect your mobile device to the same Wi-Fi network to which you connected LabQuest 2. 3. On your computer, Chromebook™, or mobile device, open a supported browser and enter the Data Sharing Source Address.
-
Page 45: Using Labquest 2 With A Computer Or Chromebook™ Via Usb
Collecting Data with Logger Lite, Logger Pro 3, or Graphical Analysis™ 4 LabQuest 2 can be used as a sensor interface with a computer or Chromebook. To collect data, follow these steps: 1. Connect a sensor to LabQuest. 2. Connect LabQuest to your computer or Chromebook using the included USB cable. The mini end of the cable connects to LabQuest and the full-sized end connects to an available USB port on your computer or Chromebook. -
Page 46: Transferring Data From Labquest To Graphical Analysis 4
Transferring Data from LabQuest to Graphical Analysis 4 Collected data can only be transferred from LabQuest to Graphical Analysis 4 through wireless Data Sharing via Wi-Fi. You cannot access data saved on LabQuest 2 through a USB connection. For more information on Data Sharing, see... -
Page 47: Emailing From Labquest 2
TIP! This is used to access the outbound email server associated with this email account required for sending emails. You cannot receive incoming emails on LabQuest 2. 6. Follow the on-screen prompts to register LabQuest with your email provider (e.g., Gmail). -
Page 48: Printing From Labquest 2
Wi-Fi network. In addition, if a printer is not available, you can use the Print to File option to save a PDF file on a USB drive or microSD card to print at a later time. For a list of compatible printers, see www.vernier.com/til/1659 To print to a compatible printer for the first time, follow the Printer Setup instructions below. - Page 49 5. Select a driver for your printer. For more information on determining which driver you should select, see www.vernier.com/til/3657 Troubleshooting Even if a driver is found, printing may still fail due to an incompatible printer. If you are sure that the printer is compatible and you are still getting an error, it may be caused by one of the following conditions: out of paper, out of ink/toner, a door on the printer is ajar, a paper jam, or you may have selected the wrong printer on the Print Options screen.
-
Page 50: Projecting And Monitoring Students' Labquest 2 Devices
LabQuest Viewer can be used in conjunction with a projector to share the LabQuest 2 screen with the entire class. Instructors can demonstrate LabQuest 2 for a class, and students can share or present their work to fellow classmates. - Page 51 ® LabQuest 2 – User Manual 3. Tap the Viewer settings gear to open the Viewer Settings dialog box. 4. Enable LabQuest Viewer (On). 5. Select the check box to Allow screen control. 6. Tap OK to exit the LabQuest Viewer settings.
-
Page 52: Additional Apps On Labquest 2
® ADDITIONAL APPS ON LABQUEST Several accessory applications can be launched from the Home menu. It is not necessary to quit LabQuest App to use these accessories; to return to LabQuest App, either close the accessory using the close button in the upper right corner of the screen, or switch to the LabQuest App by tapping LabQuest App on the Home screen. -
Page 53: Periodic Table
Power Amplifier From the Home screen, tap Power Amplifier to launch this app. The Power Amplifier app controls the Vernier Power Amplifier (order code PAMP) used to create waveforms with up to 10 V amplitude and currents of 1 A. -
Page 54: Camera App
From the Home screen, tap Accessories, and then tap Camera App to launch this app. The Camera App works with digital (USB) cameras. See www.vernier.com/til/3659 for more information regarding supported digital cameras. Use the Camera App to view a live image feed from the camera as well as capture images for later viewing. -
Page 55: Appendices
APPENDICES Appendix A – LabQuest 2 Technical Specifications Minimum Sampling Rate Display 0.00125 samples/s (800 s/sample) 11.2 cm × 6.7 cm (13.1 cm diagonal) screen Environmental Durability 800 × 480 pixel color display at 188 dpi Operating Temperature: 0 – 45°C ... -
Page 56: Appendix B - Labquest Maintenance
Appendices Appendix B – LabQuest Maintenance LabQuest Battery LabQuest uses a high-quality lithium-ion battery. This is the same chemistry used in premium laptop and cell phone batteries, and you can expect similar performance. There is never a need to condition the battery by regular full discharge/charge cycles. Use only the supplied AC adapter or optional Charging Station... - Page 57 Getting Additional Help For access to user manuals, forums, and our Technology Information Library, please visit our website at www.vernier.com/labq2 If you are located in the United States or Canada, you may also contact Vernier directly: 888.837.6437 support@vernier.com www.vernier.com/labq2 Otherwise, please contact Vernier International: 941.349.1000...
-
Page 58: Appendix C - Labquest Keyboard
Appendices Appendix C – LabQuest Keyboard LabQuest App automatically displays the keyboard when text can be entered. Standard The standard keyboard displays lowercase letters. To capitalize letters, use the Shift key . To delete the previous entry, use the Backspace key . -
Page 59: Appendix D - License Information
The LabQuest battery is a consumable, and as such, Vernier warrants this product to be free from defects in materials and workmanship for a period of one year from the date of shipment to the customer. -
Page 60: Appendix G - Accessories, Replacement Parts, And Related Products
® ® Also available, LabQuest Viewer for iPad www.vernier.com/lq-view-ipad LabQuest Charging Station Charge and store up to four LabQuest 2 interfaces with this compact and affordable station. www.vernier.com/lq2-crg LabQuest 2 Lab Armor Add extra protection from spills and falls. www.vernier.com/lq2-armor... - Page 61 Replacement Battery for LabQuest 2 Replacement high-capacity, rechargeable, lithium-ion battery for the Vernier LabQuest 2. One battery is included with each LabQuest 2. www.vernier.com/lq2-bat LabQuest Power Supply Replacement power supply for the LabQuest One power supply is included with each LabQuest 2. www.vernier.com/lq-ps...
- Page 62 Appendices Vernier Software & Technology 13979 S.W. Millikan Way Beaverton, OR 97005-2886 Toll Free (888) 837-6437 (503) 277-2299 FAX (503) 277-2440 support@vernier.com www.vernier.com/ Version 2.8.5 Revised May, 2019 Logger Pro, Logger Lite, LabQuest, Connected Science System, LabQuest Viewer, Go Wireless, Go Direct, Graphical Analysis, and other marks shown are our trademarks or registered trademarks in the United States.
Need help?
Do you have a question about the LabQuest 2 and is the answer not in the manual?
Questions and answers