Table of Contents
Advertisement
Available languages
Available languages
Quick Links
Instrukcja obsługi wizjera cyfrowego
User Instructions for Digital Door Eye
21.05.2013
Bruksanvisning för digitalt dörröga
Bruksanvisning for digitalt kikkhull
SV
Bruksanvisning i original
NO
Bruksanvisning i original
PL
Instrukcja obsługi w oryginale
EN
Installation instructions in original
340-171
© Jula AB
Advertisement
Table of Contents

Summary of Contents for Hard Head 340-171
- Page 1 Bruksanvisning för digitalt dörröga Bruksanvisning for digitalt kikkhull Instrukcja obsługi wizjera cyfrowego User Instructions for Digital Door Eye 340-171 Bruksanvisning i original Bruksanvisning i original Instrukcja obsługi w oryginale Installation instructions in original 21.05.2013 © Jula AB...
-
Page 2: Tekniska Data
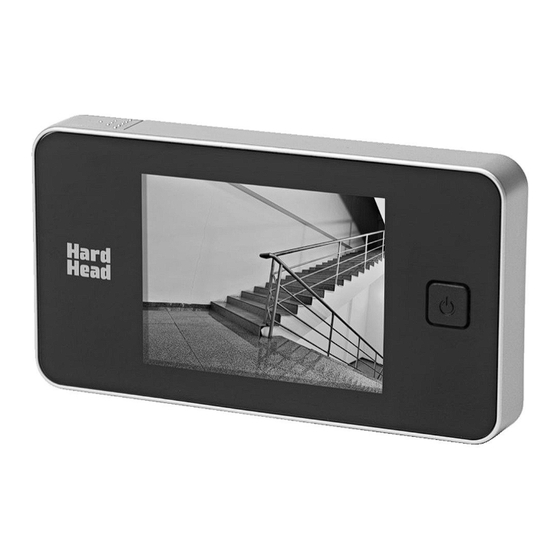
SVENSKA SVENSKA Läs bruksanvisningen noggrant innan montering! Spara bruksanvisningen för framtida referens. TEKNISKA DATA Passar alla dörrar med tjocklek: 30–110 mm Håldiameter 14–22 mm Sensor 0,3 megapixel, CMOS Display (LCD) 3,2” TFT Strömförsörjning 2 st. AAA-batterier (ingår ej) Mått (B x H x D) 125 x 68 x 15 mm Vikt 160 g... -
Page 3: Före Montering
SVENSKA Före montering Sätt i batterierna (ingår inte) innan apparaten monteras. Installation Demontera det befintliga dörrögat eller borra ett hål (Ø 14 mm) i dörren vid ögonhöjd. Placera brickan mellan kamerans baksida och dörren och för in kameran genom dörren utifrån. Kontrollera att pilen på... - Page 4 SVENSKA HANDHAVANDE Strömbrytare Tryck på strömbrytaren. Apparaten är aktiv i 10 sekunder. Indikeringslampa Byt batterier när indikeringslampan tänds. Installation and replacement of the batteries Slide the cover left to open. Install the batteries in accordance with the +/- sign. Reverse this process to close the cover. Rätten till ändringar förbehålles.
-
Page 5: Tekniske Data
NORSK NORSK Les bruksanvisningen nøye før montering! Ta vare på bruksanvisningen for fremtidig referanse. TEKNISKE DATA Passer til alle dører med tykkelse: 30–110 mm Hulldiameter 14–22 mm Sensor 0,3 megapiksel CMOS Display (LCD) 3,2” TFT Strømforsyning To AAA-batterier (ikke inkl.) Mål (B x H x D) 125 x 68 x 15 mm Vekt... -
Page 6: Før Montering
NORSK Før montering Sett inn batteriene (ikke inkl.) før apparatet monteres. Montering Demonter det eksisterende kikkhullet eller bor et hull (Ø 14 mm) i døren i øyehøyde. Plasser skiven mellom baksiden på kameraet og døren og før kameraet inn gjennom døren fra utsiden. Kontroller at pilen på... - Page 7 NORSK BRUK Strømbryter Trykk på strømbryteren. Apparatet er aktivt i 10 sekunder. Indikatorlampe Skift batterier når indikeringslampen tennes. Innsetting og skifte av batterier Skyv lokket mot venstre for å åpne. Sett batteriene inn med riktig polaritet i henhold til merkingen i batterirommet. Legg dekselet på...
-
Page 8: Dane Techniczne
POLSKI POLSKI Przed montażem uważnie przeczytaj instrukcję obsługi! Zachowaj niniejszą instrukcję obsługi w celu przyszłego użycia. DANE TECHNICZNE Pasuje do wszystkich drzwi 30–110 mm o grubości: Średnica otworu 14–22 mm Czujnik 0,3 megapiksela CMOS Wyświetlacz (LCD) 3,2” TFT Zasilanie 2 baterie AAA (nie wchodzą w skład zestawu) Wymiary (szer. -
Page 9: Przed Montażem
POLSKI Przed montażem Przed zamontowaniem urządzenia włóż baterie (nie wchodzą w skład zestawu). Instalacja Zdemontuj stary wizjer lub wywierć otwór (Ø14 mm) w drzwiach na wysokości oczu. Umieść podkładkę między tyłem kamery a drzwiami i wprowadź kamerę zewnątrz. Sprawdź, czy strzałka z przodu kamery skierowana jest w górę. -
Page 10: Wkładanie I Wymiana Baterii
POLSKI OBSŁUGA Przełącznik Naciśnij przełącznik. Urządzenie włączy się w ciągu 10 sekund. Lampka kontrolna Gdy zapali się lampka kontrolna, wymień baterie. Wkładanie i wymiana baterii Przesuń pokrywkę w lewo, aby otworzyć. Włóż baterie odpowiednimi biegunami, zgodnie z oznaczeniem wewnątrz przegródki na baterie. Ponownie załóż... -
Page 11: Technical Data
ENGLISH ENGLISH Read the User Instructions carefully before installation. Save these instructions for future reference. TECHNICAL DATA Fits all doors with thickness of: 30–110 mm Hole diameter 14–22 mm Sensor 0.3 megapixel, CMOS Display (LCD) 3.2” TFT Power supply 2 x AAA batteries (not included) Dimensions (W x H x D) 125 x 68 x 15 mm Weight... -
Page 12: Before Installing
ENGLISH Before installing Insert the batteries (not included) before installing the appliance. Installation Remove the existing door eye, or drill a hole (Ø 14 mm) in the door at eye level. Place the washer between the back of the camera and the door and insert the camera through the door from outside. -
Page 13: Inserting And Replacing Batteries
ENGLISH Power switch Press the power switch. The appliance activates in 10 seconds. Status light Replace the batteries when the status light goes on. Inserting and replacing batteries Press the cover to the left to open. Insert the batteries with the correct polarity as shown by the markings inside the battery compartment.
Need help?
Do you have a question about the 340-171 and is the answer not in the manual?
Questions and answers