Table of Contents
Advertisement
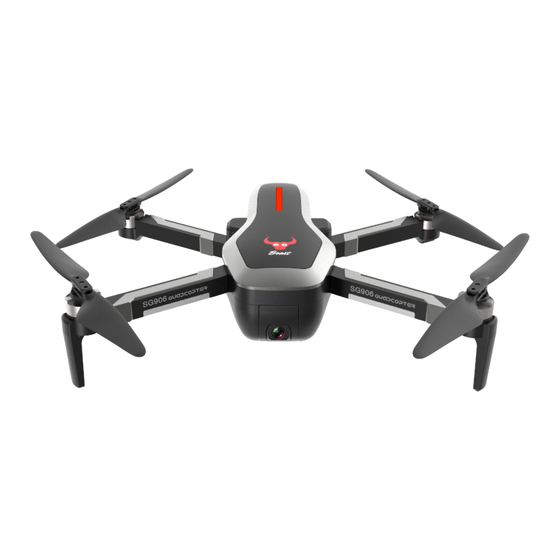
4K Full HD Image transmission200-300M
Farther. Faster. Clearer
(Please confirm that the mobile phone used supports 5G WiFi standard)
Gesture control
Follow the flight
Brushless Motor
(1806 1500KV)
SG906
User manual
Gesture photo
One-button return
Independent ESC
(Card protection, high
temperature protection)
Gesture recording
4K 5G WIFI
camera
Two-way 2.4GHz
(remote signal weak signal
alarm, low pressure alarm)
Trajectory flight
GPS system
Advertisement
Table of Contents

Summary of Contents for Teeggi SG906
- Page 1 SG906 User manual 4K Full HD Image transmission200-300M Farther. Faster. Clearer (Please confirm that the mobile phone used supports 5G WiFi standard) Gesture control Gesture photo Gesture recording Trajectory flight Follow the flight One-button return 4K 5G WIFI GPS system...
-
Page 2: Important Statement
Important statement and safety guidelines You are welcome to purchase our products. In order to make it easier and more convenient for you to use this aircraft, please read this manual and then operate it. Please save this manual as well. After adjustment and maintenance reference. - Page 3 Please operate the flight crew to pay attention to flight safety, you must understand the responsibility of accidents caused by your negligence. ● Stay away from obstacles and people The remotely piloted aircraft has an indeterminate flight speed and state when flying, and is potentially dangerous. When flying, you must stay away from people, high-rise buildings, high-voltage power lines, etc., while avoiding flying in bad weather such as wind and rain and lightning.
-
Page 4: Basic Parameters
● Keep away from high speed rotating parts When the rotor of the aircraft is rotating at high speed, please keep the pilot, the surrounding crowd and objects away from the rotating parts to avoid danger and damage. ● Keep away from heat The remote control aircraft is made of metal, fiber, plastic, electronic components and other materials, so it should be kept away from heat sources, prevent sun exposure, and... -
Page 5: Propeller Installation
Aircraft Component 1.HD camera 4. LED lights 2. Propeller 5. Smart lithium battery 3. Motor 1.Propeller Installation Make sure all propellers are installed in the correct orientation as shown below. If the installation is wrong, the aircraft will not be able to fly normally. -
Page 6: Battery Installation
2. Aircraft Lithium Battery 1.Battery switch 2.Battery level indicator 3.USB interface Electricity high - Press and hold the power button for 3 seconds to turn it on, then press and hold the power button for 3 seconds to turn it off. -
Page 7: Battery Removal
Battery Removal Press the battery clip, then place the finger on the specified position and pull it back. The battery will be removed immediately. Keep the finger and the machine clean and dry before operation. Otherwise, the battery may not be slipped. Aircraft Battery Charging Connect the battery to the 5V 1-2A adapter USB port with a USB charging cable. - Page 8 ● When charging the rechargeable battery, do not use it separately for children. It must be carried out under adult supervision. It must be kept away from inflammable materials during charging. When charging, the guardian should not leave the model to the outside of the surveillance range.
-
Page 9: Camera Removal
Camera Removal: Hold your finger on the camera snap and press the arrow (Figure 1) to remove the camera. (Figure 2) figure 1 figure 2 Tips: The camera needs to be used with the real-time transmission app. For details on the download process, please refer to the APP manual. - Page 10 Aircraft Part Name [1] Lights [2] Brushless Motors [3] Blades [4] Cameras [6] Battery compartment [7] Front indicator [8] Rear indicator...
- Page 11 Remote Control Part Name [3] [4] [10] Switch the speed button for 5 seconds to correct the gyroscope One-button return The red signal light is connected constantly Battery light Power switch Record button Photo button for 5 seconds to correctg eomagnetism Throttle stick LCD display...
- Page 12 [11] [12] [13] [14] [11] steering gear up [13] Headless mode [12] Steering gear down [14] One-button takeoff, landing LCD Display Remote Height data control battery GPS star number Return icon Video Model Take a Aircraft GPS mode photo power icon Headless mode icon...
- Page 13 Prepare The Remote Open the remote control battery cover, follow the positive and negative poles indicated by the remote control, correctly load the 4 AA batteries, and then re-cover the battery cover. ● The remote control uses 4 “AA” non-rechargeable batteries, or “AA”...
- Page 14 The remote control is turned on and the indicator light flashes. Press and hold the battery switch of the aircraft, the battery indicator lights up from left to right, the aircraft light flashes, the remote control drops, the remote indicator light is on, and the code is successful.
-
Page 15: Connect App
After the aircraft successfully pairs, the remote control camera button presses for about 5 seconds, the remote control drops, the aircraft lights flash quickly, and the aircraft is picked up 3 meters from the ground level in a clockwise direction, and the remote control drops after a click. - Page 16 Aircraft Unlocked: At this time, the throttle lever and the direction lever are pushed to the lower left corner and the lower right corner (1) at the same time, or pushed to the lower right corner and the lower left corner (2) at the same time, the unlocking can be completed, and the motor can be started after starting.
-
Page 17: Mode Switching
Back Go ahead Fly on the before left Flying on Rear the right Mode Switching 1. Mode 1: [Optical Flow Mode] After the aircraft has successfully coded, the mode of the remote control display is 0 to Mode-1, and Mode-1 is the optical flow mode. -
Page 18: Flight Mode
high-rise buildings or wires and other obstructions around it. When the number of satellites reaches about 10 or so, the remote control will drop a prompt to enter the GPS function, the lights are always on, and Mode-1 can be changed to Mode-2. Unlock to take off. -
Page 19: Headless Mode
Headless Mode When the headless mode button is pressed, the remote controller emits a "drip" sound. When the aircraft is unlocked, the direction indicated by the nose is the front of the flight. During the flight, the aircraft is rotated in the direction of the aircraft, and the front of the flight is still unlocked by the aircraft. -
Page 20: One-Button Return
Return point: During the takeoff or flight, when the GPS receives more than 7 stars for the first time, it will be recorded as the current position of the aircraft as the return point. One-button return When the GPS signal is good (the number of satellites is greater than 7), the aircraft can be returned to the aircraft through the button below. - Page 21 Low Power Return After the low pressure of the aircraft, the indicator light will flash slowly, and the aircraft will automatically return to the take-off point of 20 meters. (After low electricity, the aircraft will return to the vicinity of the takeoff point, and the height and distance of the aircraft will be limited to 20 meters) Tips: The aircraft is in a low-power return state, and the remote control...
-
Page 22: Preflight Inspection
Received Signal Strength Indication The icon “ ” is the received signal strength indication. The more the number of segments is displayed, the stronger the signal is, and the weaker the signal is. Model Flight Pre-flight Inspection 1. The remote control and the aircraft battery are fully charged. 2. -
Page 23: Product Parts
frequency Shindo Europe Japan (MHZ) 5180 Available Available Available 5745 Available Disable Disable Singapore China Taiwan Korea Available Available Available Available Available Available Available Available Channel Switching Method: Press and hold the “ ” button on the remote control for about 8 seconds. -
Page 24: Common Troubleshooting
Rear rocker camera Silicone pad battery arm B Geomagnetic GPS module Motherboard Charging Cable module Optional accessories remote control 4K 5G WIFIcamera Common Troubleshooting Problem Solution After mode 1 takes off, the The ground is too smooth, and the environment is aircraft lights are always too dark, which will cause the optical flow lens to be flashing and cannot be hovered.
Need help?
Do you have a question about the SG906 and is the answer not in the manual?
Questions and answers