Table of Contents
Advertisement
Quick Links
Advertisement
Table of Contents

Summary of Contents for EinCar NJ-1019HD
- Page 1 CLIP-ON HEADREST MONITOR Note: 1. Please read and review this instruction manual carefully before using this device to fully understand the features and operation of this product. 2. Due to patent conditions, some 1080P native schemes do not support audio and video files.
- Page 2 Digital gear for driving DDAUTO specializes in digital products for entertainment and enjoyment in cars with special expertise in audio/video electronics. Our number one goal is customer satisfaction and we treat every customer as if they were our only one. Our customer-first philosophy is what guides our every decision.
- Page 3 Features: Pixels Resolution: 9 inch: 1024(W) x 3(RGB) x 600(H) 10.1 inch: 1024(W) x 3(RGB) x 600(H) LED Backlight 16:9 Screen Format DVD/CD/VCD/MP3/WMA/DivX/MPEG4 Playback System USB 2.0 Port SD/MMC/MS Card Reader AV Input/Output Earphone Socket FM Transmitter IR Transmitter (2 Ch for Wireless Headphones) Wireless FM Modulator (8 Ch for Audio Output) On-Board Stereo Speakers Remote Control (Optional)
- Page 4 Appearance and Functions (DD1019D) TOUCH KEY MODEL---General features and operation 1. Short press for menu, long press to return main menu. 2. Volume/Analogue down, move to left during menu setup. 3. Volume/Analogue up, move to right during menu setup. 4. Short press to power on, short press for disc ejection or status when playing, long press power off.
-
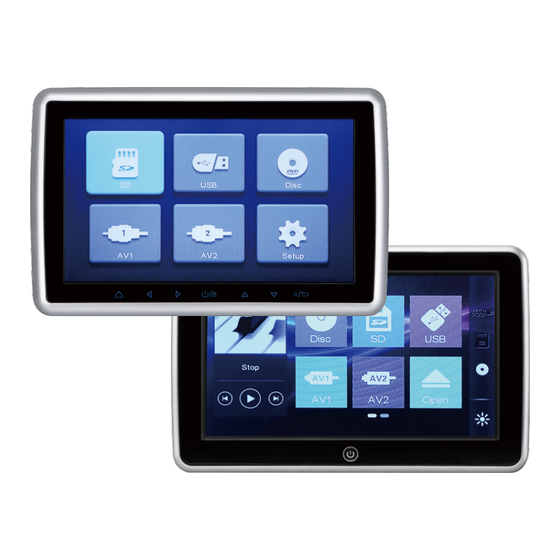
Page 5: Main Menu Functions
Main Menu Functions Displays the main menu after startup. 1. SD input 4. AV1 input 2. USB input 5. AV2 input 3. Disc play 6. Function setup System Operations ( General key features of the model 1.Use the left triangle button or right triangle button to search and select the setup icon, then click enter. - Page 6 2. Select language icon and press enter button to access language selection menu. Select desired language and press enter key. 3. Return to previous menu by pressing ▼ then choose FM OUT and confirm to enter the FM option menu. Choose desired FM Frequency and confirm, then adjust the FM frequency of the car radio to match.
- Page 7 5. Return to previous menu and select LOGO setup to enter the LOGO menu. Select the desired car brand and it will be displayed the next time the DVD is started. 6. Return to previous menu, and select the display functions setup to enter the display menu.
- Page 8 8. Press return button to go back to previous menu. Select the track function icon for track options. Press buttons to select preferred track. 9. Press return button to go back to previous menu. Select time function to setup operating time options.
- Page 9 Appearance and Functions (DD1019HT) TOUCH SCREEN MODEL---One-key control touch-screen model 1. Power switch on/off 2. USB port 3. SD port 4. Earphone jack 5. AUX input 6. DC 12V input 7. Disc in/out slot...
- Page 10 Main Menu Functions ( touch-screen model Display of the main menu screen after startup. 1. Video playback status 9. Open and close screen 2. Disc media play 10. Display DVD/SD/USB playing status 3. SD card 11. Function setup 4. USB 12.
-
Page 11: System Operation
System Operation ( touch-screen model icon, to enter setup screen. 1.Touch 2. Touch Language and select desired language. 3. In DVD/SD/USB play mode, the following icons will be displayed. Return to main menu Prev Volume Close screen Play/pause Page down Chapters Next Return to previous menu... - Page 12 4.Touch the screen in operating mode. Playback progress is shown and can be adjusted by touching and sliding. volume icon and slide to adjust the volume. 5.Touch page forward icon to adjust. 6.Touch Continuous Track display Chapter display Order Page down...
- Page 13 page down icon to adjust. 7.Touch Picture zoom Picture settings Page back Display adjustment icon on Main Menu to display FM transmitter, then select desired frequency. 8.Touch icon on Main Menu to display IR transmitter, then select desired channel. 9.Touch...
-
Page 14: Installation
Installation 1. Remove unit from packaging and remove two screws on backside. Unplug plastic supports and remove U-shaped metal clips from both sides of the bracket to separate plastic rings. 2. Raise the car headrest and choose the appropriate plastic ring that best fits the diameter of the headrest supports. -
Page 15: Remote Control (Optional)
Remote Control (Optional) Eject disc Audio right/left MAIN MENU RANDOM SUB-T Fast Reverse Fast Forward Back to previous Wiring Diagram Red (DC 12V) Fuse Black (GND) -
Page 16: Troubleshooting
Troubleshooting Problem Comment Power is disconnected. Turn the unit on. No sound and image No image Disc is scratched. Signal wire is disconnected. Adjust the volume control, check that the FM and IR No sound function status is OFF. Incorrect setup of image brightness and contrast. Black screen Low voltage.
Need help?
Do you have a question about the NJ-1019HD and is the answer not in the manual?
Questions and answers