Advertisement
Quick Links
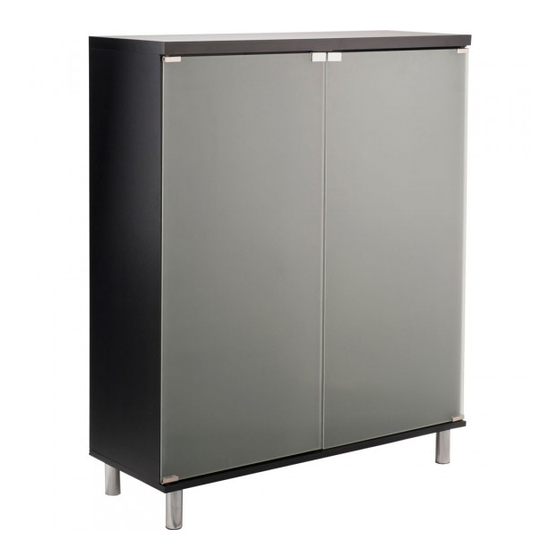
Hygena Milan shoe storage
Assembly Instructions
Dimensions
Width – 91.5 cm
Depth – 35 cm
Height – 114.5 cm
Important
– Please read these instructions fully before starting assembly
If you need help or have damaged or missing parts, call the Customer Helpline: 08456 400800
– Please keep for future reference
Note: Two people required for assembly.
875/8770
Issue 3 – 08/08/14
Advertisement

Related Manuals for hygena Milan


Summary of Contents for hygena Milan
- Page 1 Hygena Milan shoe storage Assembly Instructions 875/8770 – Please keep for future reference Dimensions Width – 91.5 cm Depth – 35 cm Note: Two people required for assembly. Height – 114.5 cm Important – Please read these instructions fully before starting assembly If you need help or have damaged or missing parts, call the Customer Helpline: 08456 400800 Issue 3 –...
- Page 2 Safety and Care Advice Important – Please read these instructions fully before starting assembly Check you have all the Do not stand or put weight on We do not ● ● ● components and tools listed on the product, this could cause recommend the use of power drill/drivers for pages 2 and 3.
- Page 3 Components - Panels Please check you have all the panels listed below Adjustable shelf x 6 Top panel Base panel Left side panel Right side panel Back panel x 2 Left door Right door...
- Page 4 Components - Fittings If you have damaged or missing components, call the Customer Helpline: 08456 400800 Please check you have all the fittings listed below Note: The quantities below are the correct amount to complete the assembly. In some cases more fittings may be supplied than are required.
- Page 5 Assembly Instructions Step 1 Taped edge. Place the Side Panels & on a flat surface, as shown. Insert two Wood dowels into the middle end holes in each Side panel. Locate Base Panel onto the ends of Side Panels & secure with 4 Screws Step 2 Screw 1 Foot...
- Page 6 Assembly Instructions Step 4 Firmly push the Top Panel onto the ends of Side panels , ensuring the Metal dowels and wood dowels enter corresponding holes. Step 5 Note: Longer leg of the cross on the Insert the 4 Metal Cams Metal Cams must into the 4 holes on face towards end...
- Page 7 Assembly Instructions Step 6 Lay the unit on its face. Fit Back panels into the Joining strip Secure Back Panels into the recess on the rear edges of Panels & using 22 Screws Note: The foiled side of Back panel should face downward Note: The foiled side (as shown).
- Page 8 Assembly Instructions Step 9 Push 24 Shelf Pins into Side Panels & at shown. Step 10 Slide the 6 Adjustable shelves onto the Shelf pins...
- Page 9 Assembly Instructions Step 11 Slide Hinges onto the top edge of Doors & and secure by screwing the screws. Note: ’Outer’ label on door, must be on outside. Note: Make sure there is a plastic Note: Make sleeve within the sure the metal bracket screws in...
- Page 10 Assembly Instructions Step 13 Adjusting the doors Note: This step will be easier with 2 people. Note: Before adjusting the doors please make sure the cabinet is in its final position and make sure it is level. Loosen the screws in the hinge.
- Page 11 Assembly Instructions Step 14 Note: This Step is for securing the Unit to a wall and should only be attempted by experienced persons. You will Need the Following: Another person to assist you Electric Drill (& Drill Bits) Screwdriver Fixings Supplied: 2 Webbings 2 Small Wood Screws...
Need help?
Do you have a question about the Milan and is the answer not in the manual?
Questions and answers