Advertisement
Quick Links
Advertisement

Related Manuals for Ryonet Riley Hopkins Junior Multi-Station


Summary of Contents for Ryonet Riley Hopkins Junior Multi-Station
- Page 1 Assembly Instructions Junior Multi-Station...
-
Page 3: Tools Required
Tools Required: • Two 9/16” wrenches • One Philips screwdriver • One Hammer What’ s in the box Item 1 per unit Main Press core assembly 1 per station 16” x 16” MDF platens with neck 1 per station Print Station assembly with Gate 1 per unit Hardware kit... - Page 4 PRCO-JRPSKIT (1 kit per print station) Riley Junior print station mounting hardware kit Name/ID Description PRHD-HC5/16NC1GR5ZC 5/16-18 x 1 Hex Tap Bolt PRHD-WA5/16USSGR5ZC 5/16 USS Flat Washer Zinc 1/4 USS Flat Washer Zinc PRHD-WA1/4USSGR5ZC PRHD-NYN5/16NCGR5ZC 5/16-18 Nyloc Nut Zinc 3/16 x 1 Roll Pin Zinc PRHD-RP3/16X1ZC...
- Page 5 PRCO-JRSTOPHDWPK Riley Junior print station mounting hardware kit Name/ID Description 2 per color PRSA-SPRINGKIT Riley Hopkins Press Mesh Covered Spring 1 per color PRCO-BMPRBLTCVRBLU Air Hose for Riley Junior bump stops 2” long 1 per color PRHD-HC3/8NF3GR5ZC 3/8-24 x 3” Hex Cap Screw grade 5 Zinc 1 per color PRHD-LNYN3/8NFGR5ZC 3/8-24 Lowpro Nyloc Nut...
- Page 6 Step 1 Install the spring assemblies with the hooks facing upward. Lower the Print head assemblies until they rest on the lower stop bolt. Repeat this step for the remaining print head assemblies. NOTE: Refer to page 3 for hardware detail Hooks MUST be facing UP Lower Stop...
- Page 7 Step 2 Install the upper stop bolts and rubber sleeves. Two 9/16” wrenches are required for this step. DO NOT OVERTIGHTEN THE BOLTS. This will cause resistance in the print head hinge point. Repeat this step for the remaining print head assemblies. NOTE: Refer to page 3 for hardware detail...
- Page 8 Step 3 Mount the press base to a sturdy table top (2) with supplied mounting screws (1). Press is shown mounted on a Riley Hopkins 2-station press cart (sold separately). A Phillips screwdriver is required for this step. Name / ID Description Mounting Hardware pack perforated bag (qty.
- Page 9 Step 4 Install the print stations with supplied hardware. Ensure the number on the print station matches the number on the center rotary. Failure to due so, will shift the platens out of alignment. Do not fully tighten at this time. They must be snug, but loose enough to adjust with bumps of the hand.
- Page 10 Step 5 Install the 3/16” roll pins to locate the print station. Tap print station to align holes visually as close as you can. This is a factory setting that ensures your platens are aligned to each other. Tap them in approx. ½”...
- Page 11 Step 6 Install the platen assembly (1) onto the tubular arm of the press. When platen is in desired location, first lock down the side knob (2). Lastly, tighten down the lower locking knobs (3). The platen can be adjusted front-to-back to help position the image onto the desired location of the substrate.
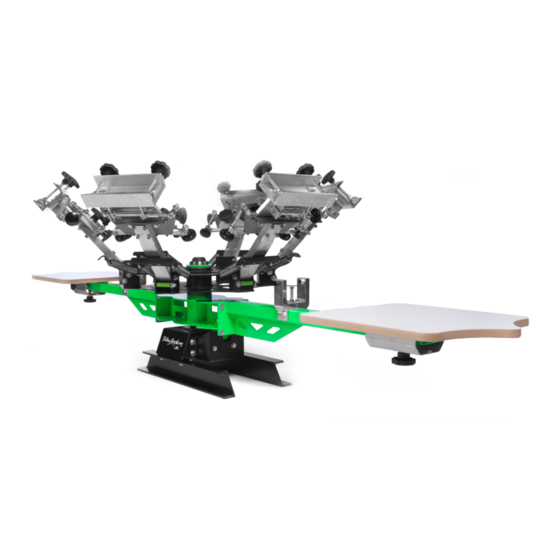
- Page 12 Multi-station Press Overview Junior multi-stations are 12” from the bottom of the mounting feet to the top of the platens. A table height of approx. 23” is recommended to achieve the common overall platen height of 35” from the ground. Press is shown mounted on a Junior 2 station press cart (Sold separately).
- Page 13 PRSA-JRPNTHED Riley Hopkins Junior Micro print head assembly. Name / ID Description PRCO-KNBFLT3/8NCFML 2-3/8“ Fluted KNOBS 3/8-16 female insert 2-3/8“ Fluted KNOBS 3/8-16 female insert PRCO-BRNZB3/8ID1/2LG Junior series-Color arm spring plate MFPD-JRCLRARMSPG PRCO-RDED5/16RHML 5/16”-24 Right Hand Tread Male Rod End PRHD-SCRWCVR3/8 Screw cover Black rubber 3/8 PRCO-KNBKNL5/16NF2-3/4ML...
- Page 14 PRSA-JRPNTHED Riley Hopkins Junior Micro print head assembly. Name / ID Description PRCO-KNBFLT3/8NC4ML Riley Hopkins Replacement Clamp Head Knob 3/8-16 Hex Finish Jam Nut PRHD-JN3/8NCGR5ZC 3/8-16 Hex Finish Nut PRHD-HN3/8NCGR5ZC PRHD-WA3/8USSPFC9ZY 3/8 PFC9 Yellow Zinc USS Flat Washer PRHD-BTN3/8NC1BLK 3/8-16 x 1 Button Head Allen Bolt Black Oxide PRHD-LNYN3/8NCGR5ZC 3/8-16 Lowpro Nyloc Zinc PRHD-WA3/8SAE-SS...
- Page 15 NOTES: NOTE: Logos, graphic elements and or photo images contained in this document may not be reproduced without the written consent of Ryonet...
Need help?
Do you have a question about the Riley Hopkins Junior Multi-Station and is the answer not in the manual?
Questions and answers