Table of Contents
Advertisement
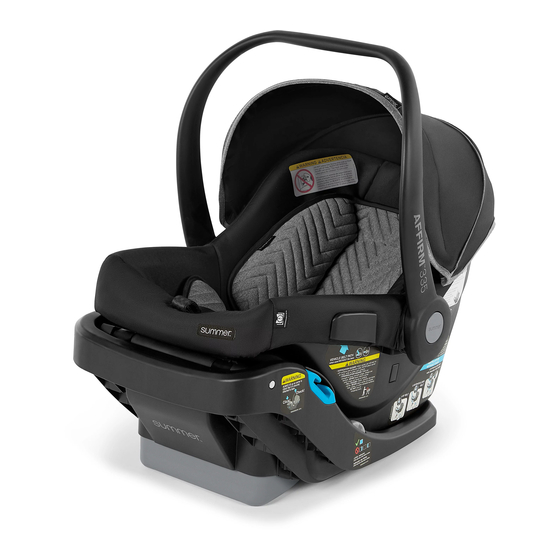
REAR-FACING INFANT CAR SEAT
Weight: 3-35 lbs (1.4 - 15.8kg)
Height: 15-32 in. (38 - 81cm)
INSTRUCTION MANUAL
Please read the following instructions and warnings carefully
before set up and use.
KEEP THIS INSTRUCTION MANUAL FOR FUTURE REFERENCE.
www.summerinfant.com
© 2019 Summer Infant (USA), Inc.
D0000000286A 12/19
Advertisement
Table of Contents

Related Manuals for Summer AFFIRM 335

Summary of Contents for Summer AFFIRM 335
- Page 1 Weight: 3-35 lbs (1.4 - 15.8kg) Height: 15-32 in. (38 - 81cm) INSTRUCTION MANUAL Please read the following instructions and warnings carefully before set up and use. KEEP THIS INSTRUCTION MANUAL FOR FUTURE REFERENCE. www.summerinfant.com © 2019 Summer Infant (USA), Inc. D0000000286A 12/19...
-
Page 2: Table Of Contents
REGISTRATION AND RECALL INFORMATION ......4-5 CERTIFICATION AND USEFUL LIFE ..........6 QUESTIONS AND ASSISTANCE ............7 WARNINGS AND IMPORTANT SAFETY INFORMATION ....8-17 CHILD FIT INFORMATION ............. 18-19 OVERVIEW OF THE AFFIRM™335 STEELOC™ BASE .... 20-21 OVERVIEW OF THE AFFIRM™335 INFANT CARRIER ....22-23 UNIQUE FEATURES OF THE AFFIRM™335 ...... - Page 3 BASE INSTALLATION WITH LATCH / BASE REMOVAL .... 52-57 BASE INSTALLATION WITH VEHICLE LAP/SHOULDER BELT ... 58-61 BASE INSTALLATION WITH VEHICLE LAP BELT ..... 62-65 CARRIER INSTALLATION WITHOUT THE BASE WITH VEHICLE LAP/SHOULDER BELT AND SHOULDER BELT GUIDE 66-69 CARRIER INSTALLATION WITHOUT THE BASE WITH VEHICLE LAP/SHOULDER BELT ........
-
Page 4: Registration And Recall Information
Child restraints could be recalled for safety reasons. You must register this restraint to be reached in a recall. Send your name, address, e-mail address, if available, and the restraint’s model number and manufacturing date to: Summer Infant (USA), Inc. 1275 Park East Drive Woonsocket, RI 02895... - Page 5 Month/Mes Day / Día DATE OF MANUFACTURE: DO NOT USE AFTER / NO USAR DESPUÉS DE: Summer Infant (USA), Inc. 1275 Park East Drive Woonsocket, RI 02895 1-401-671-6551 Factory Code / Códago de fabrica : 109 Batch No. Made in China / Hecho en Chine...
-
Page 6: Certification And Useful Life
Year /Año Month/Mes Day / Día DO NOT USE AFTER / NO USAR DESPUÉS DE: Summer Infant (USA), Inc. 1275 Park East Drive Woonsocket, RI 02895 1-401-671-6551 Factory Code / Códago de fabrica : 109 Batch No. Made in China / Hecho en Chine... -
Page 7: Questions And Assistance
QUESTIONS AND ASSISTANCE Questions or Assistance? Summer Infant (USA), Inc. If you have any questions regarding installation of 1275 Park East Drive, your child restraint, before contacting us have your Woonsocket, RI 02895 model name and number available, you can find... -
Page 8: Warnings And Important Safety Information
WARNINGS AND IMPORTANT SAFETY INFORMATION AIRBAG WARNINGS: WARNING ADVERTENCIA DO NOT place rear-facing child seat on front seat with air bag. DEATH OR SERIOUS INJURY can occur. The back seat is the safest place for children 12 and under. NO coloque un asiento de seguridad para bebés orientado hacia atrás en el asiento delantero dal automóvil con bolsa de aire. - Page 9 WARNINGS AND IMPORTANT SAFETY INFORMATION WARNING! DEATH or SERIOUS INJURY can occur, AIRBAG WARNINGS: • READ THIS MANUAL CAREFULLY! • DO NOT use this restraint in the vehicle seats equipped with air bags. Interaction between a rear-facing child restraint and air bags may cause death or serious injury. If your vehicle has an air bag, refer to the vehicle owner’s manual for child restraint installation.
- Page 10 WARNING! DEATH or SERIOUS INJURY can occur, GENERAL WARNINGS: • READ this Owner’s Manual carefully before use and keep it for future reference. Failure to follow these instructions and the warnings on the child restraint can result in death or serious injury of your child in a crash. •...
- Page 11 WARNING! DEATH or SERIOUS INJURY can occur, WHEN USED INSIDE A VEHICLE: • Use only in a rear-facing position when using it in the vehicle. • Use only with children who weigh between 3 - 35 lbs (1.4kg-15.8kg) and whose height is between 15 and 32 in.
- Page 12 WARNING! DEATH or SERIOUS INJURY can occur, WHEN USED INSIDE A VEHICLE (CONT.): • SOME CHILDREN WITH SPECIAL NEEDS, such as premature infants or those who have tested positive for positional apnea, may be at increased risk of suffering breathing or other difficulties in a child restraint. Please consult a physician to determine what type of child restraint should be used.
- Page 13 DEATH or SERIOUS INJURY can occur, WHEN USED INSIDE A VEHICLE (CONT.): • If using a base, ONLY USE with the Summer Infant Affirm™335 Steeloc™ base. ALWAYS check to make sure the infant carrier is securely attached to the base. After attaching the infant carrier to the base, lift up on the infant carrier handle to make sure that it is securely attached to the base.
- Page 14 • NEVER use accessories or parts with this child restraint other than those approved by Summer Infant. Use of accessories or parts from other manufacturers could cause the child restraint not to perform as intended in a vehicle crash.
- Page 15 WARNING! DEATH or SERIOUS INJURY can occur, USING THE INFANT CARRIER OUTSIDE A VEHICLE (CONT.) ADVERTENCIA WARNING Children have STRANGLED in loose or partially buckled harness straps. Fully restrain the child even when carrier is used outside the vehicle. Los niños se han ESTRANGULADO con las correas del arnés sueltas o parcialmente abrochadas.
- Page 16 WARNING! DEATH or SERIOUS INJURY can occur, ADDITIONAL WARNINGS: • ALWAYS replace the child restraint and base after a crash of any kind even if it was unoccupied. A crash can cause unseen damage to the child restraint that may not be visible.
- Page 17 WARNING! DEATH or SERIOUS INJURY can occur, ADDITIONAL WARNINGS: • NEVER purchase second-hand child restraints as you do not know their history and may be missing components integral to their safety. • DO NOT allow children to play with vehicle seat belts. They may create an entanglement hazard for any child that can reach the seat belt and may wrap it around his or her neck.
-
Page 18: Child Fit Information
CHILD FIT INFORMATION The American Academy of Pediatrics recommends infants and toddlers should ride in a rear-facing car safety seat as long as possible, until they reach the highest weight or height allowed by their seat. Also, some states’ laws require children to be rear-facing until age 2. - Page 19 CHILD FIT INFORMATION Hold ruler up at the top of the seat to CHECK for Minimum 1 inch (2.5 cm) CHILD’S HEAD MUST be 1” (2.5 cm) correct 1” (2.5 cm) spacing or more below the top of the seat as shown Harness straps must be adjusted to be AT or JUST...
-
Page 20: Overview Of The Affirm™335 Steeloc™ Base
OVERVIEW OF THE AFFIRM™335 STEELOC™ BASE Belt Routing Guides (both sides of base) SIDE VIEW Recline Adjustment Foot Recline Adjustment Foot Lever Recline Level Indicator (both sides of base) Belt Tensioning Arm Release Handle Carrier Attachment Hooks... - Page 21 OVERVIEW OF THE AFFIRM™335 STEELOC™ BASE OPEN VIEW Belt Tensioning Arm LATCH Storage and Instruction Manual Storage belt LATCH Date of Manufacture Label Location Strap LATCH LATCH Adjustment Release Button Hook LATCH REAR-FACING INFANT CAR SEAT REAR-FACING INFANT CAR SEAT Weight: Weight: Height:...
-
Page 22: Overview Of The Affirm™335 Infant Carrier
OVERVIEW OF THE AFFIRM™335 INFANT CARRIER Anti-Rebound / Carry Handle FRONT VIEW Infant Body Insert Harness Covers Chest Clip Seat Pad Harness Adjuster Button (under seat pad) Harness Adjuster Strap Crotch Strap Harness Buckle Instruction Manual Storage (pocket under seat pad) Harness Release Button Vehicle Belt Guide Stroller Attachment Door... - Page 23 OVERVIEW OF THE AFFIRM™335 INFANT CARRIER REAR VIEW Canopy Shoulder Belt Guide Carrier Release Handle Harness Slots Harness Straps Harness Splitter Plate Crotch Strap Slots Crotch Buckle Retainer Date of Manufacture Label Location...
- Page 24 UNIQUE FEATURES OF THE AFFIRM™335 Steeloc™ Base Full-Surround Energy Absorbing Foam Steel reinforced Energy absorbing base for added foam fully surrounds security. Easily the car seat. installs for a This added protection secure fit. helps absorb crash forces and could minimize injury.
-
Page 25: Unique Features Of The Affirm™335
UNIQUE FEATURES OF THE AFFIRM™335 Front Impact Tested - Meets or exceeds the child restraint criteria for a frontal crash test under US FMVSS 213. Side Impact Tested - Side impact tested for occupant protection and retention using the proposed FMVSS Side Impact Standard. Rear-Impact Tested - Based on European rear impact crash test procedures. -
Page 26: Features - Handle
FEATURES - HANDLE WARNING TO AVOID SERIOUS INJURY, ALWAYS make sure the handle is securely locked in the upright carrying position before carrying. THERE ARE 4 HANDLE POSITIONS: - Anti-Rebound Position / In-Vehicle Position - Carrying Position / In-Vehicle Position - Convenience Position (accessibility to child, non-locking position) - Non-Rocking / Stationary Position... -
Page 27: Features - Canopy
FEATURES - CANOPY THERE ARE 2 CANOPY POSITIONS: To open, push the canopy forward. To fold, push the canopy back. CANOPY VISOR (only on certain models): Pull visor out from under the canopy. -
Page 28: Features - Infant Body Insert
INFANT BODY INSERT with this child restraint other than those The infant body insert is optional for use approved by Summer Infant. with children from 3-11 lbs (1.4-5kg). NOTE: Your infant car seat comes assembled with the harness installed in the second set of harness slots and the middle crotch buckle slot as shown. - Page 29 FEATURES - INFANT BODY INSERT (CONT.) IF YOUR CHILD’S SHOULDER HEIGHT FITS HARNESS SLOT POSITION 1, you will need to re-position the shoulder strap slots into the first set of shoulder harness slots on INNER the insert and the inner crotch slot as shown.
-
Page 30: Checking Child Fit In The Carrier
CHECKING CHILD FIT IN THE CARRIER BEFORE PLEASE REVIEW THE FOLLOWING SECTION CHANGING YOUR HARNESS STRAP OR CROTCH BUCKLE LOCATIONS. Depending on if your child’s size, you may need to adjust the shoulder strap positions, the crotch buckle position and/or you may need to use the infant body insert. Loosen the harness straps by pushing the harness adjuster button and pull the harness straps toward... - Page 31 CHECKING CHILD FIT IN THE CARRIER (CONT.) Place the harness straps around your child. MAKE SURE HARNESS STRAPS ARE AT OR JUST BELOW CHILD‘S SHOULDERS and waist straps are around the hips. MAKE SURE the buckle is between the child’s legs. Insert the buckle tongues into the buckle as shown.
- Page 32 CHECKING CHILD FIT IN THE CARRIER (CONT.) CHECK that the child’s head Hold ruler up at the top of the seat to CHECK for is 1” (2.5 cm) or more below the Minimum 1 inch (2.5 cm) correct 1” (2.5 cm) spacing top of the seat as shown.
- Page 33 CHECKING CHILD FIT IN THE CARRIER (CONT.) CHECK the harness strap and crotch buckle strap positioning on your child. See p 34-39. CHECK to make sure the crotch buckle strap is in INNER SLOT CLOSEST TO BUT NOT UNDER YOUR MIDDLE CHILD.
-
Page 34: Changing Crotch Buckle Location
CHANGING CROTCH BUCKLE POSITION Turn the carrier over and push the buckle retainer through the slot. Pull buckle strap out from the front of the seat and through the seat pad. INNER MIDDLE OUTER... - Page 35 CHANGING CROTCH BUCKLE POSITION (CONT.) Re-insert the buckle retainer through the slot that fits CLOSEST TO BUT NOT UNDER your child. The retainer MUST go through the same set of slots in the seat pad and the carrier shell. Pull up on the buckle strap from the front of the seat to make sure the strap is secured on the bottom of the seat shell and not on the bottom of the seat pad.
-
Page 36: Changing Harness Strap Location
CHANGING HARNESS STRAP POSITION Loosen the harness straps by pushing the harness adjuster button under the seat pad while pulling the straps out. Turn the carrier over. Slide the harness straps off the splitter plate. - Page 37 CHANGING HARNESS STRAP POSITION (CONT.) Pull the straps through the front of the seat and the seat pad. BEFORE inserting the harness straps back through the seat pad, if you need to use the infant body insert in harness slot Position 1, you will need to thread the harness strap through the first set of harness slots on the insert as shown before inserting the straps...
- Page 38 CHANGING HARNESS STRAP POSITION (CONT.) Before attaching the harness straps onto the splitter plate, determine which set of harness loops you need. If your harness straps are inserted into Harness Slot Positions 2, 3 or 4 use the end loops. END LOOP If your child is under 8 lbs (3.6 kg) and the harness is in Harness Slot...
- Page 39 CHANGING HARNESS STRAP POSITION (CONT.) Insert straps onto splitter plate. MAKE SURE they are completely attached onto the splitter plate. When using the INNER LOOPS. DO NOT place the harness straps behind the splitter plate. Harness straps should lie in front of splitter plate as shown.
-
Page 40: Securing Your Child In The Infant Carrier
SECURING YOUR CHILD IN THE INFANT CARRIER Rotate handle out of the way. Push the harness adjuster button and pull the harness straps toward you. Push button on the buckle to release the buckle tongues Open the chest clip by pressing the buttons as shown. - Page 41 SECURING YOUR CHILD IN THE INFANT CARRIER Place the harness straps around your child. MAKE SURE HARNESS STRAPS ARE AT OR JUST BELOW CHILD‘S SHOULDERS and waist straps are around the hips. MAKE SURE the buckle is between the child’s legs. Insert the buckle tongues into the buckle as shown.
- Page 42 SECURING YOUR CHILD IN THE INFANT CARRIER Pull all the slack out from around the waist. Pull up on the harness while pushing the chest clip down. Do this on both sides. Slowly pull harness adjuster strap to make the shoulder straps snug around the child’s shoulders.
- Page 43 SECURING YOUR CHILD IN THE INFANT CARRIER CHECK STEP: - MAKE SURE the straps are snug, lie flat, and not twisted. If you can pinch a fold in the strap it is not snug. - Harness Tightness Test. To test for a properly tightened harness, pinch the shoulder strap.
-
Page 44: Removing Your Child From The Carrier
REMOVING YOUR CHILD FROM THE CARRIER Loosen harness by firmly pressing down the harness adjuster button while pulling forward on both straps. Push the red buckle release button and remove the buckle tongues. - Page 45 REMOVING YOUR CHILD FROM THE CARRIER Press the two buttons on the chest clip and unfasten it.
-
Page 46: Latch Usage
Vehicle seat. seat bight NOTE: The Summer Infant Affirm™335 does not require use of a tether strap. ONLY the lower anchors are used with this child restraint. This child restraint can be safely installed using either lower anchors or vehicle belts and meets the requirements of Federal Safety Standard FMVSS 213 with either installation method. - Page 47 Summer Infant allows this child restraint to be installed using the two inner lower anchors from the outboard seating positions if the distance between the inner lower anchors is between 11 and 20 inches (28-51 cm) AND if your vehicle manufacturer allows it.
-
Page 48: Vehicle Seating Locations
VEHICLE SEATING LOCATIONS WARNING! DEATH or SERIOUS INJURY can occur, FAILURE TO PLACE THE CHILD NEVER place the child restraint on any vehicle RESTRAINT IN A CORRECT SEATING seat that is not in a locked position. Folding seats POSITION INCREASES THE RISK OF can fall forward and could cause serious injury to SERIOUS INJURY OR DEATH. -
Page 49: Safe Vehicle Belt Types That Can Be Used
SAFE VEHICLE BELT TYPES THAT CAN BE USED If you have any of these types of vehicle belt systems listed, these are SAFE to use to install your child restraint in the vehicle. Review vehicle owner’s manual for specific instructions on child restraint installation. -
Page 50: Unsafe Vehicle Belt Types That Cannot Be Used
UNSAFE - VEHICLE BELT TYPES THAT CANNOT BE USED NEVER use any of these to install your child restraint in the vehicle. These vehicle belt systems are UNSAFE to use to install your child restraint in the vehicle. If available, LATCH can be used IN PLACE OF these vehicle belt types. Refer to your vehicle owner’s manual for LATCH locations. - Page 51 UNSAFE - VEHICLE BELT TYPES THAT CANNOT BE USED · · Lap/Shoulder Belts with 2 Retractors Lap belts with an Emergency (unless lap belt has a lock mode) Locking Retractor (ELR). These lap belts stay loose and can move Belts are attached to retractors at the ends of until locking in a crash or sudden stop.
- Page 52 BASE INSTALLATION WITH LATCH (LOWER ANCHORS) BEFORE installing base, make sure vehicle is on level ground. Place base on an approved LATCH vehicle seating location. Rotate handle on base to open the Belt Tensioning Arm all the way up. Remove LATCH straps from LATCH storage. Extend the strap to its longest length.
-
Page 53: Base Installation With Latch / Base Removal
BASE INSTALLATION WITH LATCH (LOWER ANCHORS) (CONT.) Route the LATCH belt through the BLUE belt guides on both sides of the base. MAKE SURE not to twist the belt and make sure it lies flat. Adjust the recline foot to achieve correct angle, see p. 77. Push base against vehicle seat back. - Page 54 BASE INSTALLATION WITH LATCH (LOWER ANCHORS) (CONT.) CHECK to make sure base is secure by holding both sides of the base near the belt guides and moving from side to side and front to back. The LATCH belt should not loosen or move easily.
- Page 55 BASE INSTALLATION WITH LATCH (LOWER ANCHORS) (CONT.) Insert the carrier into the base until you hear a click. Re-check the level indicator. ALWAYS lift up on the carrier to be sure that it is securely in the base. Recommended: Squeeze both handle adjustment buttons and lower handle to Position 1.
- Page 56 BASE REMOVAL WITH LATCH (LOWER ANCHORS) TO REMOVE BASE, turn the handle and open the belt tensioning arm.
- Page 57 BASE REMOVAL WITH LATCH (LOWER ANCHORS) (CONT.) Squeeze the clip then push the hook towards the seat, lift or twist hook out from the vehicle LATCH anchor. You may need to further loosen the tension on the LATCH strap by pushing the LATCH strap adjustment button and pulling on the strap. Repeat on other side of base.
-
Page 58: Base Installation With Vehicle Lap/Shoulder Belt
BASE INSTALLATION WITH VEHICLE LAP/SHOULDER BELT BEFORE installing base, make sure vehicle is on level ground. Place base on an approved vehicle seating location. Make sure the LATCH straps are stored in the storage area. Position base on the rear vehicle seat so that it touches the vehicle seat back. - Page 59 BASE INSTALLATION WITH VEHICLE LAP/SHOULDER BELT Route the lap/shoulder belt through the BLUE belt guides on both sides of the base. MAKE SURE not to twist the belt and make sure it lies flat. MAKE sure the lap/shoulder belt is routed through both blue belt guides on either side of the base.
- Page 60 BASE INSTALLATION WITH VEHICLE LAP/SHOULDER BELT Grab the base at the belt guides and pull from side to side and front to back to make sure it is installed correctly. The base should not move more than 1 inch (2.5 cm) in any direction.
- Page 61 BASE INSTALLATION WITH VEHICLE LAP/SHOULDER BELT Insert the carrier into the base until you hear a click. Re-check the level indicator. If not level, remove carrier, adjust recline angle and re-install. See pg. 77. ALWAYS lift up on the carrier to be sure that it is securely in the base. Squeeze both handle adjustment buttons and lower handle to Position 1 if desired.
-
Page 62: Base Installation With Vehicle Lap Belt
BASE INSTALLATION WITH VEHICLE LAP BELT BEFORE installing base, make sure vehicle is on level ground. Place base on an approved vehicle seating location. Make sure the LATCH straps are stored in the storage area. Position Base on a rear vehicle seat so that it touches the vehicle seat back. - Page 63 BASE INSTALLATION WITH VEHICLE LAP BELT Route the lap belt through the BLUE belt guides on both sides of the base. MAKE SURE not to twist the belt and make sure it lies flat. MAKE sure the lap belt is routed through both blue belt guides on either side of the base.
- Page 64 BASE INSTALLATION WITH VEHICLE LAP BELT Grab the base at the belt guides and pull from side to side and front to back to make sure it is installed correctly. The Base should not move more than 1 inch (2.5 cm) in any direction. If the base moves too much, open the belt tensioning arm and remove a little more slack from the vehicle belt, close...
- Page 65 BASE INSTALLATION WITH VEHICLE LAP BELT Insert the carrier into the base until you hear a click. Re-check the level indicator. If not level, remove carrier, adjust recline angle and re-install. See page 77. ALWAYS lift up on the carrier to be sure that it is securely in the base. Squeeze both handle adjustment buttons and lower handle to Position 1 if desired.
- Page 66 ( See pg. 50-51) A locking clip must be used with a vehicle belt that DOES NOT LOCK. Call Summer Infant Customer Service at 1-401-671-6551 to obtain a locking clip. Make sure vehicle is on level ground.
- Page 67 CARRIER INSTALLATION WITHOUT THE BASE WITH THE VEHICLE LAP/SHOULDER BELT SHOULDER BELT GUIDE Lift shoulder belt over handle and around carrier. Make sure not to twist vehicle shoulder belt. Slide shoulder belt into the blue Shoulder Belt Guide on rear of seat. Refer to your vehicle Owner's Manual for how your vehicle lap and shoulder belt locks.
- Page 68 CARRIER INSTALLATION WITHOUT THE BASE WITH THE VEHICLE LAP/SHOULDER BELT SHOULDER BELT GUIDE Look for this Check the recline angle. Adjust the seat label on the angle until the red line on the infant carrier is shell level with the ground. A tightly rolled towel or pool noodle may be placed under the infant carrier near the vehicle seat back to adjust the angle.
- Page 69 CARRIER INSTALLATION WITHOUT THE BASE WITH THE VEHICLE LAP/SHOULDER BELT SHOULDER BELT GUIDE To remove, unbuckle vehicle seat belt and carefully remove from vehicle belt guides on infant carrier. Unhook vehicle belt from shoulder belt guide on back of infant carrier. Place carrier handle in Position 2 and lift infant carrier out of vehicle with both hands.
-
Page 70: Carrier Installation Without The Base With
( See page p.50-51) A locking clip must be used with a vehicle belt that DOES NOT LOCK. Call Summer Infant Customer Service at 1-401-671-6551 to obtain a locking clip. Make sure vehicle is on level ground. - Page 71 CARRIER INSTALLATION WITHOUT THE BASE WITH THE LAP/SHOULDER BELT Refer to your vehicle Owner’s Manual for how your vehicle lap and shoulder belt locks. In many vehicles, you can switch the shoulder belt retractor into locking mode by pulling the shoulder belt out all the way and then let it go back in.
- Page 72 CARRIER INSTALLATION WITHOUT THE BASE WITH THE LAP/SHOULDER BELT Look for this Check the recline angle. Adjust the seat label on the angle until the red line on the infant carrier is shell level with the ground. A tightly rolled towel or pool noodle may be placed under the infant carrier near the vehicle seat back to adjust the angle.
- Page 73 CARRIER INSTALLATION WITHOUT THE BASE WITH THE LAP/SHOULDER BELT To remove, unbuckle vehicle seat belt and carefully remove from vehicle belt guides on infant carrier. Place carrier handle in Position 2 and lift infant carrier out of vehicle with both hands.
-
Page 74: Carrier Installation Without The Base With The Lap Belt
CARRIER INSTALLATION WITHOUT THE BASE WITH THE LAP BELT Make sure vehicle is on level ground. Place child in the carrier, refer to Securing Your Child in the Infant Carrier section, p. 40-43. Position the infant carrier on a rear vehicle seat, with the handle in Position 2 ( see pg. - Page 75 CARRIER INSTALLATION WITHOUT THE BASE WITH THE LAP BELT The carrier is allowed to touch the vehicle seat(s) in front of it, as long the recline angle of the car seat is not affected. Grab the infant carrier at the belt guides and pull from side to side and front to back to make sure it is installed correctly.
-
Page 76: Adjusting The Recline
ADJUSTING THE RECLINE WARNING Failure to properly recline the child restraint on the vehicle seat increases the risk of death or serious injury. It is very important for your child's safety that this child restraint be installed at the correct recline angle. -
Page 77: Checking The Recline With The Base
CHECKING THE RECLINE WITH THE BASE To Adjust Recline Angle Pull up the recline adjustment lever while holding the front of base. Extend or retract the recline foot until blue square is fully visible in the level indicator window. IF BLUE SQUARE IS NOT FULLY VISIBLE IN WINDOW, BASE IS NOT LEVEL. -
Page 78: Adjusting The Recline Angle Without The Base
ADJUSTING THE RECLINE ANGLE WITHOUT THE BASE WARNING Failure to properly recline the child restraint on the vehicle seat increases the risk of death or serious injury. It's very important for your child's safety that this child restraint be installed at the correct angle. DO NOT use this or any other child restraint with a premature, low birth weight, or medically fragile infant, until after you have consulted with your doctor. - Page 79 ADJUSTING THE RECLINE ANGLE WITHOUT THE BASE To Adjust Recline MAKE SURE vehicle is on level ground. Adjust the seat angle until the red level line on the label on the infant carrier is level with the ground. If you are having trouble achieving the proper recline angle: - Un-install the Infant Carrier.
-
Page 80: Using The Infant Carrier On An Aircraft
USING THE INFANT CARRIER ON AN AIRCRAFT The FAA recommends that children up to 40 pounds (18 kg) use a certified, harnessed child seat while traveling on an airplane. The Affirm™335 is certified for airplane use only WITHOUT the base. DO NOT install in an aircraft seat that is equipped with an inflatable seat belt. - Page 81 USING THE INFANT CARRIER ON AN AIRCRAFT Place child in the carrier and secure harness. Route lap belt under both vehicle belt guides. BUCKLE THE BELT. Push infant carrier firmly back and down towards the aircraft seat as you tension the belt by pulling on the free end of the lap belt strap.
- Page 82 USING THE INFANT CARRIER ON AN AIRCRAFT Grab the infant carrier at the belt guides and pull from side to side and front to back to make sure it is installed correctly. The infant carrier should not move more than 1 inch (2.5 cm) in any direction. If the infant carrier moves too much, tighten the aircraft belts more and re-check.
- Page 83 USING THE INFANT CARRIER ON AN AIRCRAFT To remove, unfasten aircraft belt. Always place handle in POSITION 2 before carrying. DO NOT USE THE BASE ON AN AIRCRAFT. IT IS NOT CERTIFIED FOR USE ON AIRCRAFT. If you plan to use the base at your destination, don’t forget to check it at the gate or check it in as luggage.
-
Page 84: Latch Storage
LATCH STORAGE When storing, place the LATCH strap and hooks LATCH stored inside the LATCH storage. Insert the straps on either side of the storage area in the designated slots. NEVER allow straps to lie outside the storage area REAR-FACING INFANT CAR SEAT Weight: Height: INSTRUCTION MANUAL... -
Page 85: Care And Maintenance
CARE AND MAINTENANCE WARNING NEVER USE THE INFANT CAR SEAT WITHOUT THE SEAT PAD INSTALLED. DO NOT damage, remove or dispose of any EPS foam. NEVER twist or cross the shoulder straps or place them in the incorrect level slots. Removing the Infant Body Insert Turn carrier over and unfasten the infant body insert strap from the back... - Page 86 CARE AND MAINTENANCE Push the buckle down through the body insert and the seat pad. Turn seat over and remove the harness straps from the harness splitter plate. Pull harness straps out through the front of the seat shell and seat pad. Remove the harness covers.
- Page 87 CARE AND MAINTENANCE Lift the canopy mount tab on each side of seat and pull canopy out from the side of the seat. Unfasten the plastic tabs all around the seat pad.
- Page 88 CARE AND MAINTENANCE Pull seat pad towards front of seat and peel seat pad off both vehicle belt guides on the sides of the seat. Pull the plastic tab out below the canopy mount hole. Pull the plastic tab out from the rear of the seat above the shoulder belt guide.
- Page 89 CARE AND MAINTENANCE Re-attaching the Seat Pad, Harness Covers and Infant Body Insert 1. Lay pad in seat, thread harness straps, chest clips and buckle tongue through the waist strap slots. (If you need to use the lowest slots for the infant body insert, place insert into seat and thread harness straps through the lowest infant insert slots.) 2.
- Page 90 CARE AND MAINTENANCE Harness Buckle Food, drink or other debris may collect inside the harness buckle which can affect proper function. Suspend the buckle in warm water and shake it back and forth. Push the button several times to make sure the buckle is working properly.
- Page 91 CARE AND MAINTENANCE Harness Straps Seat pad, infant body insert and harness covers; Sponge clean using warm water and mild soap. Air dry. Do not iron. - Machine wash COLD, delicate cycle, mild detergent - Drip Dry Plastic Parts To avoid seat cover parts shrinking: All plastic parts except the buckle can be - DO NOT machine wash warm or hot cleaned with a mild detergent and...
-
Page 92: Warranty And Replacement Parts
CUSTOMER SUPPORT, WARRANTY AND REPLACEMENT PARTS For customer support, warranty and replacement parts information, please contact: Summer Infant (USA) Inc. 1275 Park East Drive Woonsocket, RI 02895 or call 1-401-671-6551 For install instructions, scan the QR code with your camera or QR reader. If you have any questions or need further assistance, contact our Consumer Relations Team at 401-671-6551 or visit www.summerinfant.com/contact...
Need help?
Do you have a question about the AFFIRM 335 and is the answer not in the manual?
Questions and answers