Advertisement
Quick Links
DO
GUIDE
TT-100 Series
Crestron Connect It™ Cable Caddy
DO
Install the Device
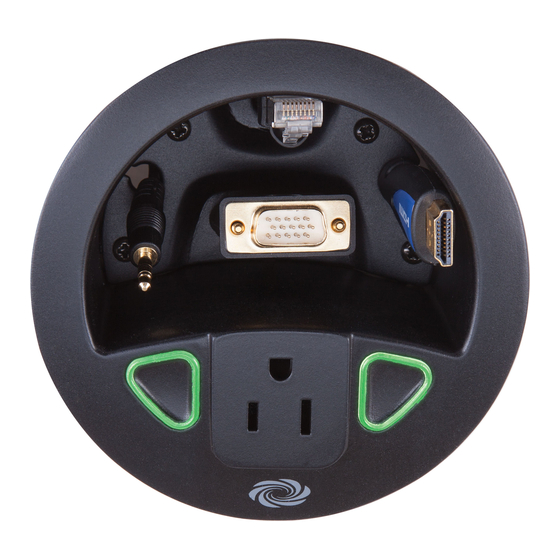
The TT-100 Series is designed for installation into a conference table.
The required thickness of the table is 1/2 inch (13 mm) to 1-1/4 inches
(32 mm).
TT-100
TT-110
NOTE: The TT-100 Series includes the TT-100, TT-101, TT-110, and TT-111.
The TT-101 consists of the TT-100 plus HDMI
, VGA, audio, and Ethernet
®
cables. The TT-111 consists of the TT-110 plus HDMI, VGA, audio, and
Ethernet cables. The TT-100, which provides a power outlet, is shown for
illustrative purposes throughout the remainder of this guide.
To install a TT device, do the following:
1. Properly protect the surface of the table.
2. Using a 4-inch (102 mm) hole saw (not included), drill a hole in the
appropriate location in the table.
3. With the TT device positioned so that the Crestron
®
logo faces the
user of the device, insert the body of the device into the hole.
Table
(User Side)
4. Twist the included locking ring onto the body of the TT device, leaving
a 1/8-inch (4 mm) gap between the locking ring and the bottom
surface of the table.
Table
1/8 in
(4 mm)
Locking Ring
5. Using the included Allen wrench, tighten the three setscrews (included
with the locking ring) to secure the locking ring to the bottom surface
of the table.
Table
(Bottom View)
Setscrews
(3)
6. Route the desired cables from the bottom of the TT device through
the cable opening. Up to four cables can be routed: one HDMI cable,
one VGA cable, one audio cable, and one Ethernet cable (all cables
supplied with the TT-101 and TT-111).
Cable
Opening
7. Insert the cables into the appropriate holes in the included cable plate.
HDMI
Audio/
Audio/
Ethernet
Ethernet
VGA
8. Seat the cable plate in the cable opening, and then attach the plate
using the four supplied Phillips pan head screws.
Phillips Pan Head
Screws (4)
DO
Check the Box
QUANTITY
PRODUCT
1
Cable, USB 2.0, A - Mini B, 6' 6" (2 m)
1
Cable, USB 2.0, B - Mini A, 6' 6" (2 m)
1
Connector, 4-Pin
1
Tool, 3/32" Allen Wrench
TT-100-B-T, TT-101-B-T, TT-110-B-T, and TT-111-B-T Only
1
Cable Plate
1
Locking Ring
4
Screw, 6-32 x 1/4", Pan Head, Phillips
TT-100-GRY-T, TT-101-GRY-T, TT-110-GRY-T, and TT-111-GRY-T Only
1
Cable Plate
1
Locking Ring
4
Screw, 6-32 x 1/4", Pan Head, Phillips
TT-101-B-T, TT-111-B-T, TT-101-GRY-T, and TT-111-GRY-T Only
1
Cable, Audio, Stereo, 1/8" Mini, 6' (1.83 m)
1
Cable, Ethernet, CAT5e, 7' (2.13 m)
1
Cable, HDMI, 6' (1.83 m)
1
Cable, VGA, 6' (1.83 m)
Not Included: 4-Inch (102 mm) Hole Saw; Phillips Screwdriver; and HDMI, VGA, Audio, and Ethernet Cables (Model Dependent)
DO
Connect the Device
Connect the device as required for the application.
NET/USB Port Connection
NET and USB ports are located on the bottom of a TT device.
NET
USB
Port
Port
Use either the NET port or the USB port of a TT device to communicate
with a compatible DigitalMedia™ device:
• The NET port requires a Cresnet
®
control cable (not included) to
connect to a Crestron control system.
24: Power, 24 Vdc (Red)
Y: Data (White)
—
—
NET
Z: Data (Blue)
24 Y Z G
G: Ground (Black)
NOTE: When the NET port of the TT device connects to a control
system, the TT device receives power via the NET port.
• The USB port, which is a USB Type mini-AB port, requires the
included A to mini-B cable or B to mini-A cable to connect to the USB
port of a compatible DigitalMedia device.
NOTE:
For proper USB functionality, the appropriate USB cable must
be connected to the TT device before the device is powered on.
COLOR
PART NUMBER
Black
2025146
Black
2038104
2003576
2036829
Black
2036696
Black
4519116
Black
2007215
Gray
2036697
Gray
4519209
2007213
2037179
2030114
2037173
2037178
The USB cable to be used depends on the USB type (Type A or
Type B) of the DigitalMedia device:
– When an A to mini-B cable connects the USB port of a
DigitalMedia device to the USB port of a TT device, the TT device
receives power via the USB port. Compatible DigitalMedia
devices that connect to a TT device using an A to mini-B cable
include the DMPS3-4K-150-C, DM-MD8X1-4K-C, HD-MD8X1-4K,
and DM-TX-401-C. The DigitalMedia devices have USB Type A
host ports, which supply USB power.
– When a B to mini-A cable connects the USB port of a
DigitalMedia device to the USB port of a TT device, the TT device
receives power via a connection to a Cresnet network or power
supply. A compatible DigitalMedia device that connects to a
TT device using a B to mini-A cable is the DM-TX-201-C.
The DM-TX-201-C has a USB Type B device port, which does
not supply USB power.
HDMI, VGA, Audio, and Ethernet Cable Connections
Connect HDMI, VGA, audio, and Ethernet cables as required for the
application:
• Connect one end of the HDMI/VGA/audio cable to the appropriate
output port of an audio/video source (for example, a laptop) and the
other end of the cable to the corresponding input port of a compatible
DigitalMedia device.
• Connect one end of the CAT5e Ethernet cable to a local network
device and the other end of the cable to the building network.
Cable
Connections
(Up to 4)
Advertisement

Related Manuals for Crestron Connect It TT-100 Series


Summary of Contents for Crestron Connect It TT-100 Series
- Page 1 Cable receives power via the USB port. Compatible DigitalMedia NET and USB ports are located on the bottom of a TT device. 3. With the TT device positioned so that the Crestron ® logo faces the Opening devices that connect to a TT device using an A to mini-B cable user of the device, insert the body of the device into the hole.
- Page 2 Crestron, the Crestron logo, Cresnet, Crestron Connect It, and DigitalMedia are either trademarks or registered trademarks of Crestron Electronics, Inc. in the United States and/or other countries.
Need help?
Do you have a question about the Connect It TT-100 Series and is the answer not in the manual?
Questions and answers