Table of Contents
Advertisement
Advertisement
Table of Contents

Related Manuals for Logia LOWSC510WB


Summary of Contents for Logia LOWSC510WB
- Page 1 5-IN-1 WIRELESS WEATHER STATION ® WITH WI-FI USER GUIDE LOWSC510WB...
-
Page 2: Table Of Contents
Thank you for purchasing the Logia 5-in-1 Wireless Weather Station with Wi-Fi ® . This User ™ Guide is intended to provide you with guidelines to ensure that operation of this product is safe and does not pose risk to the user. Any use that does not conform to the guidelines described in this User Guide may void the limited warranty. -
Page 3: Safety Precautions
11. Placing this product on certain types of wood may result in unintended damage to the finish, for which Logia™ will not be responsible. Consult your furniture manufacturer’s instructions for information on wood care. 12. Do not dispose of old batteries as unsorted municipal waste. Make sure to dispose of them properly according to your local guidelines. -
Page 4: Product Features
PRODUCT FEATURES 1. Wireless 5-in-1 weather sensor measures wind speed, wind direction, rainfall, temperature, and humidity. 2. No calibration needed! The product is fully pre-calibrated and mostly assembled; all you need to do is install it and sync with the included display console. 3. -
Page 5: Package Contents
PACKAGE CONTENTS BARO SENSOR REFRESH RESET UNIT WI-FI CHANNEL HISTORY MAX/MIN 1. Wireless Weather Sensor (1) 6. Large Hexagonal Nuts (4) 11. Micro USB Cable (1) 12. Display Console with 2. Mounting Pole (1) 7. Large Washers (4) Kickstand (1) Plastic Exterior 8. -
Page 6: Display Console Overview
DISPLAY CONSOLE OVERVIEW MAIN CONSOLE OVERVIEW BARO BARO SENSOR SENSOR REFRESH REFRESH RESET RESET UNIT UNIT WI-FI WI-FI CHANNEL CHANNEL HISTORY HISTORY MAX/MIN MAX/MIN 20 21 22 23 24 1. Kickstand 10. LCD Display (See overview 18. 12/24 button on page7 2. -
Page 7: Lcd Display Overview
LCD DISPLAY OVERVIEW LCD DISPLAY Display sec 1. Indoor / humidity 2. Weather 3. Time, ca 4. Wind dir 5. Outdoor humidity 6. Barome 7. Rainfall 8. Weather WIRELESS 5-IN-1 WEATHER SENSOR 1. Rain collector 2. Balance indicator 1. Temperature & humidity (indoor/CH) 3. -
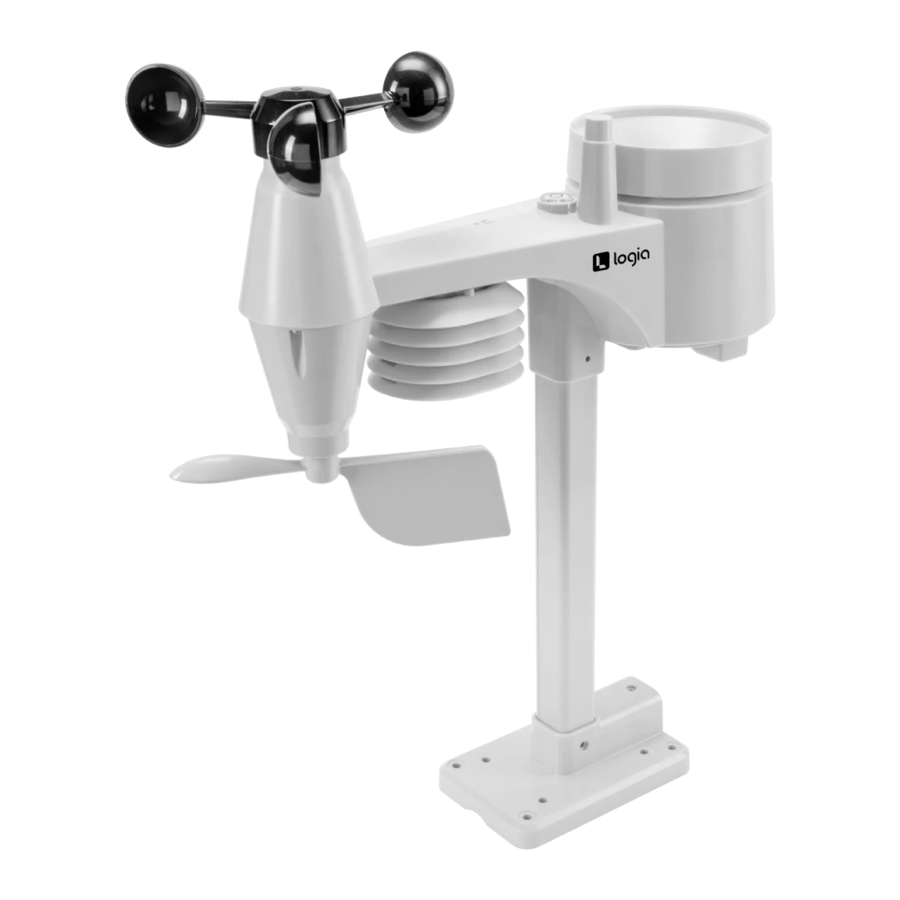
Page 8: Wireless Weather Sensor Overview
WIRELESS WEATHER SENSOR OVERVIEW MAIN DEVICE 1. Rain collector 8. Mounting base 2. Level 9. Mounting clamp 3. Antenna 10. Red LED indicator 4. Wind cups (anemometer) 11. RESET button 5. Mounting pole 12. Battery compartment 6. Sensor casing 13. Mounting clamp screws 7. - Page 9 RAIN GAUGE 1. Rain collector 2. Tipping bucket 3. Rain sensor 4. Drain holes TEMPERATURE AND HUMIDITY SENSOR 1. Sensor shield 2. Temperature and humidity sensor WIND SENSOR 1. Wind cups (anemometer) 2. Wind vane...
-
Page 10: Wireless Weather Sensor Setup
WIRELESS WEATHER SENSOR SETUP INSTALL BATTERIES 1. Unscrew the door to the battery compartment on the underside of the main sensor unit. 2. Insert three (3) new AA alkaline batteries, making sure the polarities match up with the markings inside the compartment. NSTALLATION attery door at bottom of unit and insert the ding to the +/- polarity indicated . - Page 11 sensor's indicator align . le and sensor's indicator align . 2. Insert the nut into the hexagonal hole by the sensor and hold it in place, then insert the screw through the other side. Use a screwdriver to tighten the screw. Do not insert the screw first, or the nut may not line up correctly with the designated hole.
- Page 12 4. Insert the nut into the hexagonal hole on the side of the stand and hold it in place, then insert the screw through the other side. Use a screwdriver to tighten the screw. of the stand, de and then MOUNT THE SENSOR OUTDOORS Add rubber 1.
-
Page 13: Display Console Setup
ea within 150 meters from the LCD console . 5-IN-1 sensor as level as possible to achieve accurate rain and wind 5-IN-1 sensor with the wind meter end pointing to the North to correctly he wind vane . Add rubber pads before Point to mount on... - Page 14 NOTE: If nothing appears on the LCD display screen after you plug in the power adaptor, use a pin or similar small object to press the RESET button. SET THE LCD DISPLAY VIEWING ANGLE If you have the display console wall-mounted or on a table stand, the viewing angle may need adjustment.
-
Page 15: Create Your Weather Server Account & Set Up Wi-Fi ® Connection
Your display console can upload weather data to Weather Underground and/or Weathercloud via your Wi-Fi ® router. NOTE: Logia does not own Weather Underground or Weathercloud, and these instructions are liable ™ to change without notice due to changes in either website. - Page 16 4. Write down or screenshot your Station ID and Station Key/Password for reference and to complete the setup process.
-
Page 17: Create Your Weathercloud Account
3 . Enter all the information in Create new device page, for the Model* selection box select Model selection box, choose LOWSC510WB Series under the Logia section. When presented the "W100 Series" under "CCL" section. for the Link type* selection box select the "Pro 3 . -
Page 18: Setup Wi-Fi Connection
. Jot down your ID and key for the further setup step. 4 . Jot down your ID and key for the further setup step. 4 . Jot down your ID and key for the further setup step. SETUP WI-FI CONNECTION SET UP WI-FI ®... - Page 19 3. Once you are connected to the display console, open up your internet or mobile web browser, and enter the following address into the address bar: http://192.168.1.1 (make sure to include the http:// or else the web browser may interpret the address as a search query). We recommend using the latest version of reputable web browsers.
-
Page 20: Advanced Settings Via Web Interface
Check to confirm upload to Weathercloud Mac address 00:0E:C6:00:07:10 Weathercloud Enter new Station ID and Station key Time server setup Current ID and key Station ID: assigned by Weathercloud recorded (if any) Select time server IPACIR23Wc Server URL: nist.time.gov Station key: ****** Press to complete the setting Mac address... - Page 21 Also you can press the [REFRESH ] key to get the internet time manually within 1 minute. ADVANCE SETTING IN WEB INTERFACE Press "ADVANCED" key at the top of web interface to enter the advance setting page, this page allow you to set and view the calibration data of the console, also you can update the Language: English Press ‘ADVANCED’...
-
Page 22: View Your Weather Data In Weather Underground
VIEW YOUR WEATHER DATA IN WEATHER UNDERGROUND To view your weather station data live via PC or mobile web browser, visit http://www.wunderground. com, and then enter the Station ID you were provided during account setup in the search box. Your weather data will show up on the next page. - Page 23 FIRMWARE UPDATE The console supports OTA firmware update capability. Its firmware may be updated over the air anytime (whenever necessary) through any web-browser on a PC with WI-FI connectivity. Update function, however, is not available through mobile/smart devices. Two types of firmware updates are available, namely Function Firmware and System WI-FI Firmware, and are located at the bottom of ADVANCED page.
-
Page 24: Other Console Settings And Functions
6. The console will restart once the update completes. NOTES: • You cannot update the Function Firmware and Wi-Fi ® Firmware at the same time. Updates must be installed one by one. • Make sure the power cable remains connected during the update process. •... - Page 25 - In alarm mode, the “ ” icon will display on the LCD. Northern Hemisphere Icons Moon Phase Southern Hemisphere Icons New Moon Waxing Crescent Moon First Quarter Moon Waxing Gibbous Moon Full Moon Waning Gibbous Moon Third Quarter Moon Waning Crescent Moon POINTING THE WIRELESS WEATHER SENSOR TO SOUTH Arrow Icon...
-
Page 26: Setting The Alarm
Waxing Crescent Moon First Quarter Moon Waxing Gibbous Moon Full Moon SETTING THE ALARM If you’d like to use your display console as an alarm clock, follow these instructions to set the alarm Waning Gibbous Moon time: Third Quarter Moon 1. - Page 27 Waxing Gibbous Moon Full Moon Waning Gibbous Moon Third Quarter Moon TEMPERATURE/HUMIDITY & TRENDS Waning Crescent Moon Press the °C/°F button to switch between Celsius and Fahrenheit temperature measurements. The arrows show the trend in changes to the temperature/humidity levels. Arrow Icon NOTE: Temp/Humidity Trend...
-
Page 28: Wind Readouts
Waning Gibbous Moon Third Quarter Moon Waning Crescent Moon 3. If the signal for the outdoor channel has been interrupted and does not recover within 15 minutes, the signal icon will disappear. The temperature and humidity section (outdoor) will display “—” on the corresponding channel. - Page 29 Branches of a moderate In normal mode, press [ WIND ] key to switch between AVERAGE and GUST wind speed. 18 ~ 24 mph Fresh breeze size move. Small trees in 17 ~ 21 knot leaf begin to sway. To set the wind speed unit and direction display format 8 0 ~ 10 7 m/s 1.
-
Page 30: Weather Forecast
25 ~ 30 mph Whistling heard in overhead wires. ≥ 74 mph vegetation and structures. Strong breeze Hurricane force Umbrella use becomes difficult. 22 ~ 27 knot Debris and unsecured objects ≥ 64 knot Empty plastic bins tip over. 10 8 ~ 13 8 m/s are hurled about. -
Page 31: Rainfall
RELATIVE BAROMETRIC READING RO ] key to switch between ABSOLUTE / RELATIVE barometric ws the rainfall and rain rate RAINFALL The Rainfall shows information regarding the rainfall and rain rate. Set the Rainfall Units key for 2 seconds to enter unit setting mode. toggle the rainfall unit between mm and in. -
Page 32: Weather Alert Settings
Indoor* daily MAX temperature > indoor* daily MIN temperature > indoor* daily MAX humidity > indoor* daily MIN humidity > outdoor daily MAX temperature > outdoor daily MIN temperature > outdoor daily MAX humidity > outdoor daily MIN humidity > daily MAX average wind speed > daily MAX gust >... - Page 33 Low Outdoor Humidity Alert High Indoor Temperature Alert 104°F (40°C) -40°F ~ 176°F Alert reading Sequence Alert reading Sequence Setting Range Setting Range Display Section Display Section Default Value Default Value (-40°C ~ 80°C) Low Indoor Temperature Alert 32°F (0°C) Indoor Temperature High Alert Indoor Temperature High Alert Indoor temperature &...
-
Page 34: Care And Maintenance
will sound for 2 minutes and the related alert icon and ter 2 minutes, the alert icon and readings will still keep CARE AND MAINTENANCE f the alert range. BATTERY REPLACEMENT en the weather readings falls into the alert range again. CEMENT If the low battery indicator icon is displayed in the outdoor temperature and humidity section or dicator “... -
Page 35: Specifications
SPECIFICATIONS DISPLAY CONSOLE SPECIFICATIONS DISPLAY CONSOLE General Specifications Dimensions (W x H x D) 5.4″ x 6.6″ x 1″ (117 x 189 x 31mm) Weight 0.82 lb. (370g) with batteries Power source DC 5V, 1A adaptor Backup battery CR2032, 3V battery Operating temperature range 23°F ~ 122°F (-5°C ~ 50°C) Wi-Fi... - Page 36 Typical at 77°F (25°C) Resolution 1hPa / 0.01inHg / 0.1mmHg Weather forecast Sunny, Partly Cloudy, Cloudy, Rainy, Rainy / Stormy and Snowy Display modes Current Memory modes Historical data of past 24 hours, daily Max / Min Alarm Pressure change alert Indoor / Outdoor Temperature Display &...
- Page 37 Range of rainfall 0 ~ 19999mm (0 ~ 787.3 in) Resolution 0.254mm (0.01in) Display modes Current Memory modes Historical Data of past 24 hours, daily Max Rainfall display mode Hourly / Daily / Weekly / Monthly / Total rainfall Alarm High Hourly Rainfall Alert Weather Index Display &...
- Page 38 WARRANTY INFORMATION LIMITED WARRANTY ON LOGIA ™ 5-IN-1 WIRELESS WEATHER STATION WITH WI-FI ® THIS LIMITED WARRANTY GIVES YOU SPECIFIC LEGAL RIGHTS AND YOU MAY ALSO HAVE OTHER RIGHTS, WHICH VARY FROM STATE TO STATE. WE WARRANT THAT DURING THE WARRANTY PERIOD, THE PRODUCT WILL BE FREE FROM DEFECTS IN MATERIALS AND WORKMANSHIP.
- Page 39 ® If you experience any issues with your Logia ™ 5-in-1 Wireless Weather Station with Wi-Fi , please contact us before returning your product to the place of purchase. We’re here to help! QUESTIONS OR PROBLEMS? CONTACT US! Email: info@supportcbp.com or call: 1-833-815-0568...
- Page 40 LOGIA is a trademark of C&A IP Holdings, LLC, in the U.S. Android is a trademark of Google LLC. Apple and App Store are trademarks of Apple Inc. in the U.S. and other countries. IOS is a trademark of Cisco in the U.S. and other countries and is used under license.
Need help?
Do you have a question about the LOWSC510WB and is the answer not in the manual?
Questions and answers
I just got a LOWSC510WB I WOULD LIKE to know where I can get additional transponders for other parts of the property
husband accidentally set the alarm for like 1am and it goes off every night. How do you unset the alarm, not just deactivate it until the next time.
The alarm on the Logia LOWSC510WB cannot be permanently unset; it remains set for the following day even after being stopped. You can only turn it off temporarily using one of the following methods:
1. Let it sound for two minutes until it stops automatically.
2. Press the SNOOZE/BACKLIGHT button to snooze for five minutes.
3. Press and hold the SNOOZE/BACKLIGHT button for two seconds to stop it.
4. Press the ALARM button to stop it.
In all cases, the alarm stays set for the next day.
This answer is automatically generated
Looking to replace wind cups