Table of Contents
Advertisement
Quick Links
ITEM
DESCRIPTION
A
Allan Head Bolt
B
Wooden Dowel
C
Bracket
D
Screw
E
Screw
1/8
Assembly Instructions
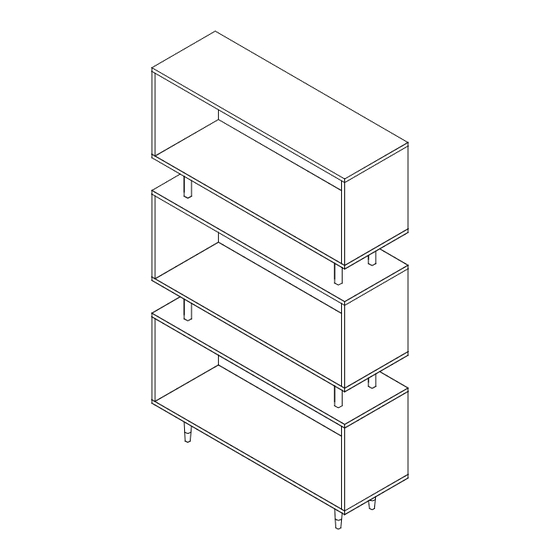
Margo Bookshelf
Item No.: 43000
Latest Version:08/31/15
Thank you for purchasing our product!
Please assemble the products with the guidance of
this manual instruction. Contact our friendly
customer service department with any comments
or in case there is any missing or damaged parts or
hardware. Replacements for missing or damaged
parts or hardware are normally shipped within 2 to
3 days.
We appreciate your business!
Hardware List
PART
QTY
20 pcs
7*40mm
24 pcs
8*30mm
2 pcs
2 pcs
3*12mm
2 pcs
4*40mm
Email: replacementparts@buylateral.com
Within 30-days from delivery date
ITEM
DESCRIPTION
F
Plasctic Anchor
G
Allan Wrench
Cam Bolt
H
6X35mm
Cam Lock
I
15X12mm
J
Glue
PART
QTY
2 pcs
1 pc
12 pcs
12 pcs
3 pcs
Advertisement
Table of Contents

Related Manuals for Simple Living Products Margo 43000


Summary of Contents for Simple Living Products Margo 43000
- Page 1 Assembly Instructions Margo Bookshelf Item No.: 43000 Latest Version:08/31/15 Thank you for purchasing our product! Please assemble the products with the guidance of this manual instruction. Contact our friendly customer service department with any comments or in case there is any missing or damaged parts or hardware.
- Page 2 Note: 1. Please be advised to have at least 2 persons to assemble this unit. 2. Tools not included, but assential for assembling this unit: "Philips" Screwdriver Flat Head Screwdriver Hammer 3. Place a large cloth or blanket on the floor or flat surface to protect parts from scratching. 4.
- Page 3 Part List ITEM DESCRIPTION PART ITEM DESCRIPTION PART 1 pc 1 pc Top Panel Bottom Panel Side Panel 8 pcs 6 pcs 2nd and 4th 2 pcs 4 pcs shelf 1st and 3rd 2 pcs Shelf Made In China...
- Page 4 24 pcs 12 pcs STEP 1 3 pcs 2 pcs 2 pcs 1. Add glue to the wooden dowel holes on side panel (2),then insert wooden dowel (B) by using hammer as shown. 2. Add glue to the wooden dowel holes on 1st & 3rd shelf (4) and bottom panel (5). 3.
- Page 5 4 pcs STEP 2 1 pc 4 pcs 1. Assemble top panel (1), side panel (2) and 1st shelf (4) together by using screw (A). 2. Insert cam lock (I) then rotate clockwise to secure cam bolt in place. STEP 3 4 pcs 1 pc 4 pcs...
- Page 6 4 pcs STEP 4 1 pc 4 pcs 1. Assemble 4th shelf (3), side panel (2) and bottom panel (5) together by using screw (A). 2. Insert cam lock (I) then rotate clockwise to secure cam bolt in place . STEP 5 6 X4 1.
- Page 7 4 pcs STEP 6 1 pc 6 X4 1. Attach the unit from step 3 to the unit from step 5 by using screw (A) as shown . 2. Attach legs (6) to 3rd shelf (4). STEP 7 4 pcs 1 pc 7 X4 1.
- Page 8 2 pcs STEP 8 2 pcs 1. Drill a 7/32" hole in the dry wall.Press the plastic wall anchor (F) to the drywall. Ensure that the anchor fits securely in the wall. 2. Rotate the product and fix it on the wall by using screw (E).
Need help?
Do you have a question about the Margo 43000 and is the answer not in the manual?
Questions and answers