Table of Contents
Advertisement
Quick Links
Advertisement
Table of Contents

Related Manuals for Keysight Technologies U3800 Series

Summary of Contents for Keysight Technologies U3800 Series
- Page 1 Keysight U3800 Series IoT Applied Courseware Getting Started Guide...
- Page 2 FAR 27.401 or DFAR could result in personal injury or death. 227.7103-5 (c), as applicable in any Do not proceed beyond a WARNING technical data. notice until the indicated conditions are fully understood and met. Keysight U3800 Series Getting Started Guide...
-
Page 3: Environmental Conditions
Compatibility (EMC) compliance and radio requirements. EMC compliance End product – IEC 61326-1:2012 / EN 61326-1:2013 – EN 301 489-1 V2.1.1 – EN 301 489-17 V3.1.1 Modules – EN 301 489-1 V2.1.1 – EN 301 489-17 V3.1.1 (WLAN/Bluetooth ® Keysight U3800 Series Getting Started Guide... - Page 4 RF health (modules) – EN 62479:2010 – EN 62311:2008 Operate the device at least 20 cm away from the transmitter. CAUTION 5.15 GHz-5.35 GHz band is restricted to indoor operations only in the following NOTE countries. Keysight U3800 Series Getting Started Guide...
- Page 5 The U3800A IoT Development Kit may experience performance degradation CAUTION due to connectivity loss with the Edison chipset when electrostatic discharge (ESD) occurs at levels that exceed 4 kV. ESD precautions should be taken when handling the device. Keysight U3800 Series Getting Started Guide...
-
Page 6: Regulatory Markings
The R-NZ mark is the compliance mark R-NZ Certifying Agency (SIRIM QAS of New Zealand radio communication International) as meeting MCMC standard. Technical Codes (TC) that applied to the product. Keysight U3800 Series Getting Started Guide... -
Page 7: Waste Electrical And Electronic Equipment (Weee) Directive 2002/96/ Ec
“Monitoring and Control Instrument” product. The affixed product label is as shown below. Do not dispose in domestic household waste. To return this unwanted device, contact your nearest Keysight Service Center, or visit http://about.keysight.com/en/companyinfo/environment/takeback.shtml more information. Keysight U3800 Series Getting Started Guide... -
Page 8: Sales And Technical Support
– Product-specific information and support, software and documentation updates – www.keysight.com/find/U3801A – www.keysight.com/find/U3802A – www.keysight.com/find/U3803A – www.keysight.com/find/U3804A – www.keysight.com/find/U3805A – www.keysight.com/find/U3806A – www.keysight.com/find/U3807A – www.keysight.com/find/U3808A – Worldwide contact information for repair and service – www.keysight.com/find/assist Keysight U3800 Series Getting Started Guide... -
Page 9: Table Of Contents
Perform Micro SD Card Test .......49 Keysight U3800 Series Getting Started Guide... - Page 10 ....... . . 56 Keysight U3800 Series Getting Started Guide...
-
Page 11: Overview
Overview Keysight U3800 Series IoT Applied Courseware is a ready-to-teach package that covers the following: 1 IoT Fundamentals (U3801A, U3802A) Introduces the fundamentals of IoT. Students who complete this course will demonstrate the understanding of IoT's architecture, technologies, standards, wireless protocols, applications, and ecosystems. -
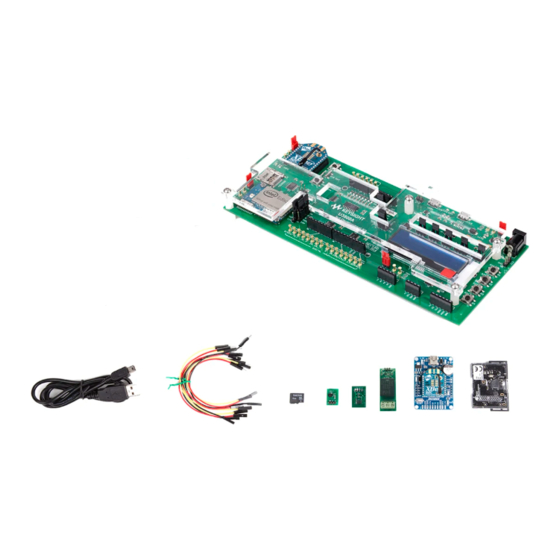
Page 12: U3800A Iot Development Kit
Digital IO pins (test points) USB1 Digital IO connectors USB2 Intel Edison module Jumpers (JP2 to JP6) Jumper for Intel Edison module (JP12) 12 VDC power adapter port Micro SD card slot Buttons (B1 to B4) Keysight U3800 Series Getting Started Guide... -
Page 13: Button Functions
1 Press and hold for eight seconds: Reset Intel Edison setting all the IO pins to high impedance state with no Reset Button (SYS RST) pull-ups. 2 Press and hold for four seconds: Restart Intel Edison. Keysight U3800 Series Getting Started Guide... -
Page 14: U3800A Default Jumper Settings
Jumper Jumper Position Jumper Function MAIN 12 V DC Input Power Connector JP11 XBEE ZigBee Module Power Connector JP12 EDSN Edison Module Power Connector JP15 SENSOR Power Connector for Analog/ I C / SPI Keysight U3800 Series Getting Started Guide... -
Page 15: Jumpers Function
PWM1 to Pin 9 PWM3+9 PWM3 to Pin 9 PWM3+11 PWM3 to Pin 11 PWM0+3 PWM0 to Pin 3 PWM0+6 PWM0 to Pin 6 JP10 PWM2+6 PWM2 to Pin 6 PWM2+10 PWM2 to Pin 10 Keysight U3800 Series Getting Started Guide... - Page 16 Edison UART1 Transmit to USB2/ZigBee (JP2, JP3) JP17 UART2+TX Edison UART2 Transmit to USB2/ZigBee (JP2, JP3) JP18 Enable/ Disable OTG RTS = Ready to Send CTS = Clear to Send DTR = Data Terminal Ready Keysight U3800 Series Getting Started Guide...
-
Page 17: System And Installation Requirements
– Windows 7, 8 or 10 (64-bit) Interface – USB (3 ports) Characteristics and Specifications For the characteristics and specifications of the U3800 Series IoT Applied Courseware, refer to the respective data sheet. – U3800 Series IoT Applied Courseware http://literature.cdn.keysight.com/litweb/pdf/5992-2745EN.pdf... -
Page 18: Setup
U3800A board. Refer to Perform USB Port Test section. Install PuTTY PuTTY is a terminal emulator, serial console, and network file transfer application. 1 Download Putty.exe from the link https://www.putty.org/. Keysight U3800 Series Getting Started Guide... -
Page 19: Log In To U3800A Using Serial Com Port
Development Kit, and the LCD will display “Keysight U3800A” when the connection is successful. USB2 2 Open Device Manager and USB Serial Port (COM#n) will be listed under Ports (COM & LPT) section. Take note of the USB serial port number (#n). Keysight U3800 Series Getting Started Guide... - Page 20 Speed: 115200 4 Click Open to connect to Keysight U3800A and log in. 5 Press Enter when you see a blank PuTTY screen. You should see a screen such as in the screenshot below. Keysight U3800 Series Getting Started Guide...
-
Page 21: Set Up Virtual Ethernet Link (Rndis)
PC to power up the board. 3 From the Windows Control Panel, open Network Connections. Right click Intel Ed ison USB RNDIS Device #n and choose Properties. 4 Select Internet Protocol Version 4 (TCP/IPv4), and click Properties. Keysight U3800 Series Getting Started Guide... - Page 22 6 Execute the PuTTY software and set the configuration as shown below. a Connection type: SSH b Host Name (or IP Address): 192.168.2.15 c Port: 22 7 Click Open to connect to Keysight U3800A and use root to log in. Keysight U3800 Series Getting Started Guide...
-
Page 23: Flash Intel Edison Firmware
6 Copy the dfu-util.exe and libusb-1.0.dll into the unzipped Intel Edison Yocto* Poky image folder. 7 Open Command Prompt. 8 Change the directory to the path of the unzipped folder from step 5. You can use the cd command as shown in the example below. Keysight U3800 Series Getting Started Guide... - Page 24 13 Once logged in, run cat /etc/version command to verify the version of the FW flashed into the Intel Edison. It should be 201606061707. 14 Run pwd command to verify that you are at /home/root. Keysight U3800 Series Getting Started Guide...
-
Page 25: Install Xctu Configuration Tool
1 Download and install WinSCP from the link below. https://sourceforge.net/projects/winscp/files/WinSCP/5.9.3/ WinSCP-5.9.3-Setup.exe/download 2 Follow the instructions on the window to complete the installation. 3 Start WinSCP and set up the connection. Click Session > New Session. Keysight U3800 Series Getting Started Guide... - Page 26 Port number User name root Password xxx (if password has been set up, otherwise leave it blank.) 5 Drag the desired file from your PC to the /home/root folder of the U3800A IoT development kit. Keysight U3800 Series Getting Started Guide...
-
Page 27: Auto Boot Up Display Setup
3 Connect USB1 and USB2 to development PC. 4 Log in to Yocto Linux remote terminal using PuTTY. (Refer to Verification, step 4 to 8) 5 Enter “cd /media/sdcard/startup” to change working directory to /media/ sdcard/startup. 6 Execute “sh autodisplay.sh”. Keysight U3800 Series Getting Started Guide... - Page 28 7 The setup is complete. Reboot U3800A and the LCD program will automatically run. Keysight U3800 Series Getting Started Guide...
-
Page 29: Install Intel System Studio Iot Edition Software
1 Download Intel System Studio IoT Edition software from the link below. https://downloadcenter.intel.com/download/26472?v=t Java is required to install Intel System Studio IoT Edition software. NOTE Keysight U3800 Series Getting Started Guide... - Page 30 Docker Toolbox is different from Docker for Windows and is required for the IoT NOTE Applied Courseware. Docker Tool box is used for its compatibility to wider set of Windows OS versions. 3 Download Java SE Runtime Environment 8 software from the link below. http://www.oracle.com/technetwork/java/javase/downloads/ jre8-downloads-2133155.html Keysight U3800 Series Getting Started Guide...
- Page 31 "jre-8u161-windows-x64.exe". 8 Install Java SE Development Kit 8 software into your Windows 10 PC. This is the installer with the filename "jdk-8u161-windows-x64.exe". 9 Install Docker Toolbox software into your Windows 10 PC. Keysight U3800 Series Getting Started Guide...
- Page 32 Docker Quickstart Terminal subsequently. 11 Type exit into the terminal to exit. 12 Extract the iss-iot-win_12-09-16.7z to your C drive of your Windows 10 PC (C:\). Open iss-iot-win_12-09-16.7z with 7zip software. Keysight U3800 Series Getting Started Guide...
- Page 33 Select the iss-iot-win folder and click the Extract button. 13 Run Docker Quickstart Terminal and leave it running. Refer to the Troubleshooting section if you encounter any problems running the NOTE Docker. Keysight U3800 Series Getting Started Guide...
- Page 34 15 When the Eclipse IDE is up and running, you may observe the following error message If you do not have the correct JDK installed: 16 Click OK to proceed. From the main Eclipse IDE window, click Window > Preferences > Java > Installed JREs. Keysight U3800 Series Getting Started Guide...
- Page 35 17 Add your installed JDK path into the setting by using the Search button and browse to C:\Program Files\Java and click OK. Select or check the JDK option. 18 From the Eclipse IDE main window, go to Intel® IoT > Manage installed development platforms. Keysight U3800 Series Getting Started Guide...
- Page 36 19 Select Intel® Ed ison and click Start. Note that when you select Intel Edison, the Platform support manager will also select other related dependencies. Upon successful installation, you should see ‘Installed’ status as shown below: 20 Click Close to close the Platform support manager window. Keysight U3800 Series Getting Started Guide...
- Page 37 21 Connect USB1 and USB2 of the Keysight U3800A to the PC. USB2 USB1 22 Open Network Connections from the Windows Control Panel. Right-click Intel Ed ison USB RNDIS Device #n and choose Properties. Keysight U3800 Series Getting Started Guide...
- Page 38 24 Change the IP address to 192.168.2.2 and the Subnet mask to 255.255.255.0. Click OK to exit. 25 From the Eclipse IDE main window, go to Intel® IoT > Create a Target Connection. Configure the target connection with the following details and click OK. Keysight U3800 Series Getting Started Guide...
- Page 39 Click OK to proceed if you did not set any password to your Keysight U3800 IoT SSH login. Every time after the code compiles, Eclipse will send the compiled code to the Intel Edison module to execute it. This is done through the SSH protocol. Keysight U3800 Series Getting Started Guide...
- Page 40 The lcd_test.zip file can be found in the courseware materials folder. In order to NOTE access your courseware materials, log in to Keysight licensing website at www.keysight.com/find/softwaremanager. 29 Save the project. 30 Select Project > Build All to compile the code. Keysight U3800 Series Getting Started Guide...
- Page 41 MRAA library to access low level GPIO and communication in the Intel Edison module. – Proceed to synchronize the packages between the target (U3800) and host (PC) when you are asked to do so as shown below. Keysight U3800 Series Getting Started Guide...
-
Page 42: Verification
Keysight licensing website at www.keysight.com/find/softwaremanager. 2 Insert the micro SD card into the micro SD card slot. Insert Micro SD card before powering on the U3800A IoT Development Kit. NOTE Keysight U3800 Series Getting Started Guide... - Page 43 Development Kit. The LCD will show “Keysight U3800A” when the connection is established. USB2 4 Open Device Manager and USB Serial Port (COM#n) is listed under the Ports (COM & LPT) section. Take note of the USB serial port number (#n). Keysight U3800 Series Getting Started Guide...
- Page 44 10 Enter “ls” and press Enter to view the micro SD content. 11 Enter “g++ QSG.c -lmraa -o qsg” and press Enter to build the lcd sample program. Ignore the warning message if prompted. Keysight U3800 Series Getting Started Guide...
- Page 45 12 Enter “./qsg” and press Enter to run the test program. 13 Press the B1 button and “Hello World” will be displayed on the LCD. Keysight U3800 Series Getting Started Guide...
- Page 46 14 Press the B2 button and “Keysight U3800A” will be displayed on the LCD. 15 Press the B3 button and “QSG Quick Test” will be displayed on the LCD. 16 Press the B4 button and “Goodbye” will be displayed on the LCD. Keysight U3800 Series Getting Started Guide...
-
Page 47: Troubleshooting
3 Unplug the micro USB cable from the USB1 port and plug in to the USB2 port. 4 Open Device Manager. The USB Serial Port will be listed under the Ports (COM & LPT) section. Keysight U3800 Series Getting Started Guide... - Page 48 – Missing Intel Ed ison Virtual Com Port and plug it in again. 4 Connect the micro USB cable to another USB port in the PC. 5 Change the micro USB cable to another micro USB cable. Keysight U3800 Series Getting Started Guide...
-
Page 49: Perform Micro Sd Card Test
Serial port disappears intermittently USB driver for more details. from the Device Manager due to 2 Connect USB cables to the U3800A board and PC. unstable connection 3 Ensure that USB cables are in good condition. Keysight U3800 Series Getting Started Guide... -
Page 50: Reset Docker Virtual Machine
1 Close Docker Quickstart Terminal if it is still running. 2 Run Windows Task Manager and look for the following background running software. 3 Right click and click End task for all VBox related processes. Keysight U3800 Series Getting Started Guide... - Page 51 4 Close the Task Manager and go to C:\Users\<username>\.docker\machine\machines using Windows Explorer. Delete the default folder. 5 Go to C:\Users\<username> and delete .VirtualBox folder. Keysight U3800 Series Getting Started Guide...
- Page 52 Observe that a virtual machine will be created and it will appear in the Oracle VM VirtualBox Manager. Once the Docker Quickstart Terminal successfully launched, you would see that the virtual machine is running. 8 Close the Oracle VM VirtualBox Manager. Keysight U3800 Series Getting Started Guide...
-
Page 53: Vmware And Other Virtual Machine Management Software
2 Extract all the files out and copy them to "/root" folder of the U3800 using WinSCP. 3 Log in to U3800 through SH or serial. 4 Change the working directory to cd /root 5 Run the U3800 soft reset script by sh u3800_soft_reset.sh 6 Reboot and log in. Keysight U3800 Series Getting Started Guide... -
Page 54: Appendix
21/0 [PWM3(Jumper Setting: JP10-10 to JP9-PWM3) / PWM2(Jumper Setting: JP10-10 to JP10-PWM2)] Digital I/O, I2S2 Transmit Data, Pulse Width Modulation [PWM3(Jumper Setting: JP9-11 to JP9-PWM3)] Digital I/O, I2S2 Receive Data Digital I/O, I2S2 Clock Keysight U3800 Series Getting Started Guide... - Page 55 Digital I/O, SPI2 Clock Digital I/O, I2C1 Data Digital I/O, I2C1 Clock Digital I/O DOUT* Digital I/O, UART0 Receive (RX) DIN* Digital I/O, UART0 Transmit (TX) Digital Output Digital Input Digital Input Digital Input Digital Input Keysight U3800 Series Getting Started Guide...
-
Page 56: Radio Frequency Modules
Rad io Modules Frequency Maximum Power Edison - WLAN 2.4 and 5 GHz 17.1 dBm Edison - Bluetooth 2.4 GHz 5.4 dBm ® 2.4 GHz 5 dBm Xbee ZigBee SensorTag (CC2650) 2.4 GHz 5 dBm Keysight U3800 Series Getting Started Guide... - Page 57 THIS PAGE HAS BEEN INTENTIONALLY LEFT BLANK. Keysight U3800 Series Getting Started Guide...
- Page 58 This information is subject to change without notice. © Keysight Technologies 2019 Edition 5, April 2019 Printed in Malaysia *U3800-90001* U3800-90001 www.keysight.com...
Need help?
Do you have a question about the U3800 Series and is the answer not in the manual?
Questions and answers